
EDIT: I should have pointed out that there are many ways to do this. Some considerably easier and more efficient. I have access to many of these including programs like Illustrator and Photoshop as well as large format printers up to 18" x 12". This is a basic tutorial that folks can accomplish with only Acrobat Reader and a printer.
Seeing the continued interest in the the Printable PDF thread, I thought I would put together a tutorial on using a home printer, standard 8.5" x 11" paper and Acrobat Reader to print and mock up full scale prints. Olav touched on the subject in the thread but I thought a step-by-step might be useful.
Is it easier than running down to Kinkos? Nope. But it's good info to have when you want to save some cash or experiment with your own designs. Plus, it's easy to do and you can make as many as you need to get you through a build.
Acrobat Reader (AR) has a feature that lets you print the current view port. Knowing how to navigate and size the PDF to take advantage of this can be a bit tricky. First load up your pdf in AR. Make sure to maximize the app so it fills your entire screen. This isn't necessary but you'll get more image per page this way. If you forget to maximize, just don't change the current view size until you've finished.
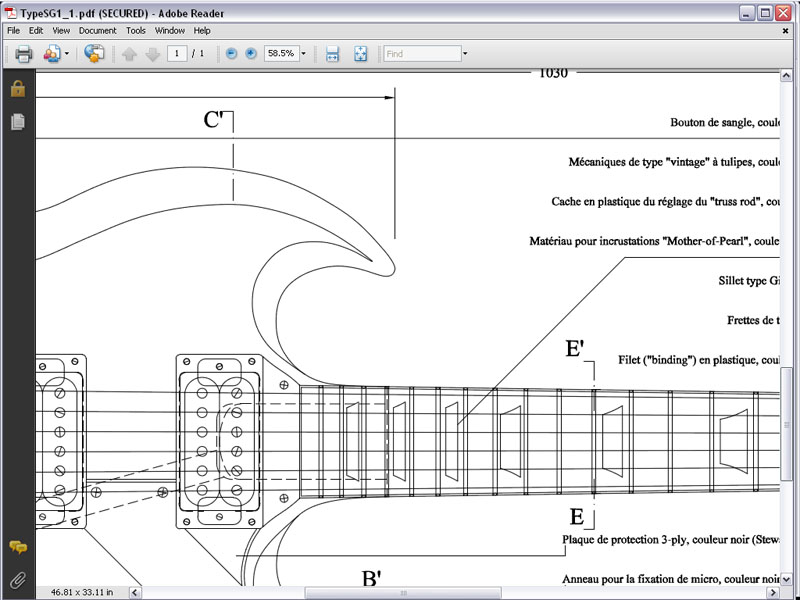
Here's our subject for the tutorial...an SG plan that has several different scales within it. We're going to focus on the front of the guitar to make a body template.

An important bit of info is that regardless of your monitor or graphic card resolution settings, screen resolution is always 72dpi. What this means is that if you match the drawing on screen with a physical ruler or caliper, the drawing will print that size.
Set a zoom level, check it with a ruler flat against the screen and adjust zoom level until you have a match. My screen res is 1024 x 768 and I've sized AR to 58.5% zoom. This makes the width of the fretboard 2.25" at the 22nd fret on screen. If your screen resolution were higher, you would need a greater zoom level to make it appear 2.25" on screen. 1280 x 960 would require 76% zoom. AR will let you type in fractional zoom values to really dial it in.

Here's my printout.

Back in our pdf, set the upper bout of the body in the current view. Then select the print command which launches the printer dialog. To get the view translated to real world prints, use the following settings in the AR print dialog. Print Range should be set to Current View and Scaling should be set to None. You may have to cancel and slide the view port around to get the printable area correct. When you have it, press OK to print.

Use the scroll bars at the bottom and right of the AR window to set the view port to the next part of the body. I just used the right hand bar to slide down.

Repeat this for however many views it takes to get the whole body. Note that the bridge PU is visible in all views. Always make sure you have a good amount of overlap from one view to the next. You'll need this overlap when trimming out the mock-up.

Next, we'll trim them out and make our mock-up.
Seeing the continued interest in the the Printable PDF thread, I thought I would put together a tutorial on using a home printer, standard 8.5" x 11" paper and Acrobat Reader to print and mock up full scale prints. Olav touched on the subject in the thread but I thought a step-by-step might be useful.
Is it easier than running down to Kinkos? Nope. But it's good info to have when you want to save some cash or experiment with your own designs. Plus, it's easy to do and you can make as many as you need to get you through a build.
Acrobat Reader (AR) has a feature that lets you print the current view port. Knowing how to navigate and size the PDF to take advantage of this can be a bit tricky. First load up your pdf in AR. Make sure to maximize the app so it fills your entire screen. This isn't necessary but you'll get more image per page this way. If you forget to maximize, just don't change the current view size until you've finished.
Here's our subject for the tutorial...an SG plan that has several different scales within it. We're going to focus on the front of the guitar to make a body template.
An important bit of info is that regardless of your monitor or graphic card resolution settings, screen resolution is always 72dpi. What this means is that if you match the drawing on screen with a physical ruler or caliper, the drawing will print that size.
Set a zoom level, check it with a ruler flat against the screen and adjust zoom level until you have a match. My screen res is 1024 x 768 and I've sized AR to 58.5% zoom. This makes the width of the fretboard 2.25" at the 22nd fret on screen. If your screen resolution were higher, you would need a greater zoom level to make it appear 2.25" on screen. 1280 x 960 would require 76% zoom. AR will let you type in fractional zoom values to really dial it in.
Here's my printout.
Back in our pdf, set the upper bout of the body in the current view. Then select the print command which launches the printer dialog. To get the view translated to real world prints, use the following settings in the AR print dialog. Print Range should be set to Current View and Scaling should be set to None. You may have to cancel and slide the view port around to get the printable area correct. When you have it, press OK to print.
Use the scroll bars at the bottom and right of the AR window to set the view port to the next part of the body. I just used the right hand bar to slide down.
Repeat this for however many views it takes to get the whole body. Note that the bridge PU is visible in all views. Always make sure you have a good amount of overlap from one view to the next. You'll need this overlap when trimming out the mock-up.
Next, we'll trim them out and make our mock-up.
Last edited:


