Checking string height while cutting a nut?

  • Thread starter tugboat1980
  • Start date
  • This site may earn a commission from merchant affiliate links like Ebay, Amazon, and others.

tugboat1980

Tele-Holic
Joined
Jun 29, 2023
Posts
567
Age
44
Location
Georgia
Does anyone have any tips on how to check string height when cutting a nut? My success rate is abysmal. I have one decently cut nut on my Warmoth Tele but I attribute that to dumb luck. I’m working on getting a decently cut nut for my homemade double cut Les Paul Special but so far all I’ve managed to do is give Stew Mac and FedEx a lot of money. And end up with kinda crappy playing guitar due to a crappy nut. I’ve watched videos on how to actually file a nut slot, and I have the right tools from stew Mac.

I think if I have some sort of way to gauge string height I will be better off. I’m pretty sure I’ve been filing the slots too deep as well as not setting the nut height itself properly. Too high, but slots too deep.

Are the stew Mac pre cut nuts any good? I’ve been ordering their pre cut nuts but this time I ordered a couple pre cut and a couple shaped but uncut blanks.

My initial thought is to maybe use monofilament fishing line to tie it tight and better simulate a tight guitar string to gauge height easily. Tie one end to a tuner, the other around the tailpiece.
 

eallen

Friend of Leo's
Joined
Jul 30, 2013
Posts
4,344
Location
Bargersville/Indianapolis, Indiana
Install the strings and tune to pitch, capo between frets 2 & 3. Use a simple feeler guage to check between the string and the top of 1st fret. I target .010" at low E & .006" at high E with other 4 strings graduated between the two measurements. Shape the top of the nut as needed if there is excess height after slots are done.

Precut nuts are never as good as self cut done properly.

I would also quit giving SM money for nuts. You can buy a handful of bone blanks off Amazon for $10 to shape and fit.
 

Hey_you

Friend of Leo's
Gold Supporter
Joined
Oct 9, 2019
Posts
3,604
Location
Colorado USA
Stewmac has many instructions and examples on there site. This is what they say about cutting a nut-

Final slot height​


Take the slots to their final height with all the strings on and tuned to pitch. Double-edge Nut Files are good for this job.
As you get close, use stacked feeler gauges as an accurate way to stop at the string height you're after. (Our frets in this example are .040" tall, so when we add .030" for string clearance we get a slot height of .070".) Stack the feeler gauges to this combined measurement, and file the slots until the file just nicks the feeler gauges.
Now you've got a good general string height, and you're ready to fine-tune it if you like: leaving the heavier strings a bit high, while the treble strings get lowered, following the radius of the fretboard. Many pro players prefer to set the low-E string clearance to about .020", and the treble E-string at .010" (give or take a few thousandths). The strings between are at graduated heights following the fretboard radius.


Freeman Keller

Doctor of Teleocity
Ad Free Member
Joined
Aug 22, 2018
Posts
15,880
Age
80
Location
Washington
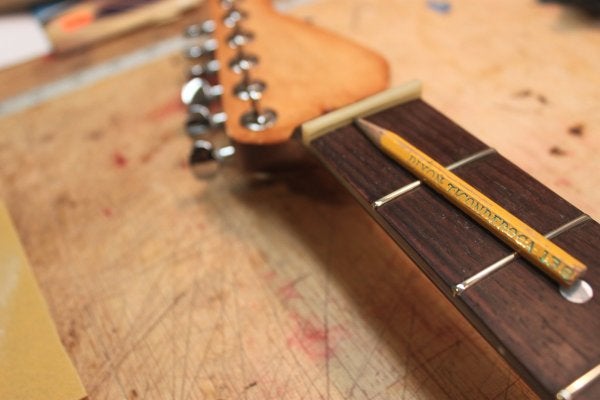
I start with a half pencil drawing the "zero fret" line on the face of the nut blank

IMG_4812.JPG

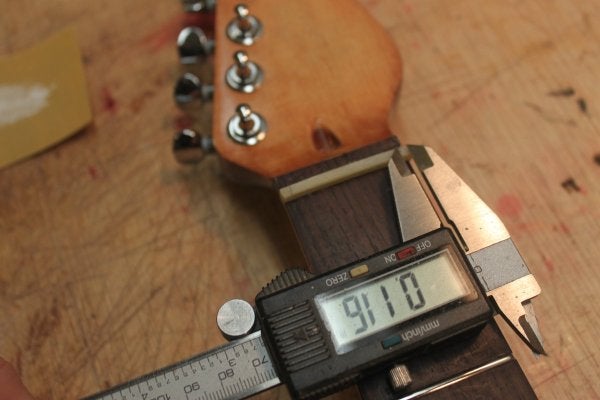
Shape the top of the nut to the fretbard radius

IMG_4813.JPG

Lay out the slots

IMG_4815.JPG

IMG_4817.JPG

Cut starter slots with a razor saw, then file the slots

IMG_4818.JPG

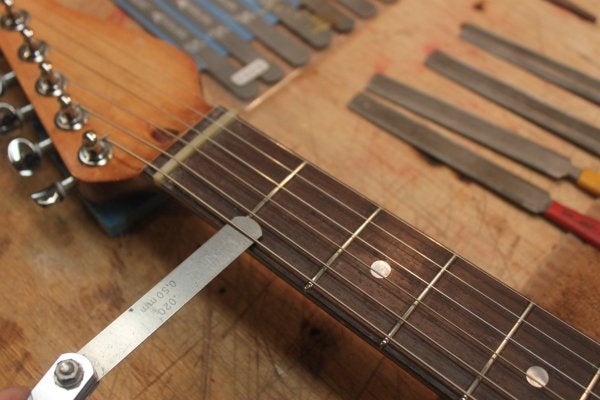
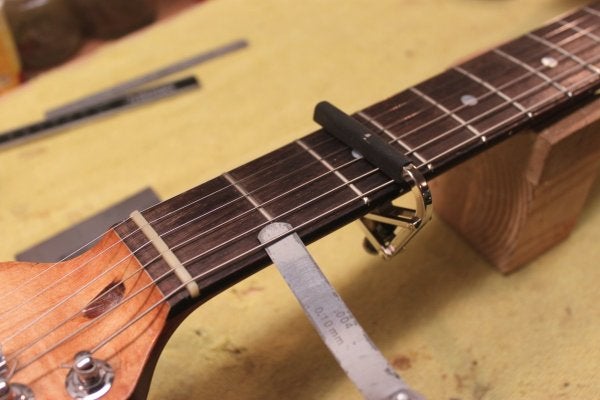
I use two measurements, the height above the first frets and double check by fretting at three and measuring the gap at one.

IMG_5326.JPG

(I don't actually use a capo, just hold the string at the third fret which also holds it at two. I want a very small gap at the first fret)

When I'm all done I shape the top of the nut so the first three strings are roughly level with the top, the lower three should be just a hair above the top. Buff and you are done
 

tugboat1980

Tele-Holic
Joined
Jun 29, 2023
Posts
567
Age
44
Location
Georgia
Install the strings and tune to pitch, capo between frets 2 & 3. Use a simple feeler guage to check between the string and the top of 1st fret. I target .010" at low E & .006" at high E with other 4 strings graduated between the two measurements. Shape the top of the nut as needed if there is excess height after slots are done.

Precut nuts are never as good as self cut done properly.

I would also quit giving SM money for nuts. You can buy a handful of bone blanks off Amazon for $10 to shape and fit.
I wish I had thought to check Amazon for nut blanks. 😣
 

schmee

Telefied
Ad Free Member
Joined
Jun 2, 2003
Posts
31,222
Location
northwest
Have at least the 1 and 6 string on. For nut slots you dont need to be to pitch, just tensioned some.
-Get it close but high.
-Then creep up on each string depth individually.
- I prefer just string 1 and 6. You can slip them off the edge , place the nut, slip the string on and test where you are.
-I set string clearance at near 0 when fretted at fret 3. .005" commonly to maybe .010 or less on the low E.
- Unless I have an odd width neck I far prefer pre slotted nuts as a starting point rather than go through the pain of making a complete nut, especially string spacing. Take the material off the nut bottom until close, then slot each string.
 

Peegoo

Telefied
Ad Free Member
Joined
Oct 11, 2019
Posts
31,576
Location
Beast of Bourbon
@tugboat1980

How to know when the nut slot depth is good? Here's the simplest method: lightly press the string just beyond the 2nd fret until the string contacts the top of the 2nd fret. The string should be *almost* in contact with the top of the 1st fret. If the string touches the 1st fret the slot is too deep. If there's more than about .004" to .005" of gap (the thickness of a Post-It note) between the string and the 1st fret, the slot is not deep enough.

The slot-cutting trap many home-gamers fall into is getting in a hurry.

When it comes to the difference between great nut action and terrible string buzz, it's only 1/1000th of an inch. You have to use a light touch and plenty of patience.

There are no shortcuts. There are tools that purport to make the job go faster...and they certainly do, but at a big price.

Example: Stooge Mac sells steel thickness gauges you lay on the fretboard in front of the nut, and they prevent the file from cutting too deeply. The problems with this approach is (1) nut files are expensive, and (2) the business portion of the nut file is destroyed when it hits steel. I really believe SM knows this and it helps them sell more files because they wear out way faster when used like this.

Pre-cut nut blanks are simply a starting point. The best thing they provide is a guide for string spacing. Beyond that, you need to file each slot to get it perfect for the guitar you install it on.

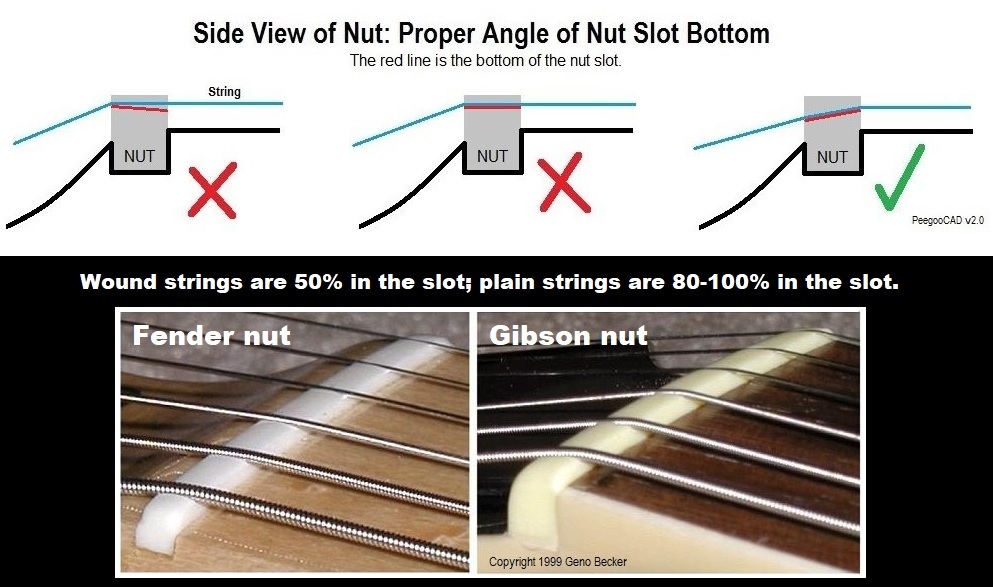
The key to good slots is the angle of the bottom of the slot: it makes for a clean breakover point at the front of the nut for the string, which optimizes good tone, easy tuning, and sustain.

Once the slot depths are cut to perfection, you put away the nut files and plane off the top of the nut, smoothing all exposed corners. I like about 50% of the wound strings in the slot and about 80% of the plain strings in the slot. It makes for a really smooooth feel in the hand.

lErhUYXz_o.jpg


So take your time and use a light touch. You really have to sneak up on the final depth. At the point that you're close, one very light swipe with the file can make or break the entire job. This is not cabinet work; it is far more exacting. It is equal to precision machining, where 1/1000th of an inch really matters.

Pro Tip: many nut files come with hard corners on the pokey end of the file, and these are just itching to dig into a pristine headstock. If your files are like this, round over the corners on a Carborundun stone and then polish the roundovers with 600-grit paper. When you inadvertently bump the smoothed end into a headstock, it will simply skip along without doing damage and you'll thank me; gashing a headstock will ruin your week. I've done it.

nfsgTCNQ_o.jpg


Lastly: do not use nut files for anything except nut material and brass saddle material. Cutting anything harder will ruin them and reduce their accuracy and efficiency. Also, storing them loosely in a drawer or box, rattling against themselves and other tools, will ruin the cutting edges. Threat them gently and they will perform like new for decades.

That is everything I know about nut files 🤠
 
Last edited:

Boreas

Telefied
Ad Free Member
Joined
Nov 3, 2019
Posts
20,703
Age
70
Location
Adirondack Coast, NY
Many people like the Fret Guru. Notice how the "knife edge" fits into the bottom of the slot the slot and the straightedge rests on the frets. The advantage is this can be done with strings removed. A very useful tool for other measurements as well. PLUS, a snazzy leather case!!

Screenshot_20241124_175612_Brave.jpg
 
Last edited:

Richdonn

Tele-Meister
Joined
Sep 27, 2021
Posts
236
Age
73
Location
Tidewater
@tugboat1980

How to know when the nut slot depth is good? Here's the simplest method: lightly press the string just beyond the 2nd fret until the string contacts the top of the 2nd fret. The string should be *almost* in contact with the top of the 1st fret. If the string touches the 1st fret the slot is too deep. If there's more than about .004" to .005" of gap (the thickness of a Post-It note) between the string and the 1st fret, the slot is not deep enough.

The slot-cutting trap many home-gamers fall into is getting in a hurry.

When it comes to the difference between great nut action and terrible string buzz, it's only 1/1000th of an inch. You have to use a light touch and plenty of patience.

There are no shortcuts. There are tools that purport to make the job go faster...and they certainly do, but at a big price.

Example: Stooge Mac sells steel thickness gauges you lay on the fretboard in front of the nut, and they prevent the file from cutting too deeply. The problems with this approach is (1) nut files are expensive, and (2) the business portion of the nut file is destroyed when it hits steel. I really believe SM knows this and it helps them sell more files because they wear out way faster when used like this.

Pre-cut nut blanks are simply a starting point. The best thing they provide is a guide for string spacing. Beyond that, you need to file each slot to get it perfect for the guitar you install it on.

The key to good slots is the angle of the bottom of the slot: it makes for a clean breakover point at the front of the nut for the string, which optimizes good tone, easy tuning, and sustain.

Once the slot depths are cut to perfection, you put away the nut files and plane off the top of the nut, smoothing all exposed corners. I like about 50% of the wound strings in the slot and about 80% of the plain strings in the slot. It makes for a really smooooth feel in the hand.

lErhUYXz_o.jpg


So take your time and use a light touch. You really have to sneak up on the final depth. At the point that you're close, one very light swipe with the file can make or break the entire job. This is not cabinet work; it is far more exacting. It is equal to precision machining, where 1/1000th of an inch really matters.

Pro Tip: many nut files come with hard corners on the pokey end of the file, and these are just itching to dig into a pristine headstock. If your files are like this, round over the corners on a Carborundun stone and then polish the roundovers with 600-grit paper. When you inadvertently bump the smoothed end into a headstock, it will simply skip along without doing damage and you'll thank me; gashing a headstock will ruin your week. I've done it.

nfsgTCNQ_o.jpg


Lastly: do not use nut files for anything except nut material and brass saddle material. Cutting anything harder will ruin them and reduce their accuracy and efficiency. Also, storing them loosely in a drawer or box, rattling against themselves and other tools, will ruin the cutting edges. Threat them gently and they will perform like new for decades.

That is everything I know about nut files 🤠
 

tugboat1980

Tele-Holic
Joined
Jun 29, 2023
Posts
567
Age
44
Location
Georgia
So after 10+ years my homemade DC Les Paul Special finally has a decently cut nut. Thank you everyone for your help! It’s amazing how much better precision work is if you actually measure while you work. 🤣

Used a pre-slotted Stew Mac bone nut. I actually overshot the low E side a bit when I was initial sanding, it ended up being perfect without having to file down to final dimension, just had to round the back end of the slots on the low e and a. Had to upsize the slot for the d string, it sounded really choked My gauge is my older MIK PRS Singlecut SE which has a setup and fretwork that is custom shop quality. Just amazing.

g, b, and e strings are about perfect. All slots were kissed on the backside to round/angle the slot back towards the tuners. Need a bit more sanding on the top of the nut for the unwound strings, but I’ll wait on that next string change.

How does one secure the nut? A small dot of titebond? i believe that’s what I did last time but it’s been soooo long since I’ve done it.
 

ChicknPickn

Poster Extraordinaire
Joined
Apr 16, 2007
Posts
9,549
Age
62
Location
Coastal Virginia
I start with a half pencil drawing the "zero fret" line on the face of the nut blank

View attachment 1292610

Shape the top of the nut to the fretbard radius


Lay out the slots


Cut starter slots with a razor saw, then file the slots


I use two measurements, the height above the first frets and double check by fretting at three and measuring the gap at one.


(I don't actually use a capo, just hold the string at the third fret which also holds it at two. I want a very small gap at the first fret)

When I'm all done I shape the top of the nut so the first three strings are roughly level with the top, the lower three should be just a hair above the top. Buff and you are done
+5 The pencil trick was a game-changer for me. Eventually, I dispensed with the feeler gauge. The tiniest sliver of daylight between string and fret is the stopping point.
 

tugboat1980

Tele-Holic
Joined
Jun 29, 2023
Posts
567
Age
44
Location
Georgia
+5 The pencil trick was a game-changer for me. Eventually, I dispensed with the feeler gauge. The tiniest sliver of daylight between string and fret is the stopping point.

That’s actually what I did. Fret at 3rd fret and look for that tiniest sliver of space.

Though my mistake for the low e side was I had the strings tensioned but not enough. By the time I tuned to approximately low e it tightened up and left less space.
 

Freeman Keller

Doctor of Teleocity
Ad Free Member
Joined
Aug 22, 2018
Posts
15,880
Age
80
Location
Washington
How does one secure the nut? A small dot of titebond? i believe that’s what I did last time but it’s been soooo long since I’ve done it.

Good job.

I put two tiny drops of CA on either the bottom of the nut or the side that butts up against the end of the fretboard. Just enough to hold it in place but still be knocked loose with a light tap.
 

Blackmore Fan

Friend of Leo's
Joined
Nov 22, 2013
Posts
4,013
Location
USA
I start with a half pencil drawing the "zero fret" line on the face of the nut blank

View attachment 1292610

Shape the top of the nut to the fretbard radius

View attachment 1292611

Lay out the slots

View attachment 1292612

View attachment 1292613

Cut starter slots with a razor saw, then file the slots

View attachment 1292614

I use two measurements, the height above the first frets and double check by fretting at three and measuring the gap at one.

View attachment 1292615

(I don't actually use a capo, just hold the string at the third fret which also holds it at two. I want a very small gap at the first fret)

When I'm all done I shape the top of the nut so the first three strings are roughly level with the top, the lower three should be just a hair above the top. Buff and you are done

Great post.
 

ChicknPickn

Poster Extraordinaire
Joined
Apr 16, 2007
Posts
9,549
Age
62
Location
Coastal Virginia
Many people like the Fret Guru. Notice how the "knife edge" fits into the bottom of the slot the slot and the straightedge rests on the frets. The advantage is this can be done with strings removed. A very useful tool for other measurements as well. PLUS, a snazzy leather case!!

View attachment 1292707
Got one based on your recommendation. Very nice tool. The silver lettering against the black background is easier on my eyes than the Stew-Mac version. Agree that the case is a nice touch as well. Looking forward to using it on the next nut I cut.
 

Boreas

Telefied
Ad Free Member
Joined
Nov 3, 2019
Posts
20,703
Age
70
Location
Adirondack Coast, NY
Got one based on your recommendation. Very nice tool. The silver lettering against the black background is easier on my eyes than the Stew-Mac version. Agree that the case is a nice touch as well. Looking forward to using it on the next nut I cut.
Yeah - it is a simple tool with allotta uses.
 

frisco slim

Tele-Holic
Joined
Jan 4, 2019
Posts
660
Location
USA
I like to rest an extra-long utility knife blade between the 3rd fret and the nut slot, then see if I can slide a paper or plastic shim between the blade and the 2nd fret. Because the blade is sharp, it goes all the way to the bottom of the nut slot, so you're getting an accurate representation of where the string will sit. I do grind off the tips of the blade to keep from stabbing myself and dull the blade edge with a whetstone.

I can use this tool with strings on or strings off. If you use it with strings on, it keeps you from having to pop the string in and out of the slot and slacken and retension it all the time.

Basically does the same thing as the Fret Guru, but doesn't cost $26.

nut_slot_depth.jpg
 
Last edited:
Top