Let's build an Eruption Frankenstrat

  • Thread starter 1 21 gigawatts
  • Start date
  • This site may earn a commission from merchant affiliate links like Ebay, Amazon, and others.

PCollen

Poster Extraordinaire
Joined
May 7, 2010
Posts
5,305
Location
Space Coast, FL
I'm been kicking around the idea to do a white Frankenstrat build for a while, and Eddie's death last month spurred me to get it going. A lot of folks do the Frankie builds, but most do the red version. I prefer the white one, and Ed has said that he did too. Plus, the white one is a much easier (cheaper) build, since you don't need the correctly routed body or a Floyd Rose.

Here is what I am starting with.
View attachment 784499
A well used Fender Starcaster that I won on GW auctions. The Starcaster is a lot like the Squire SE. Cheap, but has a full thickness, solid wood body. The neck is maple with a big headstock and a 12" radius; almost perfect for a Frankie build. I say almost because this one has a skunk stripe. Is there a way to minimize the look of the stripe (wood bleach)?

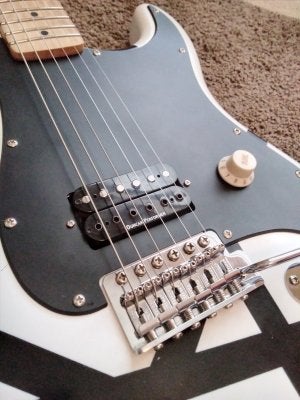
I still haven't decided between doing a replica using correct parts or just a tribute. My original plan was to do a tribute since I can just buy a single humbucker pickguard and use a Duncan Detonator from my parts bin, which would be a cleaner look than Eddie's hack job. On the other hand, a full replica wouldn't really be that much more expensive, and might be more fun to do.

Other parts required will be a MIM vintage trem assembly, a brass block (if I do a replica), and a brass nut.

Anyways, let me know which direction that you think that I should take. This project is going to take a while since I haven't received the guitar yet, but I wanted to start aquiring the parts. Figured that I would get you guys involved in the planning stages.

You will need an F-spaced (trembucker or ?) pickup for the strings to align over the pole pieces, unless you slant your standard bucker
 

1 21 gigawatts

Tele-Afflicted
Joined
Aug 24, 2020
Posts
1,688
Age
51
Location
Florida
Unfortunately the paint flaked off in some spots while I wet sanded today. I wasn't happy with the way that it was going, so I'm starting over. I stripped it down with acetone, and will sand the poly clear coat good this time prior to painting.

I did start to fit the brass nut, and painted the trem block to match (brass). I didn't feel the need to replace the new MIM steel block with a brass one, but I had some brass paint, so it will at least look correct.
 

1 21 gigawatts

Tele-Afflicted
Joined
Aug 24, 2020
Posts
1,688
Age
51
Location
Florida
I slowed down on this project a bit, kind of purposely to stretch it out. I generally look for projects, then rush through to get it done, then need another project. :rolleyes:

The brass nut is finally in. Took a bit of filing to get it in. It fits very tightly in the slot, I had to press it in with a clamp. I sure hope that I don't hate it, because it might be permanently installed...

The body is completely sanded with 400 grit for painting. We are having unusually cold days today and tomorrow, so it will probably be Thursday or Friday before I try again. I did print some full size templates to help with the tape placement. I was happy with my previous tape job, but want it to be perfect since I'm having to redo it.

I'm considering using Hipshot locking tuners. They look very much like the Schaller tuners on the original, only thicker due to the lock screw. This is another one of those decision points between accuracy vs functionality. As fanatic as Ed was about tuning stability, he would have certainly used locking tuners if they were available in 76.
 

1 21 gigawatts

Tele-Afflicted
Joined
Aug 24, 2020
Posts
1,688
Age
51
Location
Florida
Painting again this afternoon. Trying heavier coats this time. In the spirit of Eddie, I'm painting it in my backyard this time.;)

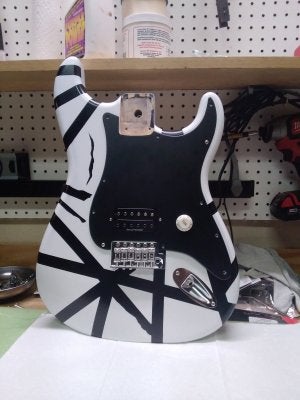
Update: Success! Painting is done. I sprayed one light followed by two heavy coats. The finish is much smoother this time. I removed the tape after about 30 minutes being sure to score any acute angles that I came up on with a razor blade. No pulls.

It actually looks pretty cool with the scuffed up black stripes (much better than glossy from the previous attempt). I think that I will wet sand just to flatten the paint lines and smooth the white finish a bit and call it good.
 
Last edited:

reddy2300

Tele-Meister
Joined
Aug 25, 2017
Posts
318
Age
56
Location
Dublin, Ohio
I slowed down on this project a bit, kind of purposely to stretch it out. I generally look for projects, then rush through to get it done, then need another project. :rolleyes:

The brass nut is finally in. Took a bit of filing to get it in. It fits very tightly in the slot, I had to press it in with a clamp. I sure hope that I don't hate it, because it might be permanently installed...

The body is completely sanded with 400 grit for painting. We are having unusually cold days today and tomorrow, so it will probably be Thursday or Friday before I try again. I did print some full size templates to help with the tape placement. I was happy with my previous tape job, but want it to be perfect since I'm having to redo it.

I'm considering using Hipshot locking tuners. They look very much like the Schaller tuners on the original, only thicker due to the lock screw. This is another one of those decision points between accuracy vs functionality. As fanatic as Ed was about tuning stability, he would have certainly used locking tuners if they were available in 76.

Where do you go to get tape templates for this?
 

1 21 gigawatts

Tele-Afflicted
Joined
Aug 24, 2020
Posts
1,688
Age
51
Location
Florida
Where do you go to get tape templates for this?
I used this one to show the order that the tape is wrapped. Just go from number to number- it works out surprisingly well. The first piece of tape goes from 1 to 15. The second from 16 to 34. Then some odd ball pieces to finish it off.
4ac2443b2445c0ea753630dea44543a6.jpg

I also printed some images of Eddie's Frankenstrat (front and back) to scale to use as reference for the details. There are some good high res photos of Fender's replica, but it surprisingly has some errors.

Use 3/4" tape. The thinner stripes were actual auto pinstripes (not paint).
 

reddy2300

Tele-Meister
Joined
Aug 25, 2017
Posts
318
Age
56
Location
Dublin, Ohio
I used this one to show the order that the tape is wrapped. Just go from number to number- it works out surprisingly well. The first piece of tape goes from 1 to 15. The second from 16 to 34. Then some odd ball pieces to finish it off.
View attachment 792715
I also printed some images of Eddie's Frankenstrat (front and back) to scale to use as reference for the details. There are some good high res photos of Fender's replica, but it surprisingly has some errors.

Use 3/4" tape. The thinner stripes were actual auto pinstripes (not paint).

Awesome!!! This is for the "black to white" only, correct? The red would add another layer of tape?
 

1 21 gigawatts

Tele-Afflicted
Joined
Aug 24, 2020
Posts
1,688
Age
51
Location
Florida
Here is the second attempt curing.
20201204_134334.jpg
20201204_134352.jpg
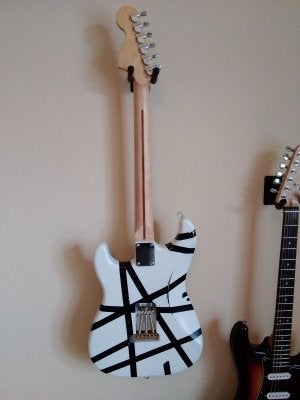
And yes, the tape error on the back of the upper horn was intentional. It is a result of the tape folding on itself while Eddie made the bend too sharp. This is one of the details that Fender got wrong. They also didn't get the mask shadowing in the cavities (a result of using continuous wraps of tape vs vinyl templates).
 

1 21 gigawatts

Tele-Afflicted
Joined
Aug 24, 2020
Posts
1,688
Age
51
Location
Florida
Awesome!!! This is for the "black to white" only, correct? The red would add another layer of tape?
Correct. If making the red frankenstrat, you'd want to tape off a lot of paint wear along with the stripes for the white layer. Paint it white. Relic it, then tape it up a second time to paint the red.
 

1 21 gigawatts

Tele-Afflicted
Joined
Aug 24, 2020
Posts
1,688
Age
51
Location
Florida
Wet sanding today. Wish me luck. Depending on how it goes will determine if I relic it or go with a freshly-painted version of Frankie.
 

1 21 gigawatts

Tele-Afflicted
Joined
Aug 24, 2020
Posts
1,688
Age
51
Location
Florida
Failure and Success

I started sanding with P-600. Before I got through the orange peel, the paint started to get thin in some spots. I stopped and switched to 1000. Barely used it because it was burning through very easily. I decided to purposely burn through on a couple of wear spots, then polished with scratch remover. The polish worked great. It is probably a good thing that I couldn't wet sand completely smooth, because it would have ended up too shiney.
20201206_133508.jpg
20201206_133536.jpg
I might relic it a bit more, but I don't want to overdue it. Maybe a few scuffs along the bottom edges.
 

1 21 gigawatts

Tele-Afflicted
Joined
Aug 24, 2020
Posts
1,688
Age
51
Location
Florida
Leveled and crowned the frets today. I'll pull the dremel out tomorrow to polish them. Almost done.
 

1 21 gigawatts

Tele-Afflicted
Joined
Aug 24, 2020
Posts
1,688
Age
51
Location
Florida
Finished! I am very happy to report that the reconfigured pickup sounds great! Not bad for an old beat up Starcaster...
20201215_144302.jpg 20201215_144341.jpg 20201215_144533.jpg

This project costs me about $145 total. The guitar and pickup were both purchased used. The Fender MIM trem, brass nut, pot, pickguard, and one can of paint were purchased new. I am thrilled with how she turned out!:cool:
 

1 21 gigawatts

Tele-Afflicted
Joined
Aug 24, 2020
Posts
1,688
Age
51
Location
Florida
Awesome build! Now....go crank some 'Unchained' on it!
I wish. All I got is "Ain't Talking bout Love" at about 3/4 speed and the intro to "I'm the One" at 1/10 speed.:rolleyes:

I am loving this guitar. I don't know if it is the maple fretboard, the brass nut, the E-flat tuning, etc, but there is just a tangible difference in feel vs my other guitars. Don't know how to describe it other than it feels "alive".
 

reddy2300

Tele-Meister
Joined
Aug 25, 2017
Posts
318
Age
56
Location
Dublin, Ohio
I wish. All I got is "Ain't Talking bout Love" at about 3/4 speed and the intro to "I'm the One" at 1/10 speed.:rolleyes:

I am loving this guitar. I don't know if it is the maple fretboard, the brass nut, the E-flat tuning, etc, but there is just a tangible difference in feel vs my other guitars. Don't know how to describe it other than it feels "alive".

That's the magic that you're looking for!!!!
 
Top