Winding a tele pickup

  • Thread starter Missing Link
  • Start date
  • This site may earn a commission from merchant affiliate links like Ebay, Amazon, and others.

Missing Link

Tele-Holic
Joined
Jan 19, 2018
Posts
723
Location
Milky Way galaxy
Okay today as most of are at home looking for things to do I decided to re-wind an old non working telecaster neck pickup with some 43 AWG wire. All set up on my wife old sewing machine and when I start I go slow and after about 12 -13 turns as the counter shows it snaps off.
I have watched a crap load of video's on this subject but not one ever says what they do with the roll of wire they are using.
I know it is a tension problem and its coming from the roll of wire that is on a shaft holding it horizontally to the work. It seems to turn freely but as said it will snap off about 11 turns.
Any suggestions on how to feed the wire off the spool smoothly?

Stay safe.
Cheers
 

kingvox

Tele-Meister
Joined
Mar 23, 2017
Posts
334
Location
CT, USA
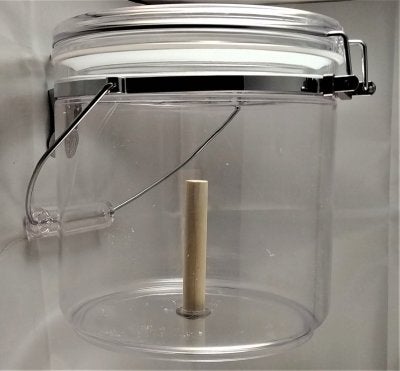
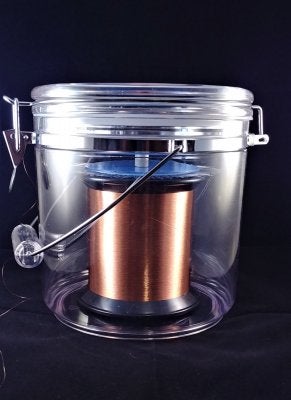
The spool simply stands right-side up on the floor. You don't have to have it mounted horizontally. I keep mine right by my feet when I wind, stood straight up like normal. I did however make a special container for the spool, and I think it helps a lot.

I use this big jar I found at Wal-Mart because I use 5lb spools. For smaller spools you can use any plastic jar that'll fit, like a peanut butter jar. Plenty empty jars on eBay too. For "peanut butter" style jars, turn them upside down. The bead for the wire to dereel thru will mount on the hard, clear plastic side, and the dowel where the spool is mounted will mount on the screw-cap lid.

It makes for a great spool holder. For the "peanut butter" style jar:

Fit a dowel (will require some sanding) so your spool of wire can slip over it snugly. Doesn't have to be too snug. Then you drill a hole through the center of the plastic screw-cap lid. Get a washer and a wood screw. Pilot hole your dowel so the screw will thread in snugly. Place the dowel over the lid, screw the dowel onto the lid, place your spool of wire onto the dowel, and onto the next step.

Then you drill through the bottom of the hard clear plastic of the jar, right in the center where the "dimple" is. A reamer is a huge help here for getting a snug fit. Your goal is to get it reamed just enough so a wooden or glass bead will snugly fit about halfway down. Half of the bead above and half of the bead below.

Size of the bead doesn't matter. Just go slow with the reaming. If you go too much, you'll need a bigger bead or another jar. You want a snug fit so it'll stay in place as you carefully paint epoxy or superglue around it.

Once the bead is mounted, thread the wire carefully from your spool through the bead. Then screw the lid back onto the jar. Your assembly is now complete. Tape the loose wire coming out of the bead to the top of the jar.

This contains the wire. As it's dereeling, it can't go outside of the jar. That keeps it from snagging on anything and breaking that way. It completely protects the spool and prevents accidental bumps as well, which can ruin expensive coils of wire very easily.

20180925_165533.jpg 20180925_171455.jpg 20180925_171934_HDR.jpg
upload_2020-4-14_1-35-0.png


This is a pic of my winding setup. The "breaker bar" (credit to Rob DiStefano for teaching me about this idea) is something I rigged up out of a steel rod, two drill stops, and some dowels and plywood I had lying around. I simply used a forstner bit in some scrap plywood to make recesses for the dowels. Drilled holes through the dowels for the steel rod, put one end through, put the drill stops on, and mounted the dowels onto the plywood. I screwed it down onto my nightstand for extra security.

The "breaker bar" is 4.5" away from the screw where the pickup mounts for winding, and about 1" higher than the screw where the pickup mounts for winding.

I'm not sure that these measurements are critical, but they have worked well for me so far. I just measured them on my setup and those are the numbers. You can use guides or not for winding. I personally prefer them.

upload_2020-4-14_1-2-17.png


The last part is the tensioner. I refer to Rob DiStefano's invention, the "Velcro Tensioner." I cut mine out of single ply pickguard material. For me, single ply pickguard material was the easiest to use, but you could get away with wood if it's thin enough.

You use two pieces of "loop" (soft) Velcro. The black square represents the loop Velcro, and the line is the magnet wire for winding:

upload_2020-4-14_1-24-42.png


You cut two pieces with Velcro that look like that. See how the wire lays over the Velcro? Now you put your other piece with Velcro on top of that piece, like a mirror image. It makes a sandwich. Then you can use a locking hemostat to clamp the thing in place.

I made a demo video here, where you can see me using the hemostat and Velcro tensioner:


You gotta play around with where you lay the wire down on the tensioner, and how tight you lock the hemostat. I find that putting the wire closer to the edge of the tensioner can make the tension too high when you clamp it, and cause the wire to break. It's likely that smack in the middle of the tensioner, it won't have enough tension. You just gotta move the wire off center, closer to the edge, center, etc., and just keep re-clamping it with the hemostat, until you find a tension that works.

You should be able to pull the wire through the tensioner by hand with some resistance, but no breakage. Once you get it set, you're good to go.

The nice thing with the jars I made is you can simply lay the Velcro tensioner directly on top of the jar when you're done. You don't need to disassemble it. I have 3 tensioners (one of my own design using maple blocks, velcro, and wingnuts), and I leave them on top of my jars that hold 5lb spools of wire.

They stay on for the entire 5lb spool. Which is nice, because it gives you perfectly consistent tension. Adjust it once, and you're good to go for the entire spool. That's another advantage of making those "peanut butter jar" spool holders.

The final possibility is that your spool is defective. Pull wire off the spool by hand, and see if it snags or breaks. It should come off the bobbin by hand very, very easily. If it snags, and you find that you can't pull the wire off the spool without breaking the wire, contact the company you bought the wire from, tell them the issue, and see if you can get a replacement.


I've managed a couple times to fish the snag out with a toothpick, and by some miracle or the grace of God, it worked. But for the most part it's a manufacturing defect. They claim that Wisker Disks solve this, but they cause their own problems as the spool depletes. Anyway, those are here:

(link removed)

They work well on brand new spools. After the spool is about halfway done, they can cause problems, causing too much tension and even wire breakage. Very strange. But it's how it is. I personally still use them, but simply remove them when a spool starts to deplete. They do seem to prevent dereeling issues and snagging on brand new spools of wire.

But other winders have told me they cause nothing but problems. And if they get a snag, will simply let the company know, and get an exchange for a new spool.

Good luck!

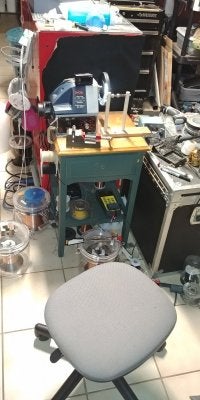
EDIT: One more final pic to clearly show my whole winding station. You can see my spool of wire in the container is on the floor right by where my feet would be. This works fine.

20200414_014455.jpg
 
Last edited:

Missing Link

Tele-Holic
Joined
Jan 19, 2018
Posts
723
Location
Milky Way galaxy
This is an excellent bit of information, want to thank you for it.
I believe it comes down to a couple of thing in my case one, the spool I got is from Remington off of the eBay store and as you can see the spool is not the type were you can set it on its side and let the wire unwrap (see photo) and you can see the wire guild I made. That is why I was using it horizontally.
Second it maybe wrapped on the spool a bit snug from the company, feels as it snags a bit when unwinding by hand. 8,500' on this spool so maybe I will try to either unwind it from this spool to a spool such as you have with a bit less tension or try to cut off one side of the spool to were it will not snag an hopefully unravel somewhat easier. If not find a better source for a spool of 43 AWG.
Also last possibility is it is just wrong type see link:

http://rover.ebay.com/rover/1/711-5...0001&campid=5338148343&icep_item=322232527748

Big thanks
Cheers
 

Attachments

  • DL146014.jpg
    DL146014.jpg
    149.2 KB · Views: 149
Last edited:

kingvox

Tele-Meister
Joined
Mar 23, 2017
Posts
334
Location
CT, USA
@Missing Link

I go through their ebay store all the time and have gotten spools just like that. Barring a manufacturer defect, it should be OK.

They tie a tiny slip knot onto the spool. Did undoing that work out okay? They thread the main wire through a loop and pull it, and this needs to be undone first so the wire can be dereeled successfully. Check the spool and make sure as you're pulling the wire off there's no visible tie or knot anywhere.

When it snags, does it just have some resistance, or if you continue pulling does the wire break?

Sometimes you can carefully use a toothpick to fish around the lead wire when it snags, and free it. You have to be extremely careful so as not to break the wire. You only want to fish around the very top part, where the wire is stuck.

If there's no visible tie or knot, and the wire is snagging to the point where you can't pull it off the spool without breaking it, contact Remington. They'll likely have you ship back the problematic spool and send you a new one.

Make sure on new spools to undo that tie that they put in the wire. After that, it should dereel very easily with the spool standing straight up. If it doesn't, something is wrong with the spool.

I've used many spools that are the same as yours without issue. Remington is great but I have occasionally had faulty spools that I needed to exchange for new ones.
 

Missing Link

Tele-Holic
Joined
Jan 19, 2018
Posts
723
Location
Milky Way galaxy
I think I will contact Remington as when I looked at it under the magnifier it looks as it has a dent in the wire in the one section which may of made the wire weak in that spot.
Other than that it had no loop tie as I recall but if it did after so many breaks It must be gone, just had a section of tape holding it to the side of the spool.
Cheers

DL146015.jpg
 

Rob DiStefano

Doctor of Teleocity
Joined
Mar 3, 2003
Posts
10,972
Age
79
Location
Free Jersey
a dent in the coil wire as it's on the spool suspect for wire insulation integrity. for me, that's a dead spool as i can't take a chance gambling its viability for pickup winding.

there are *MANY* good ways to wind pickups and lots of good machines and tool supporting components. for hobby winders, there's no need for anything special beyond beyond a motor with a speed control. not even a turn counter is needed (as evidenced by the early fender pickups). put the spool at yer feet. grasp the coil wire twixt thumb and forefinger. wind *SLOWLY* as the coil wire pulls off the spool and onto the bobbin. in a short order you'll get a "feel" for coil wire tension, and yes, you will bust the wire at least a few times - just solder the busted ends together and continue winding. there is no need for a coil wire guide - just watch it go on the bobbin at 500 to 1000 rpm. start *SLOW*. speed will make the job frustrating and far longer a task than need be as you bust or run off the wire. there is no need to wind much faster, at over 1000 rpm. when you become a pickup business, then there is a need for speed. i wind at over 4300 rpm, which would be fairly impossible for most hobby winders. go slow, enjoy what yer doing, and make yerself some good pickups.

a few tips, if i may ...
  • make sure the insides of the bobbin flatware are dead smooth, with nothing for the wire to catch on and bust, particularly the wire eyelets, use a file and emery board
  • you can always tin the start lead so that you can tin the finish lead as you wind so that you can take a DCR reading, to better know how the winding is going and to hit a target DCR (IF that matters)
  • when the bobbin is wound, tin the coil wire leads before they go into the eyelets
  • a light cotton glove, or a small swatch of cotton t-shirt might make winding and guiding coil wire easier
  • shine a strong light on the bobbin as you wind. to better see exactly where and how the wire is going onto the bobbin
  • put a layer of "write on" transparent tape around the rod magnets, for insulating them from the coil wire
r.
 

Missing Link

Tele-Holic
Joined
Jan 19, 2018
Posts
723
Location
Milky Way galaxy
Hey Rob thank you I have read you information and will make any corrections in my set up to help accomplish this winding . I did contact Remington today and are replacing the spool at no charge, that was very cool.
I did a bit of hand unwinding on this spool and as the wire came over the small defect I could indeed feel a slight restriction in the wire so yes it is a bad spool. Not sure how many layers one needs to go until the defect is gone but I would guess maybe two -three hundred turns on the counter, just not worth it.
I did read that folks do solder this wire if it breaks, how on earth can that be done as it is SO small?o_O
Thanks again for the inspiration.

Cheers
 

Rob DiStefano

Doctor of Teleocity
Joined
Mar 3, 2003
Posts
10,972
Age
79
Location
Free Jersey
...
I did read that folks do solder this wire if it breaks, how on earth can that be done as it is SO small?o_O

pull off about a foot of wire off the bobbin and a foot off the spool. grasp both wires together with one hand's pointer and middle fingers, then use the thumb and ring fingers of that same hand to grasp the those two wires about 2-3" down. those wires must touch as if they're one wire. with some solder on yer 40-45w iron's tip, run it down those wires and they'll instantly tin and be soldered as one contiguous wire. snip off the tag ends, git back to winding. life is good. :)
 

kingvox

Tele-Meister
Joined
Mar 23, 2017
Posts
334
Location
CT, USA
Hey Rob thank you I have read you information and will make any corrections in my set up to help accomplish this winding . I did contact Remington today and are replacing the spool at no charge, that was very cool.
I did a bit of hand unwinding on this spool and as the wire came over the small defect I could indeed feel a slight restriction in the wire so yes it is a bad spool. Not sure how many layers one needs to go until the defect is gone but I would guess maybe two -three hundred turns on the counter, just not worth it.
I did read that folks do solder this wire if it breaks, how on earth can that be done as it is SO small?o_O
Thanks again for the inspiration.

Cheers

My method is this:

Take the broken wire from the pickup. Leave the pickup mounted on your winder. Unwind until you have a good length. Now use some clear tape, and tape the wire to the bench. It should be fairly taut. This will keep it snugly in place while you wrap your new wire around it.

Now take some wire from your spool. Wrap it around the pickup wire that's taped to the bench. Maybe 10 or 15 times. You want to make each tie a little bit higher than the last so you don't end up with a big knot. You just want a small spiral of conjoined wire.

Now, put a tiny bit of flux on the conjoined, spiraled wires. Then tin your soldering iron, and run it up and down a few times.

Use small cutters to snip the excess on either end. I like using a multimeter to test to make sure that the connection is solid before continuing winding: one probe on the start eyelet, and the other on the freshly tinned, conjoined wire.

Rob turned me on to tinning the wire before wrapping it around the eyelet. Not only does it guarantee a solid electrical connection, but it also allows you to easily test the pickup mid-wind if necessary, as Rob mentioned in that last post. Very valuable when you have the rare wire breakage.

So I definitely second that advice. I always tin both the start and finish leads. This also allows you to run a little flux on them at the end, and some tinned solder, so you get nice, strong, solid wrapped wires around the eyelet. Much more resistant to breakage from an errant thumbnail.

A couple times, I thought I successfully joined wires, and did not. I'd say the chances of this are very low, but it's still better to make sure you've got a connection before winding the rest of the pickup, only to find at the end that it's shorted out, and having wasted another few thousand turns of wire.
 

Missing Link

Tele-Holic
Joined
Jan 19, 2018
Posts
723
Location
Milky Way galaxy
I going to practice on some discarded wire and see how well I do soldering it together, definitely will need the magnifier for that.
Well receive the new roll this morning, Remington is very cool and fast. So with some time on my hands I found a plastic a jar and with a wooden dowel screwed into the center to hold the new spool in place. Great idea as it worked excellent and not one snag. Also made the guild post with adjustable sliding blocks, this was well worth the effort in making as the winding went so much easier and faster and with less effort once all set up.
Well the tele neck pickup is done. It reads not as I expected with the 8,605 winds shown on the counter, 5.33 ohms and was going for 7.0k-7.2k for a 52 tele neck sound. The charts I have said around 7,800 to 8,000 turn to archive this, but no big deal as it I will get better, I hope. Pretty hot neck pickup, might sound pretty good in my next build.
I want to thank you guys for the directions and guidance all good information not just for me but others who maybe be considering the art of pickup winding.
I plan on doing more pickups soon, again thanks.:)

Cheers
 

Attachments

  • DL166020.jpg
    DL166020.jpg
    147.1 KB · Views: 144

monkeybanana

Friend of Leo's
Joined
Aug 6, 2016
Posts
2,809
Location
earf
This is a great thread.

Regarding your numbers, I am looking at my notes and the last Tele neck pickup I did the other day had 7900 turns and I hit 7.14K. A previous wind had 8050 turns and I got 7.54k. These were pretty low tension and wound at slow speed as wizard Rob suggests.

Further back I had wound one with 7870 turns and got 7.92k! I must have made that one really tight and stretched the wire or the counter couldn't keep up and I am using the exact same counter you are using.

And 4300 RPM? Phew!
 

Ronkirn

Doctor of Teleocity
Vendor Member
Joined
May 1, 2003
Posts
13,618
Age
78
Location
Jacksonville, FL
  • make sure the insides of the bobbin flatware are dead smooth, with nothing for the wire to catch on and bust, particularly the wire eyelets, use a file and emery board
  • you can always tin the start lead so that you can tin the finish lead as you wind so that you can take a DCR reading, to better know how the winding is going and to hit a target DCR (IF that matters)
  • when the bobbin is wound, tin the coil wire leads before they go into the eyelets
  • a light cotton glove, or a small swatch of cotton t-shirt might make winding and guiding coil wire easier
  • shine a strong light on the bobbin as you wind. to better see exactly where and how the wire is going onto the bobbin
  • put a layer of "write on" transparent tape around the rod magnets, for insulating them from the coil wire


Dawwgone Rob... You been sneaking over and taking notes? :p I was gonna say the same thing but ya kinda stole the stage... :D

Leme just say this. whatever ya do . . you are working with some very fine wire.... eventually you will get used to the "feel" as it's wound onto the bobbin... You will instantly recognize when something is wrong... and/or when the wire is about to snap... It's just an "art" kind of thing... and you will screw up more than you want learning.. it's the cost of the education... this cannot be taught, you have to get in the fire to see how warm it is.. so initially buy ya the least expensive wire you can ... learn on that before ya dump a few hundred into a 5 pound roll of Forbon double insulated wire...

and . . if your winder is vibrating violently.. stop.. get that momma balanced.. if it's not going on smoothly without the excessive vibrations, you're wasting your time...

r
 
Top