Apologies. Should have read further down the thread.He did reply that he used a curved channel.

You are using an out of date browser. It may not display this or other websites correctly.
You should upgrade or use an alternative browser.
You should upgrade or use an alternative browser.
Truss rod not adjusting neck.
- Thread starter Backtothere
- Start date
This site may earn a commission from merchant affiliate links like Ebay, Amazon, and others.
LowCaster
Tele-Afflicted
I think it’s stuck, but did you try the following trick to help the trussrod do his work? Unscrew the trussrod nut, clamp the neck on your workbench and apply pressure (cold) to get as much backbow as possible, then screw the trussrod nut with some strengh but not too much, just as it should. Unclamp and see if it worked.
I think it’s stuck, but did you try the following trick to help the trussrod do his work? Unscrew the trussrod nut, clamp the neck on your workbench and apply pressure (cold) to get as much backbow as possible, then screw the trussrod nut with some strengh but not too much, just as it should. Unclamp and see if it worked.
He did that also

Moldy Oldy
Tele-Holic
Sorry to say, but I think you’re hosed. If the rod is glued up by the nut, I think it would exhibit the exact same behavior you’re seeing. If you glued the skunk stripe with PVA you can probably remove it without damaging the neck by heating it as hot as you can get it with heat lamps and/or a heat gun.
philosofriend
Tele-Afflicted
If the threads are cutting into the wood on the convex side of the channel that could impede the action of the rod.
Your theory that the washer is jammed on the threads is another explanation. I would try using my hands to bend the neck both ways while slapping the nut end hard on the workbench to try to jar the washer loose.
My intuition is that the rod is turning. On the last rod I installed I inserted a 1 inch small diameter nail into a hole drilled in the flattened end of the truss rod to make sure that could never happen.
Backtothere
TDPRI Member
Figures. Titebond. It'll come out with heat, but destructively, I don't really have much more tools than a hairdryer, heatmat, chisel and a drill. I used a razor blade to make the stripe, hence why I didn't really want to do it again. Might as well just use a chisel on the soft walnut and see whether there are teeth marks in the maple underneath. Or put some screws in it and see if it'll pull out. I made sure to use a minimal amount of glue on glue up.
I've taken a hammer to the end of the rod, if it is stuck on the washer it's practically welded. I would have thought the rod turning would cause the nut to spin forever, not lock up after 10 rotations from off.Your theory that the washer is jammed on the threads is another explanation. I would try using my hands to bend the neck both ways while slapping the nut end hard on the workbench to try to jar the washer loose.
My intuition is that the rod is turning. On the last rod I installed I inserted a 1 inch small diameter nail into a hole drilled in the flattened end of the truss rod to make sure that could never happen.
Moldy Oldy
Tele-Holic
I helped my buddy remove one that was glued with Titebond, and we didn’t damage either the neck or the skunk stripe. We screwed a couple screws into it in the heel area to serve as handles. The holes that won’t show when the neck is mounted to the guitar. Then used a heat lamps and plus a heat gun and it took a long time to get it warm enough, like maybe 20 minutes. In our case we were removing it because when he originally glued it in he didn’t get any glue, or enough glue, at the headstock end. So the way it turned out, that end lifted without help from the screws. Then very slowly worked down the neck, focusing more heat where needed until the entire thing came out.

Backtothere
TDPRI Member
Ok so I finally got around to taking the Truss rod out. It turns out the rod wasn't stuck tightened. Rather it never tightened in the first place. Taking the rod out made no difference to the relief.
The Anchor was solidly set in with no movement from the bar.

After not managing to remove the skunk stripe without destruction, there was one small section where some glue had overflown onto the bar.

And some compression into the wood on the other side. That said, I don't think this tiny section shouldn't have completely rendered the truss rod useless.

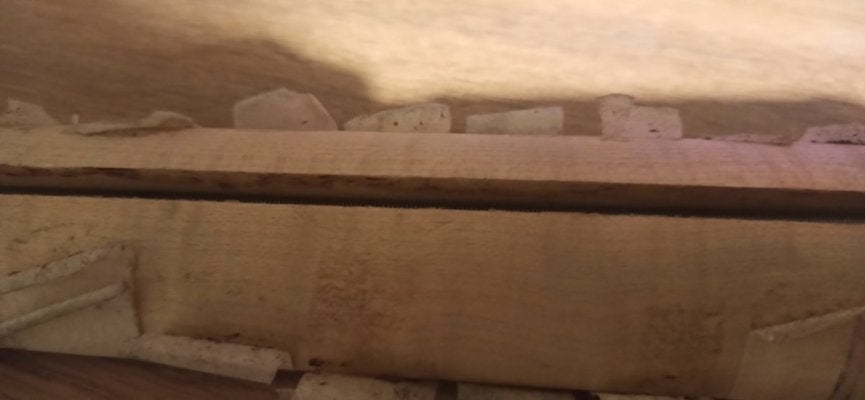
Can confirm the channel has a gradient to it. Not as promintant as in the cross section photo from earlier but there is a gradient, I made a schematic drawing to cut the truss slot, so I'll see if i can find that to get and exact radius.

Took some measurements. Obviously this is affected greatly by the neck contour so not reliable but gives a confirmation that there is some kind of radius for the rod. 3rd fret 1.33cm, 9th fret 0.97cm, 17th fret 1.56cm.

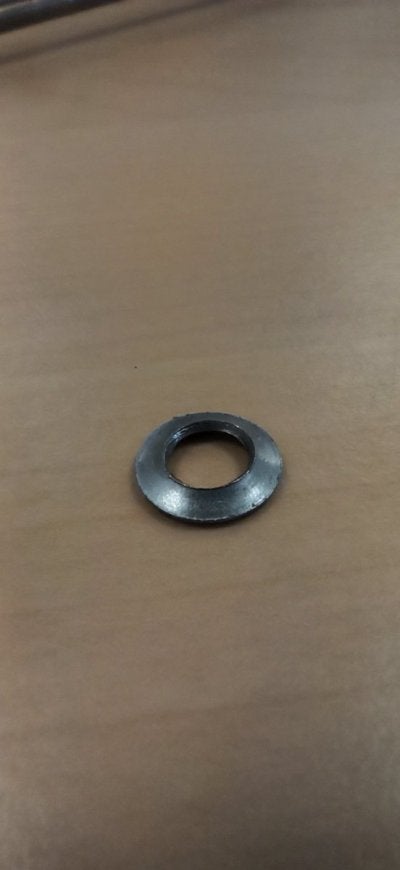
I counted that the nut would spin 10 rotations before bottoming out at the wood and getting stuck when in the neck. When out of the neck the nut would spin 19 rotations freely with no cross threading or resistance. So the nut can tighen, but something dosen't want it to go past the 10th rotation where the nut hits the wood.

I also noted that the washer was compressed and turned into a funnel shape to match the end of the nut, I think the black stuff on the threads is the washer grinding away against the threads as I tried to tighten it.

This is beyond what my mind can figure out. I was thinking of making a new trussrod from round bar if the threads were causing the whole thing to stick but that only seemed to be the case in a tiny section near the anchor end. Any ideas on why this setup wasn't working?
The Anchor was solidly set in with no movement from the bar.
After not managing to remove the skunk stripe without destruction, there was one small section where some glue had overflown onto the bar.
And some compression into the wood on the other side. That said, I don't think this tiny section shouldn't have completely rendered the truss rod useless.
Can confirm the channel has a gradient to it. Not as promintant as in the cross section photo from earlier but there is a gradient, I made a schematic drawing to cut the truss slot, so I'll see if i can find that to get and exact radius.
Took some measurements. Obviously this is affected greatly by the neck contour so not reliable but gives a confirmation that there is some kind of radius for the rod. 3rd fret 1.33cm, 9th fret 0.97cm, 17th fret 1.56cm.
I counted that the nut would spin 10 rotations before bottoming out at the wood and getting stuck when in the neck. When out of the neck the nut would spin 19 rotations freely with no cross threading or resistance. So the nut can tighen, but something dosen't want it to go past the 10th rotation where the nut hits the wood.
I also noted that the washer was compressed and turned into a funnel shape to match the end of the nut, I think the black stuff on the threads is the washer grinding away against the threads as I tried to tighten it.
This is beyond what my mind can figure out. I was thinking of making a new trussrod from round bar if the threads were causing the whole thing to stick but that only seemed to be the case in a tiny section near the anchor end. Any ideas on why this setup wasn't working?
Attachments

I can't say that I've seen allthread used as a rod in a quality neck...but that's just my experience. I'd go for a 3/16" steel rod and I bet it'll work. I would guess the threads keep things from operating. Kind of like ice grippers on your shoes. jThe threads cut into the skunk stripe as you saw. The only movement is probably the nut and washer into the wood...like you found out.
The single style vintage rod has to move slightly to compress upward against the bow.
The single style vintage rod has to move slightly to compress upward against the bow.
Last edited:
Backtothere
TDPRI Member
See I thought this at first, but on opening it up, there is only evidence of the ice gripper effect near the anchor where I had the skunk stripe clamped in for gluing, there's no evidence of binding anywhere else towards the nut, the majority of the neck should have still been bending if that's the case. I'm trying to find a round bar source that doesn't have a minimum order at the minute anyway though.I can't say that I've seen allthread used as a rod in a quality neck...but that's just my experience. I'd go for a 3/16" steel rod and I bet it'll work. I would guess the threads keep things from operating. Kind of like ice grippers on your shoes. jThe threads cut into the skunk stripe as you saw. The only movement is probably the nut and washer into the wood...like you found out.
The single style vintage rod has to move slightly to compress upward against the bow.
Moldy Oldy
Tele-Holic
The remnant of skunk stripe in your picture has thread marks even where there is no glue. Perhaps you clamped the skunk stripe tightly enough when gluing that it pressed threads into the entire length of the skunk stripe. That would explain it, and that couldn’t happen with straight rod.
See I thought this at first, but on opening it up, there is only evidence of the ice gripper effect near the anchor where I had the skunk stripe clamped in for gluing, there's no evidence of binding anywhere else towards the nut, the majority of the neck should have still been bending if that's the case. I'm trying to find a round bar source that doesn't have a minimum order at the minute anyway though.

BRIGHT MILD STEEL ROUND SOLID BAR ROD EN3B EN1A 1" 1.1/4" 1.1/2" 1.3/4" 2" | eBay UK
What is stainless-steel bar or round rod and what is it used for?.
www.ebay.co.uk
ctmullins
Tele-Afflicted
@Backtothere
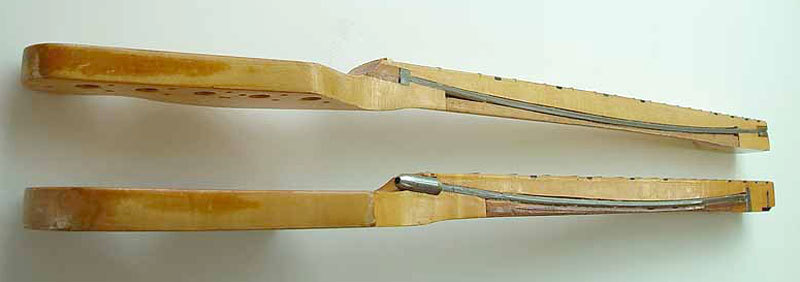
Unlike a double-acting rod, a single-acting rod needs to be mounted in a curved channel, with the skunk stripe--or internal spline under the separate fingerboard--forcing the rod into a mild U shape.
If the channel and the rod are straight, the rod will not achieve the mechanical leverage necessary to counteract string tension and prevent the neck pulling into relief.
Here are some cutaway views of correctly installed single-acting rods: top is 50s/60s style (heel adjust), and bottom is 70s style ("bullet" headstock adjust).
The terminology has always confused me.
It seems to my brain that the words "single action" and "double action" should refer to the number of directions the rod can exert bending force - only one direction for "single action", and both directions for "double action".
Is this wrong?
The reason I ask is that, if this definition applies, then there are single action rods that require a curved channel (the common/traditional type), and single action rods that are constructed with two rods, welded together at one end, and one rod threaded at the other end, with a removable nut. These rods require a small straight channel, but the construction still results in adjustability in only one direction.
I think sometimes people get these confused from a true double-action rod, which uses two rods, one with reverse threads at each end, and a welded-on nut, to provide adjustability in both directions.
I started out using the true welded-nut double-action rods from LMII, but switched to the smaller/lighter/cheaper dual-rod single-action two-rods-with-removable-nut version. I have used a ton of them in builds through the years. They're super easy to install, require a minimal amount of wood removal, and are even (in theory) removable and replaceable without disassembling/destroying the neck.
(I have never seen the appeal of a traditional compression rod....)
Backtothere
TDPRI Member
That's what I'm getting at, I'll try a new rod, but frets 0-16 have no thread marks pressed in underneath them, it's only under 17-20 where you see that from over-clamping which wouldn't be bending anyway. It could still have been binding somewhere, but nothing obvious to show for it. It doesn't look like it's all the way down the neck.The remnant of skunk stripe in your picture has thread marks even where there is no glue. Perhaps you clamped the skunk stripe tightly enough when gluing that it pressed threads into the entire length of the skunk stripe. That would explain it, and that couldn’t happen with straight rod.
Backtothere
TDPRI Member
You are right, I had a much easier time on my first build using a double action (welded nut) rod. That type costs a bit more unless you build it yourself, but saves you in that you can correct a serious ****up in wood movement.The terminology has always confused me.
It seems to my brain that the words "single action" and "double action" should refer to the number of directions the rod can exert bending force - only one direction for "single action", and both directions for "double action".
Is this wrong?
The reason I ask is that, if this definition applies, then there are single action rods that require a curved channel (the common/traditional type), and single action rods that are constructed with two rods, welded together at one end, and one rod threaded at the other end, with a removable nut. These rods require a small straight channel, but the construction still results in adjustability in only one direction.
I think sometimes people get these confused from a true double-action rod, which uses two rods, one with reverse threads at each end, and a welded-on nut, to provide adjustability in both directions.
I started out using the true welded-nut double-action rods from LMII, but switched to the smaller/lighter/cheaper dual-rod single-action two-rods-with-removable-nut version. I have used a ton of them in builds through the years. They're super easy to install, require a minimal amount of wood removal, and are even (in theory) removable and replaceable without disassembling/destroying the neck.
(I have never seen the appeal of a traditional compression rod....)
The appeal of a single action double bar is cheaper and easier to make & able to use a flat channel.
The only reason I used a single action single bar rod was because on a one piece maple neck, you can't take the fretboard off to cut a flat channel. On a rosewood neck, you route the channel and stick a fretboard on top, then put a skunk stripe in the back purely for show (it's actually cause fender's machines do it regardless of type, as far as I'm aware).
If you get down to it on the blueprints routing a flat channel from the fretboard side you can route all the way to the headstock with no issues because a fretboard covers it up afterwards. But in a one piece maple neck you can't go on the fretboard side, routing it from the back the skunk stripe ends around fret 2 unless you want to route into the back of the headstock. So you've got 2 frets of space with no channel. You need to have a curve in order to drill at an angle into the channel from the headstock side and meet it on the back without having a big kink in the rod. The only way to install the other types in a one piece neck by routing a flat channel in the back, is to route an Ibanez style pocket in the headstock, then get a special angled bit to drill through to the 2nd fret where the back route ends. Or do one of those nightmare to adjust heel adjusted truss rods.
Last edited:
Backtothere
TDPRI Member
Yeah, allthread was all I had lying around, I intended to fill the threads and wrap it in tape, but apparently forgot that part.I can't say that I've seen allthread used as a rod in a quality neck...but that's just my experience. I'd go for a 3/16" steel rod and I bet it'll work. I would guess the threads keep things from operating. Kind of like ice grippers on your shoes. jThe threads cut into the skunk stripe as you saw. The only movement is probably the nut and washer into the wood...like you found out.
The single style vintage rod has to move slightly to compress upward against the bow.
I have a question before I go putting a new rod in.
In the image above the neck showing the red rod is drawn as being very shallow around the centre marked point 3. But whatever plans I used at the time called for a deeper cut.
This is mine around point 7 (headstock end), which is pretty similar.
But here it is at point 3. Which looks a lot deeper to me. There's still a radius to it but I suspect that might have an impact on rod effectiveness aswell.
Is it worth somehow backfilling this cut to make it a bit shallower, or is this ok? It should work regardless, but might fair more effective if I put a block under the middle to make the radius tighter and compression power more effective. Or if it needs to be an equal spread of bending force, measure the radius and cut a long thin piece of wood to sit in the channel and give it a tighter radius.
Attachments
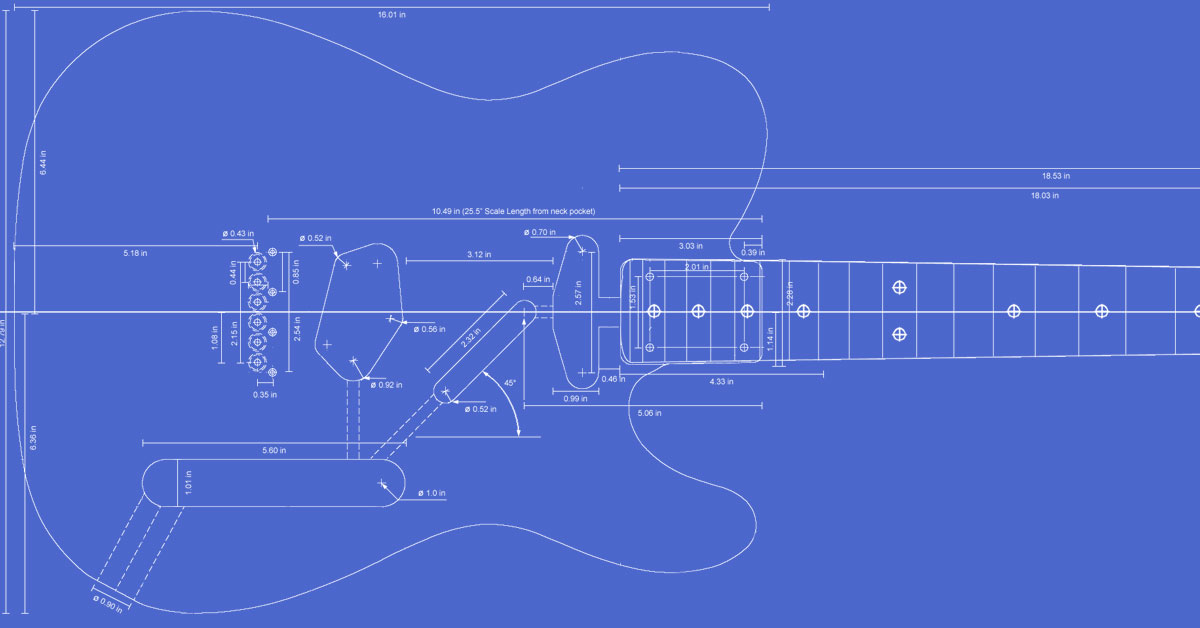
Fender Telecaster Guitar Templates | Electric Herald
Printable templates for the Telecaster (Custom, Deluxe, Thinline). Routing guides for pickups, electronics, body cavities / f-holes, necks, and fretboards.
I believe this is the Ed Hawley plan in his thread here at tdpri. That is what I used. The more bend the more work is performed when the nut is turned.
Moldy Oldy
Tele-Holic
My first tele has a single action truss rod. While routing the channel the router got away from me a little. I recovered by routing a 3/8” channel with a flat bottom and filling it with a mahogany strip. Then I routed a new proper channel for the rod, thus turning it into a feature.

Similar threads
- Replies
- 6
- Views
- 146