Telecaster - Roasted Ash body & maple neck - 1st Build

  • Thread starter SexyTeli
  • Start date
  • This site may earn a commission from merchant affiliate links like Ebay, Amazon, and others.

SexyTeli

Tele-Meister
Joined
Sep 22, 2021
Posts
126
Location
Vietnam
Hi, This is my first Telecaster build. I have zero woodworking and finish experience. But I will try.

This is the first topic related to this build I have asked before:
https://www.tdpri.com/threads/how-to-get-this-finish-with-my-parts-roasted-ash-body.1084173/

I changed my plan with the finish because I see that I have no way to achieve that level of finish, I will ruin my 1st Tele. So I will go with easiest way I can.

My configuration is:
  1. Body: Roasted Ash Body (Stratosphere)
  2. Neck: Allparts Unfinished Maple, 21 frets, C neck, 10" radius, TMO-C
  3. Pickup: Wylde Bill Lawrence Microcoils Anico T (neck and bridge)
  4. Bridge: WTB Black vintage style Bridge with compensated sadle
  5. Loaded Control Plate: Pre-wired cheap control plate from Stratosphere. I will upgrade later
  6. Tuner: Vintage 14:1 locking tuner
  7. TUSQ Nuts and String Tree
  8. Pickguard: 3-ply Black pickguard with white trim from GFS

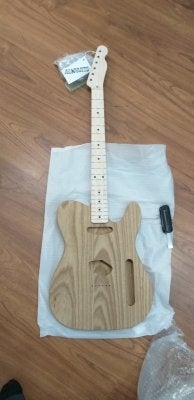
The raw body
It feels and smell good like chocolate. I love it so much.
e1b62a8a847b4f25166a15.jpg

7aa709afa75e6c00354f14.jpg


The neck
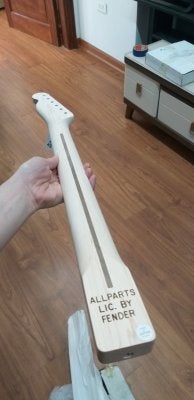
I timed the delivery date so I delivered at the driest time in my country to prevent wrapping. It takes 2 months to deliver to my country and is perfect now with humidity 41%. It said it is made in Japan. I love Japan. So, it is bonus :D

The fret work from this TMO-C Allparts neck is awesome. The fret is nicely leveled, the neck is straight like a ruler, feel great in the hand. The fret ends need some work, of course. But it dont bother me. The fret board is

6f85fbbc4a4d8113d85c10.jpg
afdc0cf2bd03765d2f1211.jpg

The Body + Neck
It does not fit perfectly snug, but it is workable. So I dont mind it.

8f14c65968a8a3f6fab913.jpg
c2275071fe8035de6c9112.jpg


Let's go! :D
 
Last edited:

SexyTeli

Tele-Meister
Joined
Sep 22, 2021
Posts
126
Location
Vietnam
Day 1

I started with the scariest part: the neck finish. The original neck is sanded great. It feels smooth. But I sanded a little bit more with 220, 320 paper to make it even smoother. Then I cleaned it with Turpentine Oil and tack cloth.

c54963a4cc55070b5e4418.jpg


I have 3 options at the moment: 1) Danish Oil finish, 2) Tung oil finish and 3) stain it then apply Danish Oil / Tung Oil finish. The Danish oi and Tung Oil of mine are varnish, not the pure ones.

I tested all the options on the back of the neck at the neck pocket:
1. LEFT/RED: Danish Oil Finish
2. TOP RIGHT/BLACK: Stained Tung Oil (bright gold color)
3. BOTTOM RIGHT/BLUE: Stained Tung Oil with Pre-stain Wood Conditioner

25af98ca373bfc65a52a17.jpg


I have read that maple is prone to blotching. So I am a little bit scared.

As you see, the color of Danish Oil Finish and Stained Tung Oil Finish + Pre-stain Wood Conditioner is not that much different.

I have checked next to the body to confirm the similarity with my body color. I decided to go with a little bit hard way: apply Pre-stain wood conditioner -> Stain it with stain tung oil.

And this is the result of the 1st coat of Stain tung oil:

e74c00edae1c65423c0d16.jpg


I am quite happly with the result regarding my zero skill. The stain dried really quick and get tacky and blotching at some point. I was scared and quickly use a little bit of Turpentine oil to wipe. I fixed those points but the color is a little bit lighter than before.

It is ok for now. I am waiting for the first coat totally dry before the 2nd coat of stain.
 

Attachments

  • 25af98ca373bfc65a52a17.jpg
    25af98ca373bfc65a52a17.jpg
    154.7 KB · Views: 98

SexyTeli

Tele-Meister
Joined
Sep 22, 2021
Posts
126
Location
Vietnam
Late hour of Day 1

I applied second coat of stain. This is the final stain coat. After that I will go with Danish Oil Finish.

I am quite happy with the result.

16387884015358219805697061804962.jpg


I bring the stained neck to the raw body to see if the general color tone is matched. It matched quite good! Now I am really happy.

d1beeaf8d305185b4114.jpg


I will apply both stained Neck and raw Body with the same finish. Tomorrow I will start sanding the body, and apply Danish Oil Finish to the neck.
 
Last edited:

SexyTeli

Tele-Meister
Joined
Sep 22, 2021
Posts
126
Location
Vietnam
You might wait to begin until people here offer suggestions. It could save you time and less chance for mistakes.

Thank you for your suggestion. I will go slowly, slooowwwly to wait for help from everybody. There are still a lot of things which need helps on my 1st Tele project :D

Looking great and nice to see a good review for the current Allparts necks as I’ve just ordered one for my Strat build :)

Thank you. I dont know much about Allparts necks, however, fortunately, my AP neck TMO-C is superb. I think after I finish this, It can be comparable with my Wizard neck of my RGD2721z in terms of quality. They did great on sanding, every corner is smooth. The frets are tall fret and a little thinner than modern wide fret. But I love the look of those frets a lot. It looks really vintage with a modern twist.

You don't really want a snug fit on the neck and body before you apply the finish. And even after the finish is applied, having a little bit of movement is ok. It can make it easier to align everything when you attach The neck.

Thank you for calming my head. At first I am a little bit worried about it. It still fit really good but not the type of perfect fit so you can put the neck into the pocket and bring the guitar with the bare neck without screwing them.

I have prepared for the worst scenario, but luckily, it is good as current state.
 

SexyTeli

Tele-Meister
Joined
Sep 22, 2021
Posts
126
Location
Vietnam
DAY 2
I start again with the neck. I applied a lot of Danish Oil finish on the neck, wait for few minutes then I wipe off the excess with clean towel. The neck... smells good :D I do this project on terrace of my company office. The airflow is awesome. The weather is excellent with 21.3 C degrees and 50% humidity.

This is the result of the 1st coat of Danish oil finish:
35fb56cbab32606c39234.jpg

87aa59d4a42d6f73363c2.jpg


404df6500ba9c0f799b83.jpg


This is the test sample of mine before I commit my neck with Danish Oil finish. I love this finish on test sample, it feels really natural. I tested wipe on poly, polycrylic once and I hate the feel on those finishes.

3749810a7cf3b7adeee21.jpg


BODY
I started sanding the body with my random orbit sander. I bought it just for this project. It is a cheap sander Makita M9204B. On the first try, I started to like it.

I started with P120 grit and will switch to 220 then apply the same finish with the neck. I dont have 150 or 180 grit. I follow a tutorial on YouTube and the guy told that I just need 80-120-220.

I forgot to take the photo of the body after sanding, but it does not change the look from the raw photo above.
 

Quexoz

Tele-Meister
Joined
Feb 14, 2012
Posts
422
Location
USA
Those are some good looking parts! I think I am going to be very jealous soon...again.

That neck alone cost more than my whole guitar + all it's upgrades.
 

SexyTeli

Tele-Meister
Joined
Sep 22, 2021
Posts
126
Location
Vietnam
Those are some good looking parts! I think I am going to be very jealous soon...again.

That neck alone cost more than my whole guitar + all it's upgrades.

Thank you. I dont think that I have enough funding to have these parts again (or my wife will kill me) :D I have found some sources of EU imported Ash in my country. A wood workshop in my country quoted me 25$ for a CNCed Ash body (I found the CAD drawing of Tele body on TDPRI). Next project, I will try that body with some XGP neck or Allparts neck again. I dont think I can cut the cost on the neck because It is the most important part of a guitar.
 

Quexoz

Tele-Meister
Joined
Feb 14, 2012
Posts
422
Location
USA
I dont think I can cut the cost on the neck because It is the most important part of a guitar.

Yep. I'd settle for a body made of glued together 2x4s or plywood if it meant having a good "proper" neck! The body you got there looks really nice though. I hope you're going to leave that grain visible.
 

SexyTeli

Tele-Meister
Joined
Sep 22, 2021
Posts
126
Location
Vietnam
Yep. I'd settle for a body made of glued together 2x4s or plywood if it meant having a good "proper" neck! The body you got there looks really nice though. I hope you're going to leave that grain visible.

Thank you. I love my Tele body too. I will leave that grain visible, one of the reasons is I dont have any skill or equipment to do any other finish like painting or tinted lacquer... :D
 

SexyTeli

Tele-Meister
Joined
Sep 22, 2021
Posts
126
Location
Vietnam
Mid of Day 2

After lunch, I have more... energy, so I decided to sand the body a little bit more :D
I started with 120 grit. After sanding, the surface seems a little bit rough. It is clearly that they sanded to 150 or 180 already. So I fixed my mistake by go up to next grit I have in hand: 220. After sanding with 220, the surface is really smooth.

But, I made another mistake. I sanded the side of the body by my sander with 220. It left some small scratches on the side.

I am greedy, I took another P320 grit paper and sand by hand all the surfaces of the body. The front and back is silky smooth. I love the touch of raw wood. But, I cant erase the small scratches on the side. I took another P400 grit to sand the side, still not successful. I think that I will use my other 220 paper to sand the side to erase those scratch then come back to 400. Oh... I ran out of 320 and 400 :( Another 5 days before those grit deliver to me. :cry: Lession learnt hard way.

The current state of the body, it feels so good.

4edb97d3925659080047.jpg
 

Kiwi_Neil

Tele-Holic
Joined
Nov 8, 2016
Posts
524
Age
65
Location
New Zealand
Just my opinion, but....slow down.....there's no need to rush things. The finish will only be as good as the preparation, and if you don't take your time to make the prep work perfect, you will see the flaws in the finish, and you will be sad for ever! That's a really nice body and neck, it doesn't matter if it takes 5 days, 5 weeks or 5 months to to finish, just take your time, do each step perfectly and you will be happy with the end result. :)
 

SexyTeli

Tele-Meister
Joined
Sep 22, 2021
Posts
126
Location
Vietnam
Just my opinion, but....slow down.....there's no need to rush things. The finish will only be as good as the preparation, and if you don't take your time to make the prep work perfect, you will see the flaws in the finish, and you will be sad for ever! That's a really nice body and neck, it doesn't matter if it takes 5 days, 5 weeks or 5 months to to finish, just take your time, do each step perfectly and you will be happy with the end result. :)

Thank you. I am really appreciate your advice! I need more patience.
 

Quexoz

Tele-Meister
Joined
Feb 14, 2012
Posts
422
Location
USA
Something like this, maybe a bit lighter, more subtle bursting, but different pick guard?

I've seen another technique where they add a black die lightly all over it to make the grain pop, then sand it back, then do something like a light burst or whatever and it looked awesome.

The finish on these Schecters look really good. Is my tobacco/honey burst bias showing a little?

TB.jpg
 
Last edited:

Jim_in_PA

Friend of Leo's
Joined
May 31, 2019
Posts
4,996
Location
SE PA - Doylestown PA
I've seen another technique where they add a black die lightly all over it to make the grain pop, then sand it back, then do something like a light burst or whatever and it looked awesome

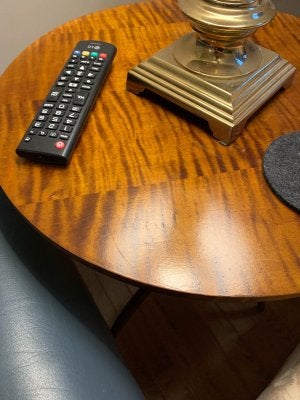
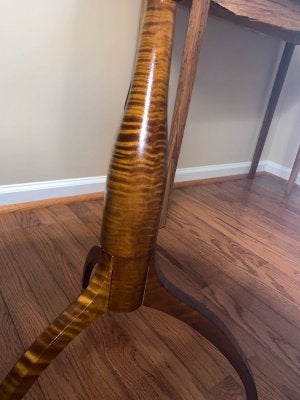
This is a common finishing technique with figured material including maple. Multiple applications of dye sanded back so it builds contrast in the more absorbent portions of the figure followed by the actual hue(s) for the intended finished look. It's a little hard to see on the center post, but this candle stand table was treated that way...tiger maple with multiple applications of darker dye to pop the figure and then the final hue. (This was actually a one day finish technique test of something that Jeff Jewitt, a finishing expert and as it turns out a guitar makers, published years ago. Water soluble dye as noted followed by BLO, shellac and waterborne top coats, all in one day. Crazy, but it worked really well.

IMG_0473.jpg IMG_0474.jpg
 

SexyTeli

Tele-Meister
Joined
Sep 22, 2021
Posts
126
Location
Vietnam
Something like this, maybe a bit lighter, more subtle bursting, but different pick guard?

I've seen another technique where they add a black die lightly all over it to make the grain pop, then sand it back, then do something like a light burst or whatever and it looked awesome.

The finish on these Schecters look really good. Is my tobacco/honey burst bias showing a little?

View attachment 926759

Man, that finish looks great! I wish I can have skill to do that :(
My pickguard is black. I have bought it from the beginning. But it is not important. I can change pickguard at any time so I can use black temporary if Black is not the best color for this project.


This is a common finishing technique with figured material including maple. Multiple applications of dye sanded back so it builds contrast in the more absorbent portions of the figure followed by the actual hue(s) for the intended finished look. It's a little hard to see on the center post, but this candle stand table was treated that way...tiger maple with multiple applications of darker dye to pop the figure and then the final hue. (This was actually a one day finish technique test of something that Jeff Jewitt, a finishing expert and as it turns out a guitar makers, published years ago. Water soluble dye as noted followed by BLO, shellac and waterborne top coats, all in one day. Crazy, but it worked really well.

View attachment 926845 View attachment 926846
One day is crazy for that beautiful finish @@
 

SexyTeli

Tele-Meister
Joined
Sep 22, 2021
Posts
126
Location
Vietnam
Day 3
I have lightly sanded the neck with 320 paper, applied second coat and 3rd coat of Danish oil. The colour does not changed much.
20211208_182253.jpg


For the body, I used 220 paper to aggressively sand the sides to erase the small scratches by sander yesterday. Luckily, after 30 minutes of sanding from 220 to 320, almost all the scratches are GOOONEE!! I can sleep tonight :D

I have applied Tung oil varnish (Bridge+Neck Pickup cavity) and Danish Oil Varnish (neck pocket) on the body to test the color. The color is very similar. My Tung oil varnish is this model: https://lco-usa.com/tung-oil-finish/

d23d935e24d1ef8fb6c01.jpg

d622d55162dea980f0cf2.jpg


The Tung Oil Varnish dried much faster than the Danish Oil Varnish, it resist water better but it also gum-up much faster when I applied on the test sample. That is the reason why I am a little bit scared to apply it on the neck. I think my Tung Oil Varnish is much similar to Tru-oil varnish.

And one thing I observed is that:
1. The roasted ash body absorb the oil like crazy!!! Right after I applied a light coat, the surface is almost dry already. It happens to both type of varnishes that I tested above
2. The color of the roasted ash darken considerably, much different to the test sample of mine with regular Ash piece (imported from Germany)

Please advice me: Should I go for Danish Oil Varnish or Tung Oil Varnish? My neck is already finishing with Danish oil varnish, should I go the same with Body?

Thank you!!!!!!!
 
Last edited:

Jim_in_PA

Friend of Leo's
Joined
May 31, 2019
Posts
4,996
Location
SE PA - Doylestown PA
One day is crazy for that beautiful finish
Agree...it was fine for this furniture piece, but I wouldn't do it for a guitar. I actually have not repeated it for furniture, either, but it has made me accelerate some steps from time to time since I knew it was possible.

-----

BTW, both the Danish oil and Tung Oil (presumably real tung oil...) you are using are relatively light in color and are not going to cause any major color shift from what you already have with the light ambering of the maple and ash. There will be some additional darkening with time from UV, etc., but not a major color shift. That would require adding coloring to the mix with dye, etc. If you choose to do that, you must use a dye that's soluble in oil...many of them are only water and/or alcohol soluble. But you could use wax free shellac as a toner with dye to get more darkening and then go back to the varnish (Danish oil) to seal things up and protect over time.
 

New Posts

Top