Routing a body, what's your protocol?

How do YOU route a guitar body?

  • Only handheld

  • Only on a table

  • Both, handheld and on a table

  • I built a cool rig

  • Ha! I only use a CNC machine!

  • All of the above


Results are only viewable after voting.

cborgman

TDPRI Member
Joined
Jan 5, 2017
Posts
63
Location
Boerne, TX
I've built a few bodies and still not very efficient at it, especially the routing part. I'm spending more time changing bits, rigs and taping templates than I am actually routing. So before I go off and buy more bits I might never use I wanted to get some feedback here from the more experienced craftsman.

What's your procedure for routing a body? Mostly the outer profile is what's got my head spinning.

Do you route from the top and take several passes, or on a table and kinda shave off the wood till you get to the template? Do you pre-cut the profile first or go at it the full block and use the remaining wood for router stabilization when going around the horn.

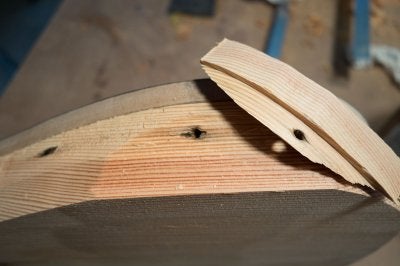
I built a rig to steady the router, works great but is a pain to change bits. In the photo I'm using it with a 2" bit as a planer.
router-rig.jpg

router-bit.jpg


I'm using only reclaimed/recovered/recycled wood and lumber and every body build is a little different so that's not very helpful when trying to be consistent and get as method going.

Would love to know how others are routing!

Thanks.
 

guitarbuilder

Telefied
Ad Free Member
Joined
Mar 30, 2003
Posts
26,731
Location
Ontario County
Before CNC:
The blank gets glued up and thicknessed to a hair oversize+ 1/32"
The pattern gets traced in pencil to locate shape, routs, and hole locations
The neck, pickup, and control routs are routed from the top to depth in 1/4" increments using the stewmac 1/2" pattern bit.
The body gets cut out to a hair outside the pencil line of the perimeter on a bandsaw.
The shape is sanded to the line with a spindle sander, belt sander, and sanding block. If you actually learn how to use the power tools and get a feel for how they operate, if you have the correct abrasive grit sizes, this is a piece of cake.
The edges get radiused on a router table with the specific roundover bit.
The body gets thickness sanded to 1-3/4" through an abrasive drum sander and lastly an orbital.

I have always used the stewmac bits for the routs with the exception of a 1" long pattern bit for the control cavity.

I gave up trying to rout the shape with a template. It produced tear out 99% of the time and it ended up being faster to sand to the line than it took to repair the tear out from the template. I also would avoid cutting in the wrong direction with a router bit to try and avoid it. Once you fling a neck or body across room or back into yourself...you learn that the woodworking " rules" are correct.

I would never again try to rout a body shape to a template these days unless I bought one of these super spiral bits:

'''https://www.whitesiderouterbits.com/collections/flush-trim-spiral-bits

If you read various build threads you'll see what I mean. Tear out happens more in this forum than it doesn't.


After CNC.

Pretty much the same except I have the cnc cut the perimeter as the first part of the program. Yes, it still gets tearout once in a while because I still use a 2 flute straight bit.

I usually avoid cutting into the spoil board, so I'll rout the last 1/8" off with a trim router to the perimeter that was previously cut.
It gets sanded and radiused.
 
Last edited:

adirondak5

Wood Hoarder Extraordinaire
Joined
Oct 24, 2009
Posts
8,913
Location
Long Island NY
Glue up blank
Thickness sand blank to 1/32 over
Trace body shape on blank
Cut out body shape on bandsaw as close to line as possible
Sand to line on spindle sander
Install body template and route body outline (by this point there is about 1/32" left to remove)
Hog out pockets and cavities on drill press install pocket and cavity template and finish route them


That's how I did bodies before CNC .
 
Last edited:

R. Stratenstein

Doctor of Teleocity
Ad Free Member
Joined
Aug 3, 2010
Posts
15,971
Location
Loganville, Ga.
I do it exactly the same way as adirondak5 described above. I also cut necks the same way.

Ditto. I would add that there is a lot of futzing about with different thickness router templates, and lengths, and diameters of pattern bits, to get the various body cavities the proper depth and corners of the routes the proper radius.

I would also add that especially for rescued wood, with differing end grain patterns and orientations, the Whiteside 2" spiral upcut pattern bit would be indispensable for routing the body outline. This bit must be used in a table, and I think most builders who use other bits use a table too.

It is extremely dangerous used improperly, but so are other practices, such as wearing gloves while using power tools. They provide no protection from the machine, and can pull your hand further into the tool, or in the case of a handheld router, pull the router more deeply into your hand, turning a serious injury into a catastrophic one.
 

cborgman

TDPRI Member
Joined
Jan 5, 2017
Posts
63
Location
Boerne, TX
I gave up trying to rout the shape with a template. It produced tear out 99% of the time and it ended up being faster to sand to the line than it took to repair the tear out from the template.
I would never again try to rout a body shape to a template these days unless I bought one of these super spiral bits:

'''https://www.whitesiderouterbits.com/collections/flush-trim-spiral-bits

If you read various build threads you'll see what I mean. Tear out happens more in this forum than it doesn't.

Tear out, mine have been like blow outs! In defense of the lumber, it's either 100+ years old (plus nail holes) or never intended to be part of a guitar.

One hollow body I built was 2 3/4" deep and routing that was an experience I don't want to repeat. Lately I've been thinking about cutting/sanding process but I kept telling myself, "no, that can't be right, that's why they made the pattern templates, they are for a router, not a pencil!" I'm so glad to learn that it's "OK". LOL

Geez, that 2" bit all the guitar builders seem to get (based on reviews) is expensive, $88; $30 more than my Skil router! Ha! Recently updated to a DeWalt variable speed.
 

Attachments

  • blow-out-old-wood.jpg
    blow-out-old-wood.jpg
    131.1 KB · Views: 439

adirondak5

Wood Hoarder Extraordinaire
Joined
Oct 24, 2009
Posts
8,913
Location
Long Island NY
Are you then routing from top or bottom? All in one go or do you still make reduced height passes?

I use a router table so I route from the bottom on the body perimeter , the pockets and cavities I route from the top with a handheld trim router , those I clean up in incremental passes . I use a spiral bit for the perimeter route and I do that in one pass , taking about 1/32" off and always feeding against the rotation of the bit .
 

cborgman

TDPRI Member
Joined
Jan 5, 2017
Posts
63
Location
Boerne, TX
...but so are other practices, such as wearing gloves while using power tools. They provide no protection from the machine, and can pull your hand further into the tool, or in the case of a handheld router, pull the router more deeply into your hand, turning a serious injury into a catastrophic one.

Hmm, didn't think about it like that, thanks for the comment! I almost always have to force myself to put them on to keep from getting splinters when handling the old wood. I really don't wear them much when using power tools, I think I did it because so many youtubers wear gloves when operating machinery. I thought, well, they got a channel on YouTube so they MUST know what their doing!
 

jvin248

Doctor of Teleocity
Joined
Apr 18, 2014
Posts
13,112
Location
Lions & Tigers oh Mi !
.
Here's the hand-built process I use:
-glue up the blank
-trace the template
-bandsaw close to the line (12inch Craftsman, many say you can't do a Tele on less than 14inch, technique is involved).
-clamp the blank and template to a table firmly, route half to 2/3rds that is free of the clamps.
-rotate the body and template, reclamp, and route the remainder.
-repeat the routing using the cut surface to trim the remainder.
-route the control cavity, pickup cavities, neck pocket changing the cutter depth height.
-spindle sand the outer shape to clean up.

I use the straight two-fluted bearing cutter from Home Depot and a Harbor Freight 2hp router, after my 30 year old Craftsman 1-1/2hp let its magic smoke out.

The trick for no tear-out is avoid knots in the perimeter when you can, and cut only in the direction where the cutter is laying down the fibers not lifting them up/out. With the Tele body facing up, left to right from the jack area into the knee rest, then right to left from the front horn to the knee rest.
Think about it like petting a dog, you want to pet in the direction the fur lays down. You want the router to cut the way the fir lays down too. The body is clamped tight and I hang onto the router tight.

These are some of the hand cut bodies I did this way.
TBodies_IMG_20170126_135815.jpg

The next run of builds I'm using the CNC I have been working with, but it's been a slow process so far.

.
 

BorderRadio

Doctor of Teleocity
Joined
Apr 2, 2014
Posts
12,422
Age
45
Location
Phoenix, AZ
Here to learn, just noting that the first time I used a 2" inch Whiteside spiral bit I jammed the test block into my hand and chewed up the practice wood. Immediately after I questioned my ability as a woodworker and my choices toward enjoying a long life. After reading up again, I lowered my speed and went at it again. Carved like butter and no tear out but I still get the heebie jeebs.
 

nosmo

Friend of Leo's
Joined
Jan 31, 2012
Posts
4,582
Location
Lake Jackson, TX
Speed has more to do with the diameter of the bit. If you run a smaller dia bit too slowly, it's more likely to chatter & grab. (Not so much a spiral bit.) Big bits can come apart if you run them too fast.

Either way, minimum material removal is the key.

Edit: Just to be clear - I was referring to the OP's 2" dia planer bit in my first post.
 

Artslap

Tele-Afflicted
Joined
Mar 17, 2014
Posts
1,078
Age
57
Location
Sydney, Australia
A router is a brutal machine.

I use a table router with the assumption that the sharp thing is strapped into the table and can't get me if I keep clear.

+1 for nosmo's tip.

Multiple passes, taking off a little material as possible with each pass.
 

trev333

Telefied
Ad Free Member
Joined
Dec 3, 2009
Posts
35,767
Location
Coolum Beach,Australia
I sand to the outside line with a ROSS.... rout the pockets with a trim router....

On my big router I use the 1/2" round over bit, the trimmer for any smaller round overs........
 

cborgman

TDPRI Member
Joined
Jan 5, 2017
Posts
63
Location
Boerne, TX
Watch the RPM's with that 2" bit.

RPMs, yeah, I thought about that later, that's why I bought a variable speed router. But at the time I was swinging that large piece a metal at full 25,000 rpms on the fix speed Skil! Actually no problems at all, no crazy vibrations etc... But I won't do it again!
 

2blue2

Friend of Leo's
Joined
Jul 20, 2013
Posts
2,993
Location
Island of Oahu
I'm still doing it down and dirty backyard style. I'm routing with templates by hand because I don't have a router table. I'm very careful with router directions, about amount removed with each pass(sneak up on the line), and how hot its getting. Will be buying a Ross or a robosander soon. I do a lot by hand. Big router bits scare me.

I have more ambition than tools.
 

cborgman

TDPRI Member
Joined
Jan 5, 2017
Posts
63
Location
Boerne, TX
I'm still doing it down and dirty backyard style. I'm routing with templates by hand because I don't have a router table. I'm very careful with router directions, about amount removed with each pass(sneak up on the line), and how hot its getting. Will be buying a Ross or a robosander soon. I do a lot by hand. Big router bits scare me.

I have more ambition than tools.

I'm in my garage, but still feels very down and dirty most of the time. I got this: https://goo.gl/MGVJwy paid a little more, $104 but well worth it... especially now that so many people are talking about "sanding to the line." I'm excited again!

All you need for a router table is a solid table (build one) and 3/4" good plywood or MDF. I made a hole in my work bench then mounted the router to the plywood so it hangs upside down. Now mount your new "router table" to the existing table, should have a big hole in it now, big enough to drop the router through it. Put in your biggest bit and "drill" through the top. Or, get your biggest Forstner drill bit and make a hole. Easy and about free. When mounted mine feels really solid, but I'm sure a real table has better mounting.

See this:
 
Last edited:

cborgman

TDPRI Member
Joined
Jan 5, 2017
Posts
63
Location
Boerne, TX
A router is a brutal machine.

I use a table router with the assumption that the sharp thing is strapped into the table and can't get me if I keep clear.

+1 for nosmo's tip.

Multiple passes, taking off a little material as possible with each pass.

Are you using a pattern bit the full width/depth on the body, like a 2"? I seen some videos of guys using a bottom bearing bit in a table so the bearing (and your template) would be face down, and the blades of the bit are sticking straight up! Just looked so dangerous.
 

Artslap

Tele-Afflicted
Joined
Mar 17, 2014
Posts
1,078
Age
57
Location
Sydney, Australia
I've got both. 2" with bearings either on top or the bottom.

Horses for courses.

Both are fine, but it's like any tool. Follow the instructions and use with caution.

Cp.
 
Top