Router Table Size?

  • Thread starter MM73
  • Start date
  • This site may earn a commission from merchant affiliate links like Ebay, Amazon, and others.

MM73

Tele-Afflicted
Joined
Feb 24, 2015
Posts
1,762
Age
52
Location
South Lyon, MI
Anyone have a suggestion regarding table top size that seems to work for routing guitar bodies?

I have a need to modify an existing router table to accomodate a big 'ol bit. The current table is a beginner table from Craftsman. Its just barely big enough to work with guitar bodies if I constantly focus on not letting it tip (while mostly focusing on keeping the sharp spinny thing away from my soft fleshy things).

Anyway, I'm kinda considering this as an opportunity to upgrade the entire table - make something with a larger table top so guitar bodies can't tip off the edge, add router plates, and maybe even include a lift and some storage.

Plans seem plentiful online, but I'll gladly accept any advice on overall plans that can be offered.
 

adirondak5

Wood Hoarder Extraordinaire
Joined
Oct 24, 2009
Posts
8,913
Location
Long Island NY
Mark , my router table is 24" x 32" , its not home made its a Woodpecker's table , its plenty big enough for bodies I wouldn't want to go any smaller if I were making one , not to say that a smaller size wouldn't work . I saw your post where you need to enlarge the hole for that 7/8" round over bit . If I were to make a table I would probably double up 3/4" MDF and laminate the top and sides with Formica or equivalent . I would definitely look into a router plate inset into the table or a lift , most come with changeable rings for larger and smaller bit diameters and usually provide for a solid mount up of the router , also if you do look at plates and are thinking of a lift down the road make sure the plate and lift plate are the same dimensions . My old Grizzly router table had a weird size plate that was pretty much incompatible with any of the popular lift plates when I went to a router lift so I ended up getting a new table .
 

BorderRadio

Doctor of Teleocity
Joined
Apr 2, 2014
Posts
12,422
Age
45
Location
Phoenix, AZ
I'm using an older Rockler table, with a blue aluminum plate. It's 24" x 32" laminated 1-1/8" MDF and it works for a body. I plan on building a solid stand w/ storage but by then this thing will probably sag and be ready for the trash heap. So I keep it stored on its side and keep the plate and lift stored flat with no router. I use this for now, as a stand. Actually, I have a couple of these plus a traditional wood bench. I routed a hole to fit the motor and leveling screws, and clamp it down if needed:

http://www.homedepot.com/p/Signature-Development-72-in-Fold-Out-Wood-Workbench-WKBNCH72X22/203083493

bench.jpg
 

R. Stratenstein

Doctor of Teleocity
Ad Free Member
Joined
Aug 3, 2010
Posts
15,971
Location
Loganville, Ga.
My ho-made router table is 24" X 36", maybe a wee bit too big, but I think a good rule of thumb is to allow for the length of 75% or so of the body on each side of the bit. So using a rule of thumb length (Strat) at about 18", that's . . .umm, , , wait a minute, umm, got to take off my other shoe to count. . aha 13.5 inches, so rounding up to 14, that would be 28" at least, so the commercial one that Marty and Border Radio have sounds good at 32". Plenty of body (and don't forget neck, too) support.

I am wanting to make an improved, mobile, permanent router table, so your question is very timely, and induced me to do some figuring I'd have needed to do eventually. My router table is currently "portable" and I clamp it to my table saw top, but it's a giant PITA.
 

Davecam48

Poster Extraordinaire
Joined
Dec 31, 2009
Posts
5,149
Age
77
Location
Queensland Australia
My home made router table is about 3' x 2' and the top is a sheet of thick form ply (black side up for slip) and has north/south and east/west T-track built in on top of a small office desk steel frame. If there is a place nearby selling 2nd hand office furniture get a steel framed desk and build on that. All my "stuff" is built the same way and are all on lockable casters so I can shift them out to the roller door where there is some natural light.

DC
Router table.jpg
 

jvin248

Doctor of Teleocity
Joined
Apr 18, 2014
Posts
13,112
Location
Lions & Tigers oh Mi !
.

Not where I can grab the links for you atm, but here are two to look at:

Ron Paulk 'ultimate workstation' or 'ultimate workbench'. He has this portable workbench out of plywood that is pretty smart. It includes a drop in router plate so you effectively get a 4x8 router table. Maybe you don't use the whole plans but see what's in there for the router.

Crimson Guitar's review of the Triton router and workbench (it's probably Triton too). Ben Crowe goes through some features on that table that are useful to consider.

Look up Ikea options for any formica topped panels, they might have something just about the size you want that you only need to cut down and drill some holes.

I used half inch scrap plywood and cut top and sides to glue and screw into a box where I mounted an old router (so I didn't need to change it out all the time) and used that for a while. I have one of those Ryobi mini router benches I traded a guy a starter guitar for, that I will rework into my rolling workbench (table saw, flip up bandsaw, router, maybe flip up scroll saw) that is 4x8. Not done building other than the table saw is in it with the full wings on that I haven't used in a long time, mostly getting by with a single wing so it's nice to have the full width again. Do youtube search on rolling bench and you'll get some more ideas.

The fast way to the well may be the scrap plywood from another project or home depot handy panels in the 2x2 plywood size with a similar handy panel of 1/8in hardboard to top it for sliding. Leave an inch rim overhanging your box top so you can clamp down a board for any fence needs. Window in the back of the box to change tools, open bottom for dust to fall out. I needed special thread screws for my router box (countersunk in the table top) to mount the router.

.
 

fabricator

Tele-Meister
Joined
Jun 29, 2012
Posts
403
Location
Texas
I'm in the middle of rebuilding my router table right now. I'm going with the same dimensions: 24" x 48" and about 1/4" shorter than my table saw (it doubles as an outfeed table). The router is situated where the bit has roughly 12" of table on 3 sides and 36" on the 4th side. Since I also use it for other purposes, I wanted it to be perfectly flat and slick. The top is framed with 4x4 pine (planed perfectly flat on the top and inside), and covered with three layers of 3/4" MDF and a Formica top. I checked it with a 48" machinist straightedge, and it's as flat/straight as could be.

It's very similar to my last router table (which was still very flat after 15 years of use), except this one has a better router & lift (Porter Cable & Jessem). I also plan to add some drawers underneath for storage, and I'm re-using the old base & casters.

The 4x4 frame, besides adding stability, also gives more surface area for clamps. I also plan to get some veneer press clamps (that I can temporarily bolt to the table - see photo) for gluing up tops on guitar bodies. My previous method was to clamp around the sides and set a couple 50lb. dumbbells on the center of the top (think LP top, not acoustic).

IMG_6951.JPG
 

Deneb

Tele-Afflicted
Joined
Feb 16, 2011
Posts
1,646
Location
Ukraine, Dnipro
My home made router table is about 3' x 2' and the top is a sheet of thick form ply (black side up for slip) and has north/south and east/west T-track built in on top of a small office desk steel frame. If there is a place nearby selling 2nd hand office furniture get a steel framed desk and build on that. All my "stuff" is built the same way and are all on lockable casters so I can shift them out to the roller door where there is some natural light.

DCView attachment 445734
Dave I really liked your router table.:cool: Simple and functional the lifting mechanism.
1.jpg
 

John Nicholas

Friend of Leo's
Joined
Jun 26, 2014
Posts
2,856
Location
Poughkeepsie, NY
Mark,

I was in the same position as you. What I ended up doing was buying this from Grizzly..

http://www.grizzly.com/products/Rou...432?utm_campaign=zPage&utm_source=grizzly.com

The only real downside is that the phenolic base plate flexes and from what others have said the plate size is not standard.

It works well and is far better then the home made one that it replaced.

Even when I purchased this Grizzly, there was a better idea in mind. I found this plan a while back. I will definitely be building it, just wanted to get more experience so the planning stages will bring me closer to my ideal workstation.

http://www.crestonwood.com/plans.php

You can download the plans from the link above.

Some changes will be required for guitar building. For instance the router bit drawers are not ideal for the Whiteside 2 inch spiral bit. If I built it before using this bit, the table would not hold the bit in the drawers designed for bits. That kind of stuff bugs me...

The bits and pieces required for the Creston table have slowing been showing up in my garage!!
 

guitarbuilder

Telefied
Ad Free Member
Joined
Mar 30, 2003
Posts
26,731
Location
Ontario County
I modified the grizzly table with a router lift and it makes it pretty good. I was really disappointed with the quality of the griz... but in retrospect the affordable import stuff is only so-so..and I shouldn't have expected so much I guess.

My bench dog router table is a step up from the Grizz but it's too small.

Looking back, the best table I had was made from a plan in woodworker's journal. It consisted of two layers of plywood with a Masonite top. The fence ran along the length and was movable up and down. It was about 2'x 3' IIRC. It was simple and did the job.


router table.png


Here's a few more:


https://morningchores.com/router-table-plans/
 
Last edited:

NotAnotherHobby

Tele-Afflicted
Joined
Oct 27, 2015
Posts
1,594
Location
Da' Magic Mittin'
Anyone have a suggestion regarding table top size that seems to work for routing guitar bodies?

I have a need to modify an existing router table to accomodate a big 'ol bit. The current table is a beginner table from Craftsman. Its just barely big enough to work with guitar bodies if I constantly focus on not letting it tip (while mostly focusing on keeping the sharp spinny thing away from my soft fleshy things).

Anyway, I'm kinda considering this as an opportunity to upgrade the entire table - make something with a larger table top so guitar bodies can't tip off the edge, add router plates, and maybe even include a lift and some storage.

Plans seem plentiful online, but I'll gladly accept any advice on overall plans that can be offered.


I made mine something like 20" by 30". Lots of support. Very easy to move a body or a neck around when you've got about 12" of surface beneath the work piece.

You *could* go with a smaller table size, and move the router back on the table so more of the body rests on the table.

And yeah, I got one of those Craftsman tables. Hence the reason I threw one together.

It doesn't take much to make your own. That being said, next time I make one, I'll probably use 1 x 4 or 2 x 4 for bracing underneath, and use a 1/2" or 3/4" plywood top as opposed to laminating two pieces of something together. Drill a hole where you want the bit to come through, and bolt the router to the underside of the board.
 

Vizcaster

Poster Extraordinaire
Joined
Sep 15, 2007
Posts
5,340
Location
Glen Head, NY
Will you want or need a fence on the router table? That makes a big difference in the size you need and how you position the router.

I probably do more router table work using a fence, whether it's making molding or cutting mortises for furniture. So I need a bit of room in the back of the table for the fence and a dust-collection box behind the bit. That means my insert winds up in the middle of the top.

If you don't picture yourself using a fence, and the majority of your work will be with a template, then you can cheat the insert opening towards the back of the router table top. Without a fence, however, I strongly suggest the use of a starter pin. You rest the workpiece against the starter pin and gently swivel it into place against the spinning bit.
 

Vizcaster

Poster Extraordinaire
Joined
Sep 15, 2007
Posts
5,340
Location
Glen Head, NY
A miter gauge slot is also helpful if you ever do cope-and-stick joinery for five-piece cabinet doors (or really any time you rout a profile across the the end of a board), and of course that means you need enough space for the miter gauge (or coping jig) to ride across in front of the bit.
 

fabricator

Tele-Meister
Joined
Jun 29, 2012
Posts
403
Location
Texas
Got mine back together the other day. When I get time, I'm closing in the space around the router (it'll have a door and dust collection port). I'm also adding drawers underneath and installing t-slots for fence and miter (although I rarely have news of them).

The top is super thick & stable, and perfectly flat.
IMG_6974.JPG
IMG_6974.JPG


It doesn't look like much at the moment, but it works great!
 

MM73

Tele-Afflicted
Joined
Feb 24, 2015
Posts
1,762
Age
52
Location
South Lyon, MI
Well, in browsing router threads, I found the one I started.

I’ll just finish my router table here, and save my jointer thread for actual jointer discussion.

I finally had one more occasion where I needed to drill straight holes further into a piece than my drill press can reach.
So I bought one of those doo-hickeys that converts your hand held drill into a mini press.

61CF2C38-4EF4-4FA4-B882-D65241A3E042.jpeg

It worked great.

Just need to cut the rabbet, and then I can start using this table.

I’ll noodle on fences and locating a miter slot.
 

Mat UK

Tele-Afflicted
Joined
Feb 17, 2009
Posts
1,702
Location
London, UK
Well, in browsing router threads, I found the one I started.

I’ll just finish my router table here, and save my jointer thread for actual jointer discussion.

I finally had one more occasion where I needed to drill straight holes further into a piece than my drill press can reach.
So I bought one of those doo-hickeys that converts your hand held drill into a mini press.

View attachment 523436

It worked great.

Just need to cut the rabbet, and then I can start using this table.

I’ll noodle on fences and locating a miter slot.

I hope your wife doesn’t find out you’re doing guitar related stuff again... haven’t you got a wall to paint or something? ;-)
 

MM73

Tele-Afflicted
Joined
Feb 24, 2015
Posts
1,762
Age
52
Location
South Lyon, MI
I hope your wife doesn’t find out you’re doing guitar related stuff again... haven’t you got a wall to paint or something? ;-)

Oh man, are you my neighbor?

I have a horrendous mess in the entry hall where the built in bench was going to be!!!

Oh well, it’s summer building season now.

I’ll get back to that indoor project in November :rolleyes:
 

Mat UK

Tele-Afflicted
Joined
Feb 17, 2009
Posts
1,702
Location
London, UK
Oh man, are you my neighbor?

I have a horrendous mess in the entry hall where the built in bench was going to be!!!

Oh well, it’s summer building season now.

I’ll get back to that indoor project in November :rolleyes:

Ha, maybe a World Wide Web neighbour.

I remember you saying after your last build how your wife had banned you from guitar projects... it struck a chord with me (pardon the pun)! I have a body and neck in my spare room gathering dust and a perpetual list of house jobs I’m working my way through!

Glad to hear your back on it!
 

MM73

Tele-Afflicted
Joined
Feb 24, 2015
Posts
1,762
Age
52
Location
South Lyon, MI
Ha, maybe a World Wide Web neighbour.

I remember you saying after your last build how your wife had banned you from guitar projects... it struck a chord with me (pardon the pun)! I have a body and neck in my spare room gathering dust and a perpetual list of house jobs I’m working my way through!

Glad to hear your back on it!

I was kinda banned...then I think everyone forgot about it.
A router table isn’t shaped like a guitar, so it flew under the radar till it was too late!

Got my Detroit ride in this morning, then had some time in the shop : )

BA037E29-6E1B-4B20-B9F2-0042923387B7.jpeg
Scott Fountain on Belle Island.

468BCD73-F143-4BB0-833A-A06DD0EFB51C.jpeg
Magnum, Axel, and Robocop together like they should be.

59DE59BF-A63D-42D9-AEFA-ADF2C5FD327C.jpeg
Setup was good, but execution was rather poor - glad I picked up a leveling kit.

8CDC2CA3-4C5D-4E66-A264-A9570AE6FB29.jpeg
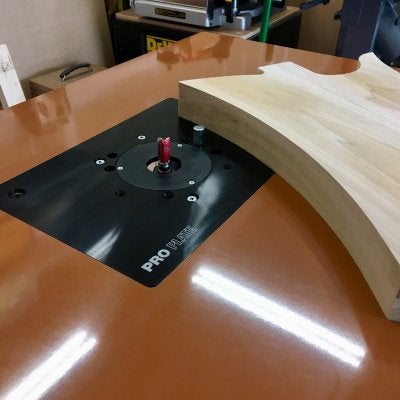
“Finished” table thanks to donor hardware from the scrap table.
Miter slot and fence will come later.

D6B3F131-20AC-4AA0-9428-B46EBE0FA70B.jpeg
Now where did I put the Tigre?
Flat enough for me :)
 

Attachments

  • 7666236A-6ADB-405F-9A85-09C4F0DEDDF9.jpeg
    7666236A-6ADB-405F-9A85-09C4F0DEDDF9.jpeg
    193.4 KB · Views: 98
Top