DjangoRobinson3
TDPRI Member
Hi. I recently found these parts from my old bandsaw. I was wondering if they would be suitable for making a pickup Winder, also what do I need to take into account when making it? 

 www.tdpri.com
 www.instructables.com
 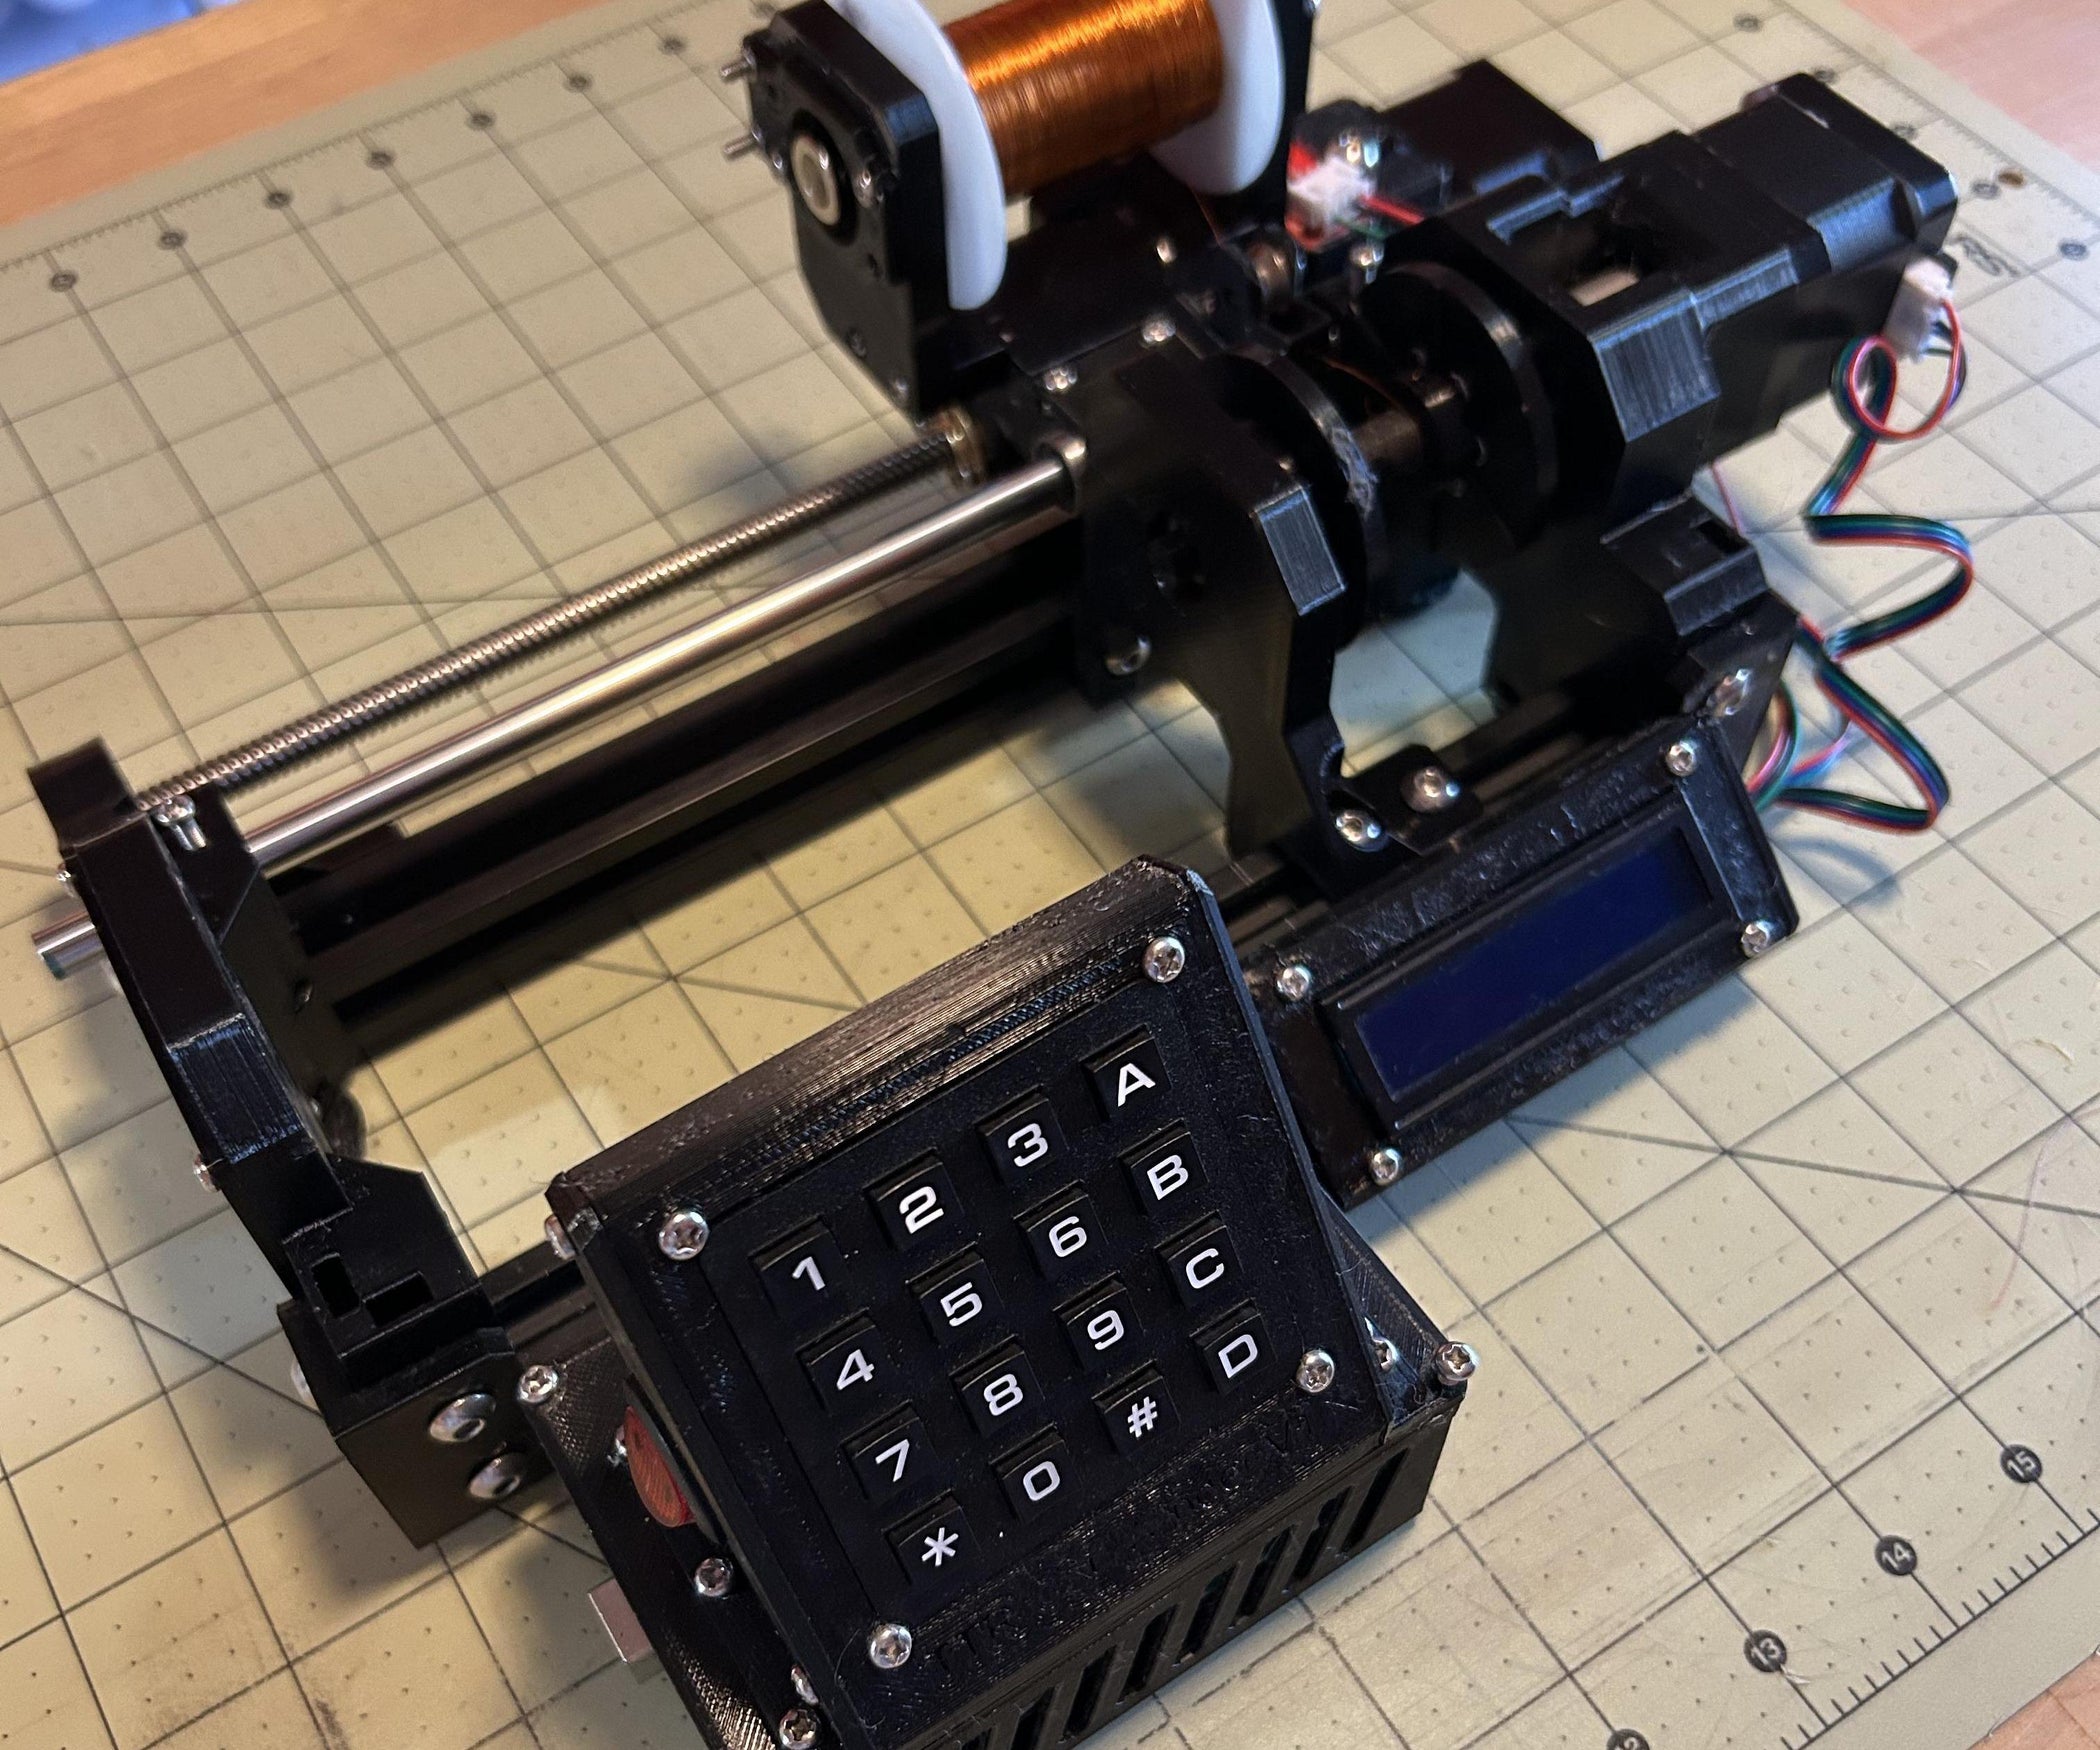 www.instructables.com
 Maybe a bit to advanced for me I think. Just want something a bit more basic.DIY Coil Winder
DIY Coil Winder: Coil winders can be a time saving tool to have in your arsenal, whether it be radio coils, power supply chokes, Tesla coils, or electromagnets a coil winder can save you hours of time and lots of headaches. The coil winder that I have designed can b…


Absolutely, im actually going to use the spindle from my cnc. Id also like to be able to change winding patterns and tension. All help welcome.From your picture, it looks like you already have a variable-speed motor and some sort of a control box with off/on switches and a knob for controlling the speed.
Making a winder from that stuff could be as simple as rigging some sort of a motor mount to secure the motor, and getting or making a hub for the motor's shaft which would allow you to mount some sort of plate to it so you can secure a pickup bobbin to it.
You want to have accurate speed control over the motor, where you can take the motor down to a complete stop, and then gradually bring the motor up to a winding speed that you are comfortable with.
I've built several winders, and I usually use one of these gizmos to mount a pickup winding platten or baseplate to the motors shaft
Like these -
3.15mm-14mm Rigid Flange Coupling Motor Guide Shaft Coupler Connector | eBay
Brass Ball Valve Inline Hose Barb Water/Air Gas Fuel Line Shut-off. 1M Sandpaper Cloth Roll Abrasive Sanding Roll 60-1000 Grit. 304 Stainless steel Stainless Steel Ball 8mm 10mm 12mm 14mm. 50-300Amp Waterproof Car Circuit Breaker Fuse Reset for Boat Auto DC 12V-48V.www.ebay.com
Those ^^^ are for metric sized motor shafts, if your shaft is a fractional size, you'd need a correspondingly sized coupling.
You'd need to measure the motors shaft diameter very closely and get a coupling with a diameter sized to fit it.
The flanged motor coupling mounts to the motor's shaft with set-screws, and the holes in the flange allow you to mount a plate to it with machine screws.
It doesn't take much to get started with pickup winding.
I'd be happy to post up some pictures if you'd like to see the details of how to make up a platten that will work for mounting single-coil flatwork, like for a Tele or Strat or a P-90 - or for mounting bobbins for humbuckers.
.
Absolutely, im actually going to use the spindle from my cnc. Id also like to be able to change winding patterns and tension. All help welcome.
Absolutely. I'm not expecting any overnight results. It will be an experimentation all the way.Just my own 2cents...learn how to wind a working pickup before you start to get fancy with them.
I am also interested in winding my own, but the wires are so thin, I dunno. Maybe there's a trick or two (there always is) but those wires are so wicked thin ... gives me pause.Hi. I recently found these parts from my old bandsaw. I was wondering if they would be suitable for making a pickup Winder, also what do I need to take into account when making it?View attachment 1352549
I am also interested in winding my own, but the wires are so thin, I dunno. Maybe there's a trick or two (there always is) but those wires are so wicked thin ... gives me pause.


") .
.Do you know anything about these "magnetic tension" guides?Good point -
The mechanical aspects of winding are pretty easy to master, but it took me some practice to learn how to handle the coil wire - it definitely takes a light touch to handle the fine wire without breaking it.
Like any other operation involving hand/eye coordination and the sense of touch, the only way to learn is to jump in and actually do it.
Yes, the wire is fine and fragile, but your brain and fingers will figure out how to handle it.
I started out like most beginning winders by hand-guiding the coil wire as I wound a coil and using finger pressure to control the wire tension, but as I've gotten older, I've developed a neurological condition, and my hands aren't as steady as they used to be.
So, I began using a hand-held tensioning tool - the one I built and use is similar to the one MojoTone used to sell - it provides tension by running the coil wire through two felt pads mounted so that the pressure of the pads can be adjusted.
I still use a version of that tool with the felt pads, although I know of other winders who use velcro instead of felt to apply the tension.
View attachment 1354579
The wire enters the tensioner by coming up from the bottom and through one of the holes on the right of the pic - then it lays over the slippery white nylon piece, and then is threaded between the two felt pads - and then finally, it threads through the copper nozzle (to the left in the pic) at the front of the gizmo.
View attachment 1354581
Pretty much, all of the parts are available from a hardware store.
I made the tensioner from a piece of 5/8" X 5/8" aluminum angle, 3/4" X 3/4" would work just as well.
I epoxied a threaded T-nut into a hole in the side of the angle to provide a mount for the tensioning screw - I used 10-32 thread for them.
The white roller-looking thing is just a piece of the white (or black) nylon tube that we use for stand-offs.
The felt pads are cut from a piece of the heavy felt padding sold for use as protective pads underneath things you don't want scratch-up a finished surface.
The "nozzle" is simply a MIG welding tip - they have a very smooth wire path that doesn't damage the coating on coil wire - they usually have the end threaded with 1/4" X 28tpi threads, so you can either tap the aluminum with 1/4 X 28 threads or just use a 1/4 X 28 fine-thread nut to secure it.
You can also use a tip from a hypodermic needle for the "nozzle".
Some folks put a handle on their tensioning tool, but I found it easier to use by just holding it with my fingers with the coil wire feeding up from a spool either sitting in my lap or setting on the floor.
I usually keep my coil wire in plastic containers - they are easy to handle and store, and also protect the wire from getting beat-up.
View attachment 1354609
View attachment 1354611
As long as the coil wire can spool off without any interference - you're good.
It's not necessary for the spool to rotate as the wire spools off - the spool can remain stationary while the wire spools off - the slight twisting effect this has on the wire doesn't affect the wind.
So - how much tension is applied to the coil wire ???
I can't tell you in a simple, quantified, answer, although I believe the more sophisticated tensioning devices that are sold for this purpose measure their tension in grams.
With these simple tensioning devices, or if you use your fingers to apply tension, you just have to experiment a bit to discover the proper winding tension.
If you don't apply enough tension, your coil will be loose and sloppy.
Too much tension can actually spread the walls of a bobbin and distort it, or, of course, simply break the coil wire.
You just have to jump in and do it - you will find the right tension
Something that might be helpful to learning, is to pick up a spool or two of regular old fine sewing thread, and using it to wind a practice coil or two.
Unless you find some exceptionally fine sewing thread, sewing thread is going to be quite a bit stronger than 42awg or 43awg coil wire.
This will allow you to get a feel for your handwork and some practice at laying down even layers on your coil without worrying about breaking coil wire.
Don't be discouraged if you mess up winding a pickup coil - I messed up plenty while learning
You can cut the coil wire off of a bobbin or flatwork by working the tip of an Exacto-knife under the wire and cutting it loose, and thereby save the bobbin or flatwork for another go
.
Do you know anything about these "magnetic tension" guides?
Agreed. It would be easier to use the double pad technique if I had a way to Travers it from side to side.thanksSorry, but I have no experience with the magnetic tensioners.
I did check them out a while back, but they seem sort of complicated to do what is a fairly simple operation - you just need a way to put even and consistent tension on the coil wire.
The "magnetic tension" gizmos look like they would be more useful for a commercial operation where lots of coils are being wound.
Friction from a thumb and a finger can work pretty darn good if your hands are nice and steady.
I think most of us small-time and hobby pickup winders use simple tools that replicate the action of applying friction with a thumb and finger.
With any method of tensioning, ya still have to have a way to traverse the wire - to lay it down in layers across the width of the coil.
I've been experimenting with a couple of different ways to mechanically traverse coil wire controlled by an Arduino micro-controller, but right now, I'm still hand guiding it.
Winding pickups becomes so interesting when you are doing it yourself - but I think it's best to start out simple, and first wind a couple and play them - and then see where you might want to go with it.
.
That's ^^^ what I use myself.
Small 12v or 24v DC motors - good small DC variable speed controls with a forward and reverse switch already wired into them are cheap too.
One thing you do want is a decent counter and sensor that will accurately count at your highest anticipated winding speed.
Some of the cheap counters that use a small magnet and sensor will only count accurately up to maybe 500 rpms, if that.
.is this what counts the number of turns on the bobbin?
