one piece flamed maple neck with 2 way truss rod

  • Thread starter asax
  • Start date
  • This site may earn a commission from merchant affiliate links like Ebay, Amazon, and others.

asax

TDPRI Member
Joined
Dec 16, 2014
Posts
78
Location
ny
I decided to attempt a one piece flamed maple tele neck with a two way truss rod.
I had two pieces of quartersawn flamed maple and decided to use the plainer one for my first attempt.
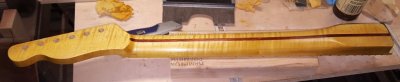
here are the results:
20160930_223638.jpg


The truss rod is a stew mac low profile truss rod installed from the back with a bloodwood skunk stripe over it. Adjustment is from the heel end. Medium jumbo frets, bone nut, and gfs vintage style tuners.
 

asax

TDPRI Member
Joined
Dec 16, 2014
Posts
78
Location
ny
Starting material was a board from ebay and a pattern from the web.
20160526_180317.jpg


traced the outline, and then used a straight edge and bearing bit to make the bottom edge of the blank parallel to the center line. The parallel edge was used to sit against the fret slot miter box so that the fret slots would be perpendicular to the midline
20160616_201755.jpg
 

asax

TDPRI Member
Joined
Dec 16, 2014
Posts
78
Location
ny
the miter box has piece of a hacksaw blade with the teeth ground off sitting in a slot in the bottom.
20160622_144653.jpg


This thin strip of metal registers in the slots of a maple fretboard bought from stew mack.
The maple fret board is double stick taped to the bottom of my blank.
20160622_144617.jpg


For each slot I just slide the blank up to the next slot of the template underneath.
20160622_144338.jpg
 

asax

TDPRI Member
Joined
Dec 16, 2014
Posts
78
Location
ny
All the slots cut, then band sawed rest of neck.
The straight sides were fine tuned with a straight edge double stick taped to neck and a bearing bit on the router table.
The curves on the headstock were finished on the oscillating spindle sander, not the router table. I was afraid of tearout.
20160623_205057.jpg
 

asax

TDPRI Member
Joined
Dec 16, 2014
Posts
78
Location
ny
The 22nd fretboard overhang was cut with a handsaw. The rounded contour of the neck heel was done with files. I could have routed to a template but I was afraid of tearout.
20160624_134359.jpg
 

asax

TDPRI Member
Joined
Dec 16, 2014
Posts
78
Location
ny
The stewmac low profile 2 way trussrod was laid out, and marked onto the the back of the neck
20160630_125444.jpg


My truss rod jig has a 1/4 inch slot for a straight 2 fluted router bit.
The back edge of the jig rides on a straight edge clamped to my router table
The neck is clamped to the jig so that the slot is centered on the center line of the neck. This picture is from my strat neck build

20160914_155245.jpg


The slot runs off the heel end but stops just short of the head stock.
A board clamped to the headstock end of the jig stopped the jig by contacting the right side of the router table at the end of each pass
20160630_145237.jpg

The slot was cut in multiple passes.
 

asax

TDPRI Member
Joined
Dec 16, 2014
Posts
78
Location
ny
A skunk stripe was bandsawn then sanded to final thickness with a fence clamped to the spindle sander.
20160630_190927.jpg

the fence was tapped over by just a a hair for several passes until the strip would just fit into the slot.
rounding the radius at the end was done easily and suprisingly accurately with sandpaper. no router and no jigs.
20160630_191505.jpg

20160630_191612.jpg


20160630_191702.jpg

a couple minutes with a blockplane leveled things nicely.
Next step is reaming the heal end of the slot for end of the trussrod.
 

RickyRicardo

Friend of Leo's
Joined
Mar 27, 2012
Posts
4,192
Location
Calgary, Alberta
How deep is the channel? I usually go 13/16 with a two way rod otherwise you run the risk of popping out the skunk stripe when you adjust the truss rod. That also depends how much you take off the back for the contour at the first and second frets. To be safe I always soak the skunk stripe with CA after it's in and before finishing. I did have one pop out on me recently and that's because I went 3/4" deep and the contour was pretty narrow (.82 - .83) at the first fret.

I looked at the rod on StewMac's site and they say a 3/8 deep channel but that would be for a two piece neck. Most two way rods you buy are that height - at least the ones I buy off of eBay are. Some have suggested that the two way rods are only meant for two piece necks and I've used them mostly successfully for both.
 

asax

TDPRI Member
Joined
Dec 16, 2014
Posts
78
Location
ny
Pic is kind of dark to see stripes.
This piece has a very subtle flame. I used it as a practice run for a really nice piece I didnt want to mess up.
this picture shows the really flamed piece I was practicing for:

(link removed) (link removed)
How deep is the channel? I usually go 13/16 with a two way rod otherwise you run the risk of popping out the skunk stripe when you adjust the truss rod. That also depends how much you take off the back for the contour at the first and second frets. To be safe I always soak the skunk stripe with CA after it's in and before finishing. I did have one pop out on me recently and that's because I went 3/4" deep and the contour was pretty narrow (.82 - .83) at the first fret.

I looked at the rod on StewMac's site and they say a 3/8 deep channel but that would be for a two piece neck. Most two way rods you buy are that height - at least the ones I buy off of eBay are. Some have suggested that the two way rods are only meant for two piece necks and I've used them mostly successfully for both.


I routed the channel 3/4" deep leaving a 1/4" for the fretboard side. The rod itself is 3/8" tall and 1/4" wide. This leaves 3/8 for the skunk strip before neck contouring. I like a fairly thick u shape neck, It should hold up.
 

asax

TDPRI Member
Joined
Dec 16, 2014
Posts
78
Location
ny
Reaming the heel end of the slot for end of the trussrod:
Unlike other truss rods I have used, (Luthiers mercantile 2 way), the stew mac rods are slightly wider at the adjustment end.
This means that the deeper potion of the slot needs to be reamed to a round shape to fit the wide nut.

20160914_162500.jpg


The reamed area:
20160630_174845.jpg


Stew mac sell a tool to do this. Instead I found a drill bit that matched the size of the adjustment nut.
I drilled a hole into a board for a drilling jig. I then slid it onto the back of the neck with the socket protruding.
I then clamped the jig to the table, marked the location of the neck, removed the rod, and clamped the neck to the table: (better picture of the jig from my strat neck build)
20160914_163923.jpg


the rod is in as far as it goes with the adjustment end protruding through the drilling jig.
I penciled the location of the neck on the table, removed the rod then clamped the neck down.
20160630_164258.jpg


even after using the jig I still had to enlarge the hole I made with slightly larger drill bits to get the rod to go.
Big tip: if you need to make the hole a tiny bit bigger run the drill backwards so the larger drillbit doesn't feed itself into the hole uncontrollably.
This step was a big pain. Ive done it for two necks now and it was a big hassle both times.
 
Last edited:

asax

TDPRI Member
Joined
Dec 16, 2014
Posts
78
Location
ny
Pic is kind of dark to see stripes.
the tele neck blank was quartersawn straight grained with a very subtle flame. ($14 on ebay). It was a practice run for a much more expensive piece that I am using on a build right now.
This is really figured board is the one in front. It's going to be a 70's style strat neck.
20160211_212024.jpg
 

asax

TDPRI Member
Joined
Dec 16, 2014
Posts
78
Location
ny
thicknessing the headstock:
I used a bandsaw to cut away most of the excess headstock thickness.
The final thickness was brought down with the drum sander and fence.
The smallest diameter drum was used to make the cove shape in front of the nut
20160706_163848.jpg
20160706_163908.jpg
20160706_172812.jpg
 

asax

TDPRI Member
Joined
Dec 16, 2014
Posts
78
Location
ny
Marking and drilling for the tuners did not work out the first time.
The hole for the D string was too low. I made a custom dowel to fill the hole so I could redrill it in the right spot
I took some scrap wood from the neck, made a square plug which I then chucked in the drill press and spun against a rasp to make the plug.
This is before the repair.
20160706_162236.jpg
 

Attachments

  • 20160706_160833.jpg
    20160706_160833.jpg
    113 KB · Views: 129

asax

TDPRI Member
Joined
Dec 16, 2014
Posts
78
Location
ny
The neck was radiused using a 12 inch radius sanding block with 120 then 320 adhesive sand paper.
I clamped the neck to the benchtop, with a straight rail next to it keep the motion straight and even
20160707_140849.jpg


the neck was scribbled with pencil and sanded until all the marks were gone
20160707_134316.jpg

20160707_140757.jpg

It only takes about 15 minutes to radius a neck this way.
The sanding beam is expensive but it's great. The 2 rolls inch adhesive were from amazon:
ABN 2-3/4" X 20 Yd Golden Longboard Dura Yellow Stickys PSA Sandpaper Gold Roll Sandpaper (120 Grit) $14.99 for 20 yards!
320 Grit DURA-GOLD Premium Gold LONGBOARD FILE SANDPAPER 2 3/4" x 20 Yard PSA Roll $34.96 for 20 yards.
 

asax

TDPRI Member
Joined
Dec 16, 2014
Posts
78
Location
ny
Next I drilled for and installed the dots. I bought a bag of 50 from all parts.
I resanded with the sanding beam and 320 grit to level the dots after the glue set up overnight.
20160716_150639.jpg
 

asax

TDPRI Member
Joined
Dec 16, 2014
Posts
78
Location
ny
I used my home made fret bender to curve the fret wire just slightly tighter than 12 radius
20160718_202047.jpg

Before placing the wire I used the stew mac gauge yo insure that the slots were deep enough
20160718_191155.jpg

I had to slightly deepen several slots:
20160718_191135.jpg

blue tape acts as adepth guide.

Hammering in the frets:
20160718_202208.jpg

The ends of the frets were then filed flush with the neck then beveled at 35 degrees,and smoothed in the corners.
Final fret work was done by first making sure neck was flat ( I would have used the truss rod if it back bowed from the pressure of the frets in the slots). Then I used a sharpie to mark all of the frets. 320 grit in the sanding beam was used until all of the frets were even.

I let the neck sit for a while and repeated this step again and used a fret rocker. Finally a diamond crowning file and stew mac fret erasures were used to recrown and polish the frets.
 

Attachments

  • 20160825_112136.jpg
    20160825_112136.jpg
    40.9 KB · Views: 166

asax

TDPRI Member
Joined
Dec 16, 2014
Posts
78
Location
ny
Making the tele body:
I found a mill in Oregon that could ship me a 14 inch wide alder board.
The board was long enough for 1 strat and two teles.
20160217_150317.jpg
the blue prints were found online and printed up full size at fedex/kinkos.
One strat, one tele, one thinline tele.
 
Top