pypa
Tele-Afflicted
I wanted to share the jig I made for routing the neck pocket on the Gibson I'm making.
I've use online calculators and full scale drawings to compute the right neck angle on the past couple builds. However, despite best efforts, I rarely get it spot on; it's been off by a half degree or so. There are ways of course to work around this. But the more I make, the more I wanted to take the stress out of the routing part. I wanted a way that would also allow easy tweaking of the angle after fitting.
Plans call for angling the neck, but I find that hard to do unless the taper is cut on the blank. Also, it requires undercutting the end of the neck to be perpendicular to heel - not the fretboard. This is just a pain to do. Last, this method does not allow easy adjustment after the the rest of the neck taper is defined.
I came up with this: a piece of hardwood onto which I cut and joint a 3 degree taper. A softer wood is easier to tweak, but will be altered under repeated contact with a router, so it's worth it to use something more durable and with very little flex... I used the original flat neck template to route a recess in the taper jig.
Next, I screw it to the body, screwing through where the pickup will be. This location is kind of critical. It has to be close enough to the pocket to allow the taper to sit flat and to pull out any bow that might develop in the base.

Next, I use a forstner bit to drill out the waste, taking care of course to drill about 1/4" shy of the final depth.

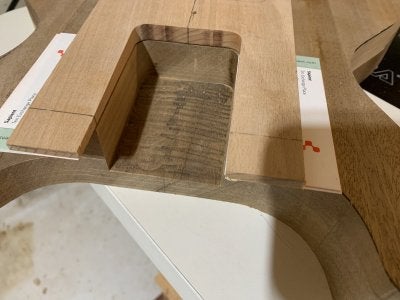
Then I use a template routing bit (diameter to match the pocket corners) to flush the bottom and sides. I prefer to do this at the router table to prevent tipping and to allow finer depth control, but it can be used with a plunge router as well.

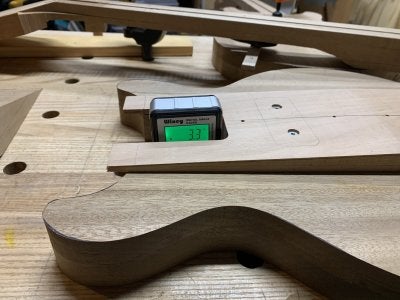
You can see that the actual angle is measuring about 3.3 degrees. I can probably get away with this, but the plans call for closer to 2.8.

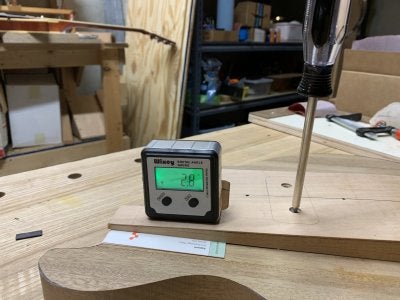
To achieve this, I shimmed the tips up with some business cards. The paper is nice because it compresses slightly, so when you screw down the jig, I was able to adjust the actual angle by not fully torquing down the screws. The screws allow the jig to be precisely re-set to the exact original location, so the pocket is not enlarged.

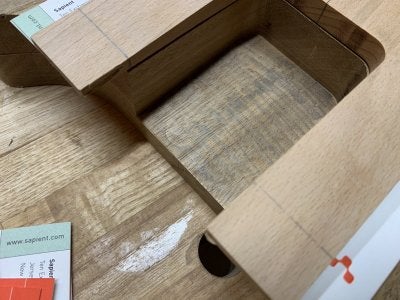
Then back to the router table. You can see how precisely it works by the barely removed the pencil marks


Voila! 2.8 degrees.

Now I fully recognize that this level of accuracy might not be required - that's what saddles are for!!! But regardless, it still makes AIMING for the right number a lot less stressful.
The jig also gives me the option to adjust a little bit if I've miscalculated. It's easier to make the pocket shallower, since the opening side depth is not affected. Making the angle more acute would require shimming on the other side of the screw and making the pocket opening at the neck slightly deeper. Options.
I've use online calculators and full scale drawings to compute the right neck angle on the past couple builds. However, despite best efforts, I rarely get it spot on; it's been off by a half degree or so. There are ways of course to work around this. But the more I make, the more I wanted to take the stress out of the routing part. I wanted a way that would also allow easy tweaking of the angle after fitting.
Plans call for angling the neck, but I find that hard to do unless the taper is cut on the blank. Also, it requires undercutting the end of the neck to be perpendicular to heel - not the fretboard. This is just a pain to do. Last, this method does not allow easy adjustment after the the rest of the neck taper is defined.
I came up with this: a piece of hardwood onto which I cut and joint a 3 degree taper. A softer wood is easier to tweak, but will be altered under repeated contact with a router, so it's worth it to use something more durable and with very little flex... I used the original flat neck template to route a recess in the taper jig.
Next, I screw it to the body, screwing through where the pickup will be. This location is kind of critical. It has to be close enough to the pocket to allow the taper to sit flat and to pull out any bow that might develop in the base.

Next, I use a forstner bit to drill out the waste, taking care of course to drill about 1/4" shy of the final depth.

Then I use a template routing bit (diameter to match the pocket corners) to flush the bottom and sides. I prefer to do this at the router table to prevent tipping and to allow finer depth control, but it can be used with a plunge router as well.

You can see that the actual angle is measuring about 3.3 degrees. I can probably get away with this, but the plans call for closer to 2.8.

To achieve this, I shimmed the tips up with some business cards. The paper is nice because it compresses slightly, so when you screw down the jig, I was able to adjust the actual angle by not fully torquing down the screws. The screws allow the jig to be precisely re-set to the exact original location, so the pocket is not enlarged.

Then back to the router table. You can see how precisely it works by the barely removed the pencil marks


Voila! 2.8 degrees.

Now I fully recognize that this level of accuracy might not be required - that's what saddles are for!!! But regardless, it still makes AIMING for the right number a lot less stressful.
The jig also gives me the option to adjust a little bit if I've miscalculated. It's easier to make the pocket shallower, since the opening side depth is not affected. Making the angle more acute would require shimming on the other side of the screw and making the pocket opening at the neck slightly deeper. Options.
Last edited:

