My JP Dragon Build

  • Thread starter Spiv
  • Start date
  • This site may earn a commission from merchant affiliate links like Ebay, Amazon, and others.

Spiv

TDPRI Member
Joined
Jun 13, 2012
Posts
47
Location
Perth Scotland
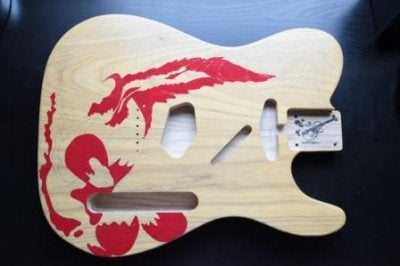
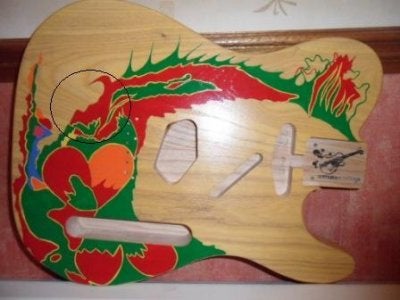
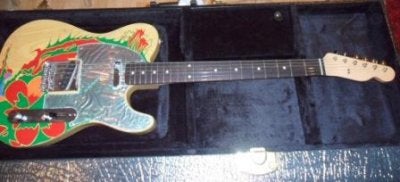
When I joined this forumI then came across the Dragon Telecaster that Jimmy Page used in the Yardbirds and also in the early days of Led Zeppelin. I then decided to build a replica of this guitar. I browsed various Forum’s and web pages to try and find out exactly what the guitar was. From my research I found the guitar was a Blond 1959 Fender Telecaster that had been left to him when Jeff Beck departed the Yardbirds. Jimmy Page decided to sand the body down and hand painted the dragon design using Humbrol enamel paints. A pickguard was then made out of clear acrylic in a standard Telecaster shape with the addition of a tail part between the bridge and control plate. The pickguard was lined with mylar film, which is a reflective film, the idea being that this reflected different colours from the stage lights. The neck and pickups were I believe the original parts. The start was to try and find a body with a similar grain pattern and I eventually found one from guitarbuild in UK. I then discovered Wudtone guitar finishing kits and decided to use that prior to painting. It is very easy to use it comes in 2 small bottles, base coat and top coat. I chose the Dairy Blond and the Satin top coat.Below 2 pics of the body after sanding and the body after coating with Wudtone.
 

Attachments

  • Blank with Wudtone.jpg
    Blank with Wudtone.jpg
    25.3 KB · Views: 805
  • Blank Body.jpg
    Blank Body.jpg
    21.1 KB · Views: 361

Spiv

TDPRI Member
Joined
Jun 13, 2012
Posts
47
Location
Perth Scotland
Painting the Dragon

Next stage was to buy Humbrol enamel paints, and make a couple of cardboard templates and started to pencil draw on the cardboard. At this point I realised it wasn't going to work as I am just not a good enough artist so, time to find someone who could do it. I googled Scottish painters and came up with a lady called Ulianka, who is a Russian lady who lives in Aberdeen, so I emailed her and she said she could do it no problem, so after sending her lots of pics of the original guitar and some clear ones of replicas we decided after comparing all the pics what way we would go. Bear in mind this was hand painted by JP and no two were going to be exactly the same I said go ahead with it.Below it shows the stages of painting it. The difference in colour on the body is just down to lighting.
 

Attachments

  • Paint guitar_1.JPG
    Paint guitar_1.JPG
    24.5 KB · Views: 1,151
  • Paint guitar_3.JPG
    Paint guitar_3.JPG
    26.2 KB · Views: 1,149

Spiv

TDPRI Member
Joined
Jun 13, 2012
Posts
47
Location
Perth Scotland
Painting Finished

Next two Pics show the painting completed. After collecting the painted guitar I went on to use the Satin top coat over the paint which will protect it. The Wudtone kits are very easy to use, basically you need a lint free cloth, I use old T-shirts cut into 6'' squres and you pour a little onto the cloth and rub in. As they tell you on the instructions a little goes a long way.
 

Attachments

  • Paint guitar_5.JPG
    Paint guitar_5.JPG
    26.9 KB · Views: 1,988
  • Paint guitar_6.JPG
    Paint guitar_6.JPG
    41.7 KB · Views: 538

Spiv

TDPRI Member
Joined
Jun 13, 2012
Posts
47
Location
Perth Scotland
Pickguard

While the guitar was being painted I started to work on the pickguard. From the research I had done I knew it was some kind of reflective film under a clear plastic pickguard with the addition of the tail part that went between the control plate and bridge. On looking at the other replicas , none seemed quite like the original, many seemed like crunshed up foil, so I started to look at what this mysterious reflective film is. Thats when I discovered the name mylar, it is a thin plastic film which relects different colours as it is moved around. So I ordered 4 sheets of mylar and 2 sheets of 2mm clear acrylic. On my first attempt I used a Tele pick guard to draw the outline and added the tail part. I then ran a very thin line of glue under the guard and crunched a sheet of the mylar up and laid it on and allowed it to dry before trimming it off with a craft knife. First thing I noted was it was indeed reflective as when you moved it in the light you could see orange and green and blue and pink. When I laid it on the guitar I noted 2 things - (a) It was see through and therfore you could see the wiring through into the body and (b) It did not look the original, that was because I had crunshed it up too much. You can just about make out the colours in the next pic which was first attempt
 

Attachments

  • Dragon Pickguard 1.jpg
    Dragon Pickguard 1.jpg
    35.3 KB · Views: 898

Spiv

TDPRI Member
Joined
Jun 13, 2012
Posts
47
Location
Perth Scotland
PickGuard cont

On my 2nd attempt I never crunshed the film so much, but did basically the same, ran a very thin film of glue round the outside and the neck pickup hole, the another film of glue on the mylar and a sheet of foil shiny side up under it. I let the whole thing sit for a day before going round it with a craft knife. I was quite pleased with the end result and think it looks pretty much like the original. Again it is one of those things that no one but JP knows exactly what he done.
The only thing that was on the original that I haven't done is, the overspill of green paint going under the pickguard. I am not ever sure if it was deliberate or he pressed the pickguard down while the paint was still a bit wet ? OR it could have been to make it appear the dragon was coming out from under the pickguard.
I forgot to take a pic of it before I put it on the guitar, but below you can see a pic of it on the guitar.
 

Attachments

  • Pickguard2.JPG
    Pickguard2.JPG
    61.5 KB · Views: 1,760

Davecam48

Poster Extraordinaire
Joined
Dec 31, 2009
Posts
5,149
Age
77
Location
Queensland Australia
I shall probably be stoned for this, but.......I have looked at this, and several tribute builds, as well as pix of the original, but, for the life of me I cannot see a dragon there at all.

Nice job so far though!
 

Spiv

TDPRI Member
Joined
Jun 13, 2012
Posts
47
Location
Perth Scotland
Head circled

I shall probably be stoned for this, but.......I have looked at this, and several tribute builds, as well as pix of the original, but, for the life of me I cannot see a dragon there at all.

Nice job so far though!

Dave see inside the circle that is the head of the Dragon
 

Attachments

  • Dragon Head Circled.JPG
    Dragon Head Circled.JPG
    42.2 KB · Views: 571

jkingma

Super Moderator
Staff member
Joined
Nov 15, 2006
Posts
13,307
Location
46.050888, -79.801023
Nice work so far.

Does anyone know why JP's pickguard had that extension out between the bridge and the control plate? I have never seen another one like it. Was it custom made to cover up something perhaps??
 

Spiv

TDPRI Member
Joined
Jun 13, 2012
Posts
47
Location
Perth Scotland
Nice work so far.

Does anyone know why JP's pickguard had that extension out between the bridge and the control plate? I have never seen another one like it. Was it custom made to cover up something perhaps??

No idea why he decided on that extension part, it's one of the things I like - the many mysteries of the Dragon Tele. He made the pickguard himself as far as I know and I would guess he did it in a similar way that I did - with a fine toothed hacksaw and a dremel with a round sander
 

Spiv

TDPRI Member
Joined
Jun 13, 2012
Posts
47
Location
Perth Scotland
Pickups

For the pickups I browsed around this and other Forums and one name kept popping up - Don Mare. I browsed his site and came across the ones people were raving about ZeppAtones and so ordered a set of those. I only took a pic of the bridge pickup, but I'm sure I have another pic of the neck one somewhere,
 

Attachments

  • Don Mare Bridge Pickup.JPG
    Don Mare Bridge Pickup.JPG
    40.7 KB · Views: 256

Spiv

TDPRI Member
Joined
Jun 13, 2012
Posts
47
Location
Perth Scotland
Bridge

When it came to the bridge it took a while to get finished due to the fact that while the body was drilled for through body JP used a top loader bridge. I have read somewhere it was something to do with bending the strings ?? Another little snippet I read was that he strung the guitar with the first 4 strings through the bridge but the 2 bass strings ( A and E) went through the body.I have a close up shot of the bridge and can see the top loaded string but I can't see the top 2 for his hand. I eventually got a Fender bridge and steel threaded saddles and took the bridge to a machine shop and had it drilled as a top loader.
 

Attachments

  • Bridge.JPG
    Bridge.JPG
    72 KB · Views: 281
  • Bridge 2.JPG
    Bridge 2.JPG
    59.3 KB · Views: 252

Spiv

TDPRI Member
Joined
Jun 13, 2012
Posts
47
Location
Perth Scotland
Neck

Took me a while to find a suitable neck and eventually found a Vintage Style Telecaster neck from Japan at the The Music Room in Clegheaton UK. From the numerous pics I had of the original I could see the neck was lighter colour than the body and was worried if I sprayed it with nitro what colour I would get. Wudtone to the rescue again. I saw on their site they had neck finishing kits and they had a colourless kit, so I decided to go with that and I am really glad I did, as it came out really nice and is silky smooth and kept the neck the same colour. The neck was then fitted with Kluson Type machine heads and a single string tree. Oh and a TUSQ nut was fitted.
 

Attachments

  • Neck Headstock.JPG
    Neck Headstock.JPG
    28.5 KB · Views: 238
  • Headstock Back.JPG
    Headstock Back.JPG
    29.3 KB · Views: 265

surfoverb

Doctor of Teleocity
Joined
Jul 17, 2007
Posts
12,390
Location
Virginia
I shall probably be stoned for this, but.......I have looked at this, and several tribute builds, as well as pix of the original, but, for the life of me I cannot see a dragon there at all.

these are the best pics. you can see the dragons eye,horn and fangs. looks like he used the ash grain to look like smoke coming out the nostrils.

image removed

image removed
 

Spiv

TDPRI Member
Joined
Jun 13, 2012
Posts
47
Location
Perth Scotland
these are the best pics. you can see the dragons eye,horn and fangs. looks like he used the ash grain to look like smoke coming out the nostrils.

image removed

image removed

Yes you could be correct there with the grain pattern, it's funny that it is almost clearer to see in Black and White
 

Spiv

TDPRI Member
Joined
Jun 13, 2012
Posts
47
Location
Perth Scotland
Final Assembly

Now that I had all the parts together, I wired the pickups onto a 4 way switch, 250K CTS Pot's, super tone 0.047uf Paper in Oil Capacitor and Treble bleed mod. all done with cloth covered wire. I then drilled the pickguard screwed it down, screwed the control plate on and everything looked pretty good. I then plugged it in and tapped the pickups and that seemed fine so it came to fitting the neck. One of the things I liked when I got the neck was it fitted real snug. I never had to force it, nor was it too loose it was just a snug fit. I then strung it with a couple of old strings in the top and bottom E positions to check the alignment and it looked spot on, so drilled the neck, put on the neck plate and tightened it. I tuned up the 2 old strings and plugged it in again and it sounded great, it just sounded different to the other Tele's that I had worked with, not sure how to describe it exactly but in a couple of positions it sounded .... big and quite beefy. I had previously fitted a TUSQ nut to the neck and it was still a little high so took that out again and adjusted it, re-strung it with a set of 9's and worked on the set up till I wa fairly happy with it. While stringing it I remembered the bit I had read about him stringing the top two bass string through the body while the others went through the bridge, so I went that way.
So that was my attempt a replicating the Jimmy Page dragon Telecaster, overall I am quite please with he result and the 2 pics below are of the finished guitar in it's case.
 

Attachments

  • Dragon Complete1.JPG
    Dragon Complete1.JPG
    39.3 KB · Views: 710
  • Dragon Complete2.JPG
    Dragon Complete2.JPG
    36.4 KB · Views: 561
Top