My Archtop Build

  • Thread starter Picton
  • Start date
  • This site may earn a commission from merchant affiliate links like Ebay, Amazon, and others.

Picton

Friend of Leo's
Joined
Feb 7, 2009
Posts
2,666
Age
50
Location
Reading, Massachusetts
So I fell in love with archtops once while reading George Gruhn's vintage guitar book. Alas, neither my playing skills nor my bank account nor my 10-month-old allowed me to go buy even a cheap archtop, but I was able to persuade my wife to let me build one. Lovely lady that she is, she said yes, so here goes...

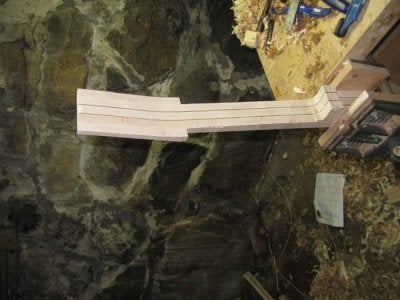
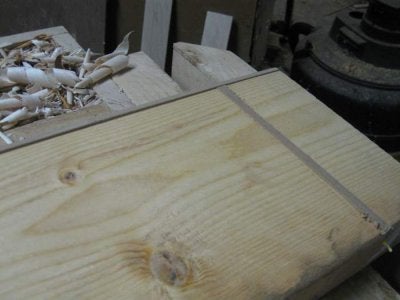
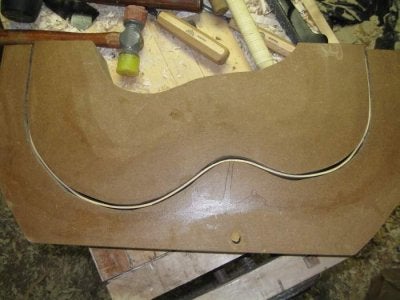
I vastly prefer hand tools, but I'm not above ripsawing on a table saw or bandsawing where necessary; all smoothing and shaping, though, is done by planes, spokeshaves, and scrapers. I'm not the most careful woodworker in the world, but I'd managed to crank out three ukuleles over the past couple of years, so I started with my own design:

24.5-inch scale
2 Mighty Mite P90s (my blues-playing uncle's recommendation)
Designed for a Bigsby B60 (still negotiating that purchase...;))
Split-shaft Gotoh tuners
Maple construction, cherry FB (largely stuff I had on hand in the basement)
Hand-applied blue burst (because I have a LOT of blue dye on hand)

I drew up a plan on the back of some of my students' projects:
 

Attachments

  • 000 Supplemental Plan small.jpg
    000 Supplemental Plan small.jpg
    13.8 KB · Views: 210
  • 00 Original Plan small.jpg
    00 Original Plan small.jpg
    18.7 KB · Views: 310

Picton

Friend of Leo's
Joined
Feb 7, 2009
Posts
2,666
Age
50
Location
Reading, Massachusetts
Neck Construction

I thought I'd start with the FB. It was fairly straightforward, and I cut it to accommodate jumbo SS frets.

The other photos show the neck blank as it moves from glued-up, through tapered, to rough-shaped. I tapered by cutting to the line with a backsaw, chiseling out the waste, and giving it a quick shot with a block plane.
 

Attachments

  • 01 FB Pre-radius sm.jpg
    01 FB Pre-radius sm.jpg
    37.7 KB · Views: 170
  • 02 Neck Blank small.jpg
    02 Neck Blank small.jpg
    37.3 KB · Views: 200
  • 06 Neck Taper During 1 small.jpg
    06 Neck Taper During 1 small.jpg
    44 KB · Views: 201
  • 07 Neck Taper During 2 small.jpg
    07 Neck Taper During 2 small.jpg
    42.2 KB · Views: 180
  • 08 Neck Taper After Rough sm.jpg
    08 Neck Taper After Rough sm.jpg
    40.3 KB · Views: 156

Picton

Friend of Leo's
Joined
Feb 7, 2009
Posts
2,666
Age
50
Location
Reading, Massachusetts
More neck!

I shaped the heel with a rasp and some files; I then left some "ears" so that I could clamp it for further work. Again, fairly straightforward. I used my MIM Tele FB dimensions (42mm nut width), adapted for the shorter scale. FB radius ended up at about 10 inches, but I did it by feel so I'm not too sure. As for the eventual neck shape, that was by feel as well. It's a bit chunkier than my MIM, but I just kept spokeshaving and gripping it until it "felt" right.

Headstock design (see the plan in the first set of pics) is what I use on my ukes. I like it; it's nicely art-deco, and was inspired by an old desk stapler.

The last photo shows the bolt-on system I used for the neck-to-body connection. Cumpiano suggested it, and it seems to be working well. I'd always made my ukukleles with a Spanish heel; this is great for nylon-stringed instruments, but since steel strings exert such greater pull over time, I thought I'd plan for a WAAAY future neck reset.
 

Attachments

  • 10 Headstock and Neck After sm.jpg
    10 Headstock and Neck After sm.jpg
    44.4 KB · Views: 174
  • 11 Heel Before sm.jpg
    11 Heel Before sm.jpg
    36.5 KB · Views: 147
  • 12 Heel During sm.jpg
    12 Heel During sm.jpg
    34 KB · Views: 150
  • 15 Rough-Shaped Neck sm.jpg
    15 Rough-Shaped Neck sm.jpg
    37 KB · Views: 315
  • 16 Cumpiano Hardware sm.jpg
    16 Cumpiano Hardware sm.jpg
    37.2 KB · Views: 267

LocustPlague

Tele-Holic
Joined
Sep 17, 2008
Posts
933
Location
Texas
I'm excited about this build thread. I'm hoping to build some arch-top instruments in the upcoming year or two and want to read as much as I can.
 

Picton

Friend of Leo's
Joined
Feb 7, 2009
Posts
2,666
Age
50
Location
Reading, Massachusetts
Truth to tell, Locust Plague, major construction is largely done already; it's taken my some months to track down software that can easily crank my pictures down to a postable size. I'll get them all up over the next several days.
 

Picton

Friend of Leo's
Joined
Feb 7, 2009
Posts
2,666
Age
50
Location
Reading, Massachusetts
Thanks, but I'm just using photoshop; it's hard to find the time, though. I've got over 100 pics so far, so I have to be selective.
 

drgonzo2

Tele-Meister
Joined
Jul 22, 2007
Posts
210
Location
Daventry, U.K.
Interesting. I have to wonder how you're going to access the bolts on the neck though? Through the pu holes? Or through a removable endpin?

... G
 

LaExpatriot

Tele-Meister
Joined
Sep 23, 2009
Posts
455
Location
Central OH
That looks really interesting. I am looking forward to see how you do the bolt on neck. I build archtops from time to time also, and have been trying to rack my head with a way to bolt on the neck.
 

Picton

Friend of Leo's
Joined
Feb 7, 2009
Posts
2,666
Age
50
Location
Reading, Massachusetts
I went 'round and 'round about the neck joint. I really was just going to do a Spanish heel, but I read/heard enough scare stories on MIMF and elsewhere that I realized another solution was the way to go. There's a reason, it seems, that every manufacturer in the acoustic/archtop world uses some sort of mortise and tenon or dovetail.

I got sold on using hardware when I realized Taylor uses a pair of screws through the tailblock. If it's good enough for Taylor...

Anyway, the preferred technique seems to be threaded inserts. The Cumpiano method I used prevented me from having to screw anything into end grain, even coarsely-threaded inserts designed for the task. I reckon that, if everything goes right, the neck might need a reset around 2030 or so, at which point I'll learn how to do it. ;)

Dr Gonzo, I planned the pup holes to give plenty of access for wiring and neck adjustment. That, too, was a story all its own... turns out there's a damn good reason archtop builders use dog-ear mounts on their P90s. But I think I devised a solution; I'll let you know how it develops.

On to the sides...
 

Picton

Friend of Leo's
Joined
Feb 7, 2009
Posts
2,666
Age
50
Location
Reading, Massachusetts
How to flatten and thickness sides... with handplanes!

If anyone's sick of hearing me rave about handplanes, now's the time to tune out.

I've been lucky; when the shop program at my school closed down, I inherited several handplanes. That, plus the few cheapo ones I already had, supplemented by some yard-sale and antique-shop gems, has left me with a great many wonderful tools for a great little outlay of cash.

A million woodworking references cover the process of flattening and dimensioning stock using, first, a coarse scrub plane, and then a jointer plane to get rid of the scrub-plane marks. I took a few pics of the process. My uke adventures had taught me that the hardest part about thicknessing stock down to 2mm or so is holding it in place while you plane. So here's my setup.

First pic are the sides, resawn from some Home Depot maple. I'm a bad resawer, which is okay since I'm a good planer. You can see how wide the mouth is on my cheap Sears handplane; I use it as a scrub plane, having cambered the iron a great deal. It's delightful. Then I show my thicknessing jig, made from some MDF and a piece of wood the previous homeowner left me.
 

Attachments

  • 23 Final Thicknessing Fixture 2 sm.jpg
    23 Final Thicknessing Fixture 2 sm.jpg
    29.4 KB · Views: 144
  • 22 Final Thicknessing Fixture 1 sm.jpg
    22 Final Thicknessing Fixture 1 sm.jpg
    42 KB · Views: 167
  • 20 Scrub Plane Mouth sm.jpg
    20 Scrub Plane Mouth sm.jpg
    39.4 KB · Views: 182
  • 17 Thicknessing Before sm.jpg
    17 Thicknessing Before sm.jpg
    36.5 KB · Views: 150

Picton

Friend of Leo's
Joined
Feb 7, 2009
Posts
2,666
Age
50
Location
Reading, Massachusetts
Flattening, cont

You flatten stock by planing on a diagonal, or straight across. It's not hard work as long as the plane is sharp, and I timed the process: from the time I turned on my cheap little bandsaw for the resawing, through the thicknessing and smoothing, to the finished product took around 2.5 hours.

The pics show my progress: note the diagonal scrub-plane marks, later smoothed by a longer and more finely-set jointer or jack plane. Be warned: if you do not get the sides dead-flat, the stock will go flying as you try to plane it.

In the early stages, the stock was too thick to use my jig reliably; that's what's with the ghetto-looking combination of clamps and masonite that was meant to form a planing stop.

It did not go well.

So I suggest resawing more carefully than I did, in order to avoid having to remove quite so much material with the scrub plane.

The last pic is a "before-and-after" look at what happened to the two sides during thicknessing. I should point out that, of the 2.5 hours total, the actual handplane work took just a shade over forty minutes, with occasional beer breaks.
 

Attachments

  • 18 Basic Thicknessing Setup sm.jpg
    18 Basic Thicknessing Setup sm.jpg
    43.4 KB · Views: 150
  • 19 Scrub Plane Marks sm.jpg
    19 Scrub Plane Marks sm.jpg
    32.8 KB · Views: 158
  • 21 Before and After Basic Thicknessing sm.jpg
    21 Before and After Basic Thicknessing sm.jpg
    30.2 KB · Views: 157

Picton

Friend of Leo's
Joined
Feb 7, 2009
Posts
2,666
Age
50
Location
Reading, Massachusetts
Finally, the scrub-planed side is down to nearly its finished thickness. In this pic, the stock is barely clearing the MDF fence, which is around 1.5mm above the surface.

Notice that the stock is much thinner on the right than on the left; it's my tendency to to plane this way, and it's a bad habit. Since it's easily corrected, though, I'm over it.

Next: side bending!
 

Attachments

  • 195 More Scrub Plane Marks sm.jpg
    195 More Scrub Plane Marks sm.jpg
    33.1 KB · Views: 175

Picton

Friend of Leo's
Joined
Feb 7, 2009
Posts
2,666
Age
50
Location
Reading, Massachusetts
Bending the sides: therapeutic

Before I bent the side of a musical instrument, I presumed it would be a pain. Having done a few, I find it relaxing. My "technique" (such as it is) is pure Bogdanovich; he wrote an outstanding book on classical guitar building. Many people build massive, partially-automated side benders that work spactacularly, especially in a production setting. But the plywood, springs, and metal heating blankets these contraptions use cost money, so I'm left with...

1. A side mold made of stacked, shellacked MDF.
2. A side bender made of MDF, a lightbulb, some bad wiring, and a soup can (Progresso, not Campbell's; only Progresso cans are big enough to clear the lightbulb).
3. Lots and lots and lots of clamps.

Behold! the side bender. The lightbulb is 100 watts, and the soup can portion slides off to accommodate bulb changes. I assumed this thing would fall apart soon after I made it, but I've been pleasantly surprised by its strength.
 

Attachments

  • 27 My Side Bender small.jpg
    27 My Side Bender small.jpg
    50.6 KB · Views: 208

Picton

Friend of Leo's
Joined
Feb 7, 2009
Posts
2,666
Age
50
Location
Reading, Massachusetts
Any number of books and online resources can tell you how to bend a side; basically, you soak your thin side wood, mark it to make sure you're bending the right parts in the right direction, and then move it over your bending iron. The iron heats the water soaked into the wood, and the resulting steam makes the wood's structure pliable.

It does take some practice, but not as much as you might think. Following the actual bending, you clamp it into a sturdy mold and let it dry overnight; the mold will help ensure it holds its shape. That's the process you see below; I soaked my sides in the bathtub, bent them (keep the stock moving to help avoid the worst scorching), then molded them. Since I'm an impatient man, I usually just use a hammer to force the mold closed. Then, clamped, the mold hung out overnight in my basement stairwell.

A key precaution: ensure the side is "straight" when it goes into the mold; otherwise, you'll bend a twist into your side.
 

Attachments

  • 28 Bending the Treble Side sm.jpg
    28 Bending the Treble Side sm.jpg
    33.9 KB · Views: 189
  • 29 Fitting the Treble Side to the Mold sm.jpg
    29 Fitting the Treble Side to the Mold sm.jpg
    41.8 KB · Views: 175
  • 30 Molding sm.jpg
    30 Molding sm.jpg
    39.3 KB · Views: 511
  • 26 Soaked, Marked Treble Side sm.jpg
    26 Soaked, Marked Treble Side sm.jpg
    22.4 KB · Views: 146
  • 31 In the Mold sm.jpg
    31 In the Mold sm.jpg
    39 KB · Views: 170

Picton

Friend of Leo's
Joined
Feb 7, 2009
Posts
2,666
Age
50
Location
Reading, Massachusetts
Once you "decant" your dried side, it'll still need some "touch-up" to correct its tendency to spring back. Then it will need to be held securely in a lighter mold so that it holds its shape until it's assembled. That's the process you see below.

I made a simple holding structure called a solera that kept the treble side bent while I dealt with the bass side. While waiting for the sides to dry, I made the headblock (simple) and the tailblock (harder; it had to carefully match the tenon on the neck, and I had to be careful when drilling for the Cumpiano hardware). The two blocks hold the sides in place with a good long-grain glue joint. I should mention I use Titebond I exclusively.

I didn't get pics of the cutaway, but I just marked out its location on the treble side, re-bent it back the other way, and glued it to the rest of the side using a carefully-carved corner block of mahogany. I made the cutaway Florentine because I thought it'd look cool, but also because I assumed it would be easier to make. The hardest part was keeping everything lined up squarely. You can see the little block if you look closely at the last pic.
 

Attachments

  • 33 Treble Side on Solera sm.jpg
    33 Treble Side on Solera sm.jpg
    34.7 KB · Views: 183
  • 35 Side Glue-Up sm.jpg
    35 Side Glue-Up sm.jpg
    45.2 KB · Views: 156
  • 36 Decanted Sides sm.jpg
    36 Decanted Sides sm.jpg
    50.1 KB · Views: 173

Picton

Friend of Leo's
Joined
Feb 7, 2009
Posts
2,666
Age
50
Location
Reading, Massachusetts
If anyone's interested, I have a few more pics of the side process, let me know.

I'll put up the back/side carving over the next couple of days. Tomorrow's busy, but I'll get it done eventually.

Story of my life...
 

Engraver-60

Friend of Leo's
Joined
Jan 6, 2008
Posts
4,490
Age
73
Location
Brentwood, TN
Very cool. I am impressed by your ingenuity, and go-gettter attitude. Post all of your pictures; this is fascinating.
 
Last edited:

ColeRyan

TDPRI Member
Joined
Apr 7, 2010
Posts
87
Location
Orlando, FL
Off to a great start. I'm impressed more & more by the way you get the wood to permanently curve like that.

Hope that doesn't make me sound like a moron.

I'll be following this :)
 
Top