Master Volume Micro - attempt to build

  • Thread starter fastedtex
  • Start date
  • This site may earn a commission from merchant affiliate links like Ebay, Amazon, and others.

fastedtex

TDPRI Member
Joined
Dec 20, 2018
Posts
92
Location
Irving, TX
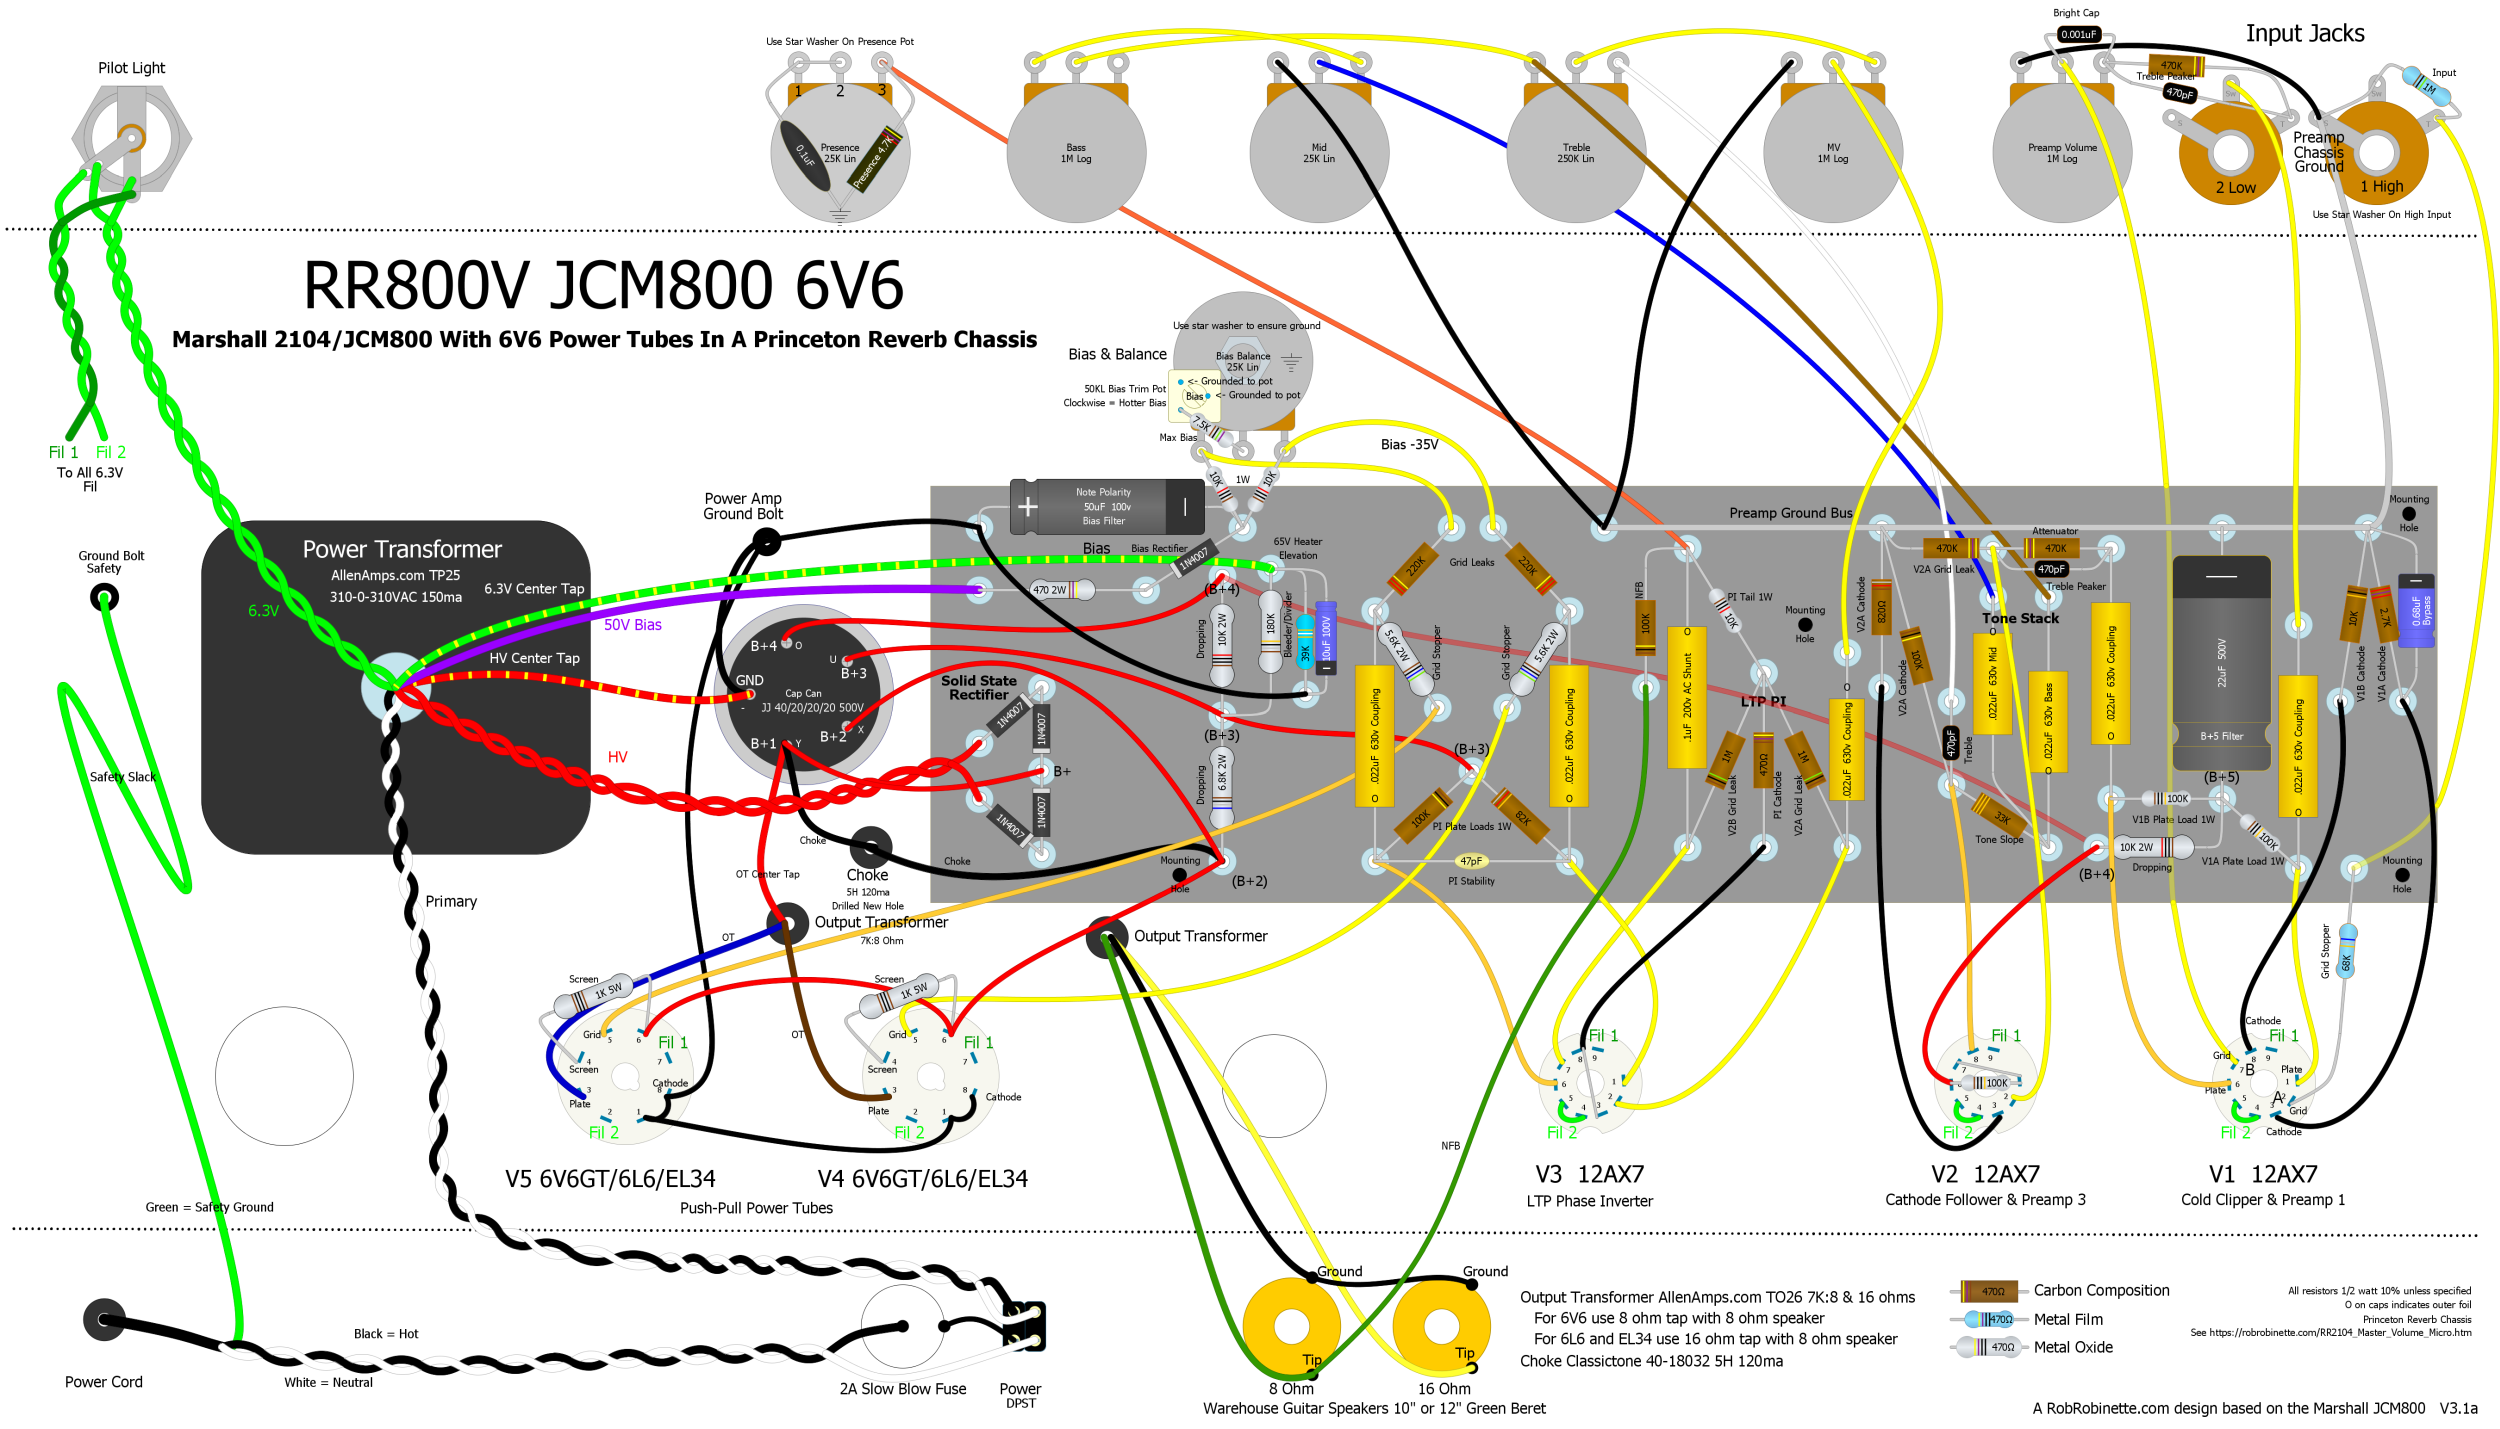
I decided to attempt to put the reverb back in Rob's Blackvibe, but then I found the Master Volume Micro.
I think it is a good place to start and an interesting amp. So I'm starting a tread of my build as comic relief. :D

I have my board from Hoffman (thanks Doug, great board) and most of the pieces parts.
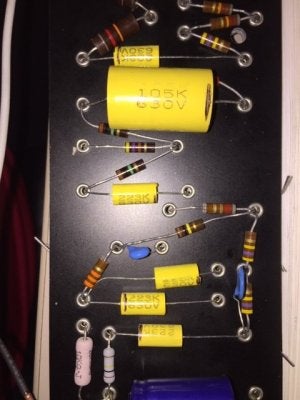
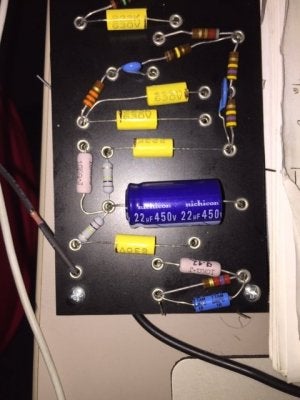
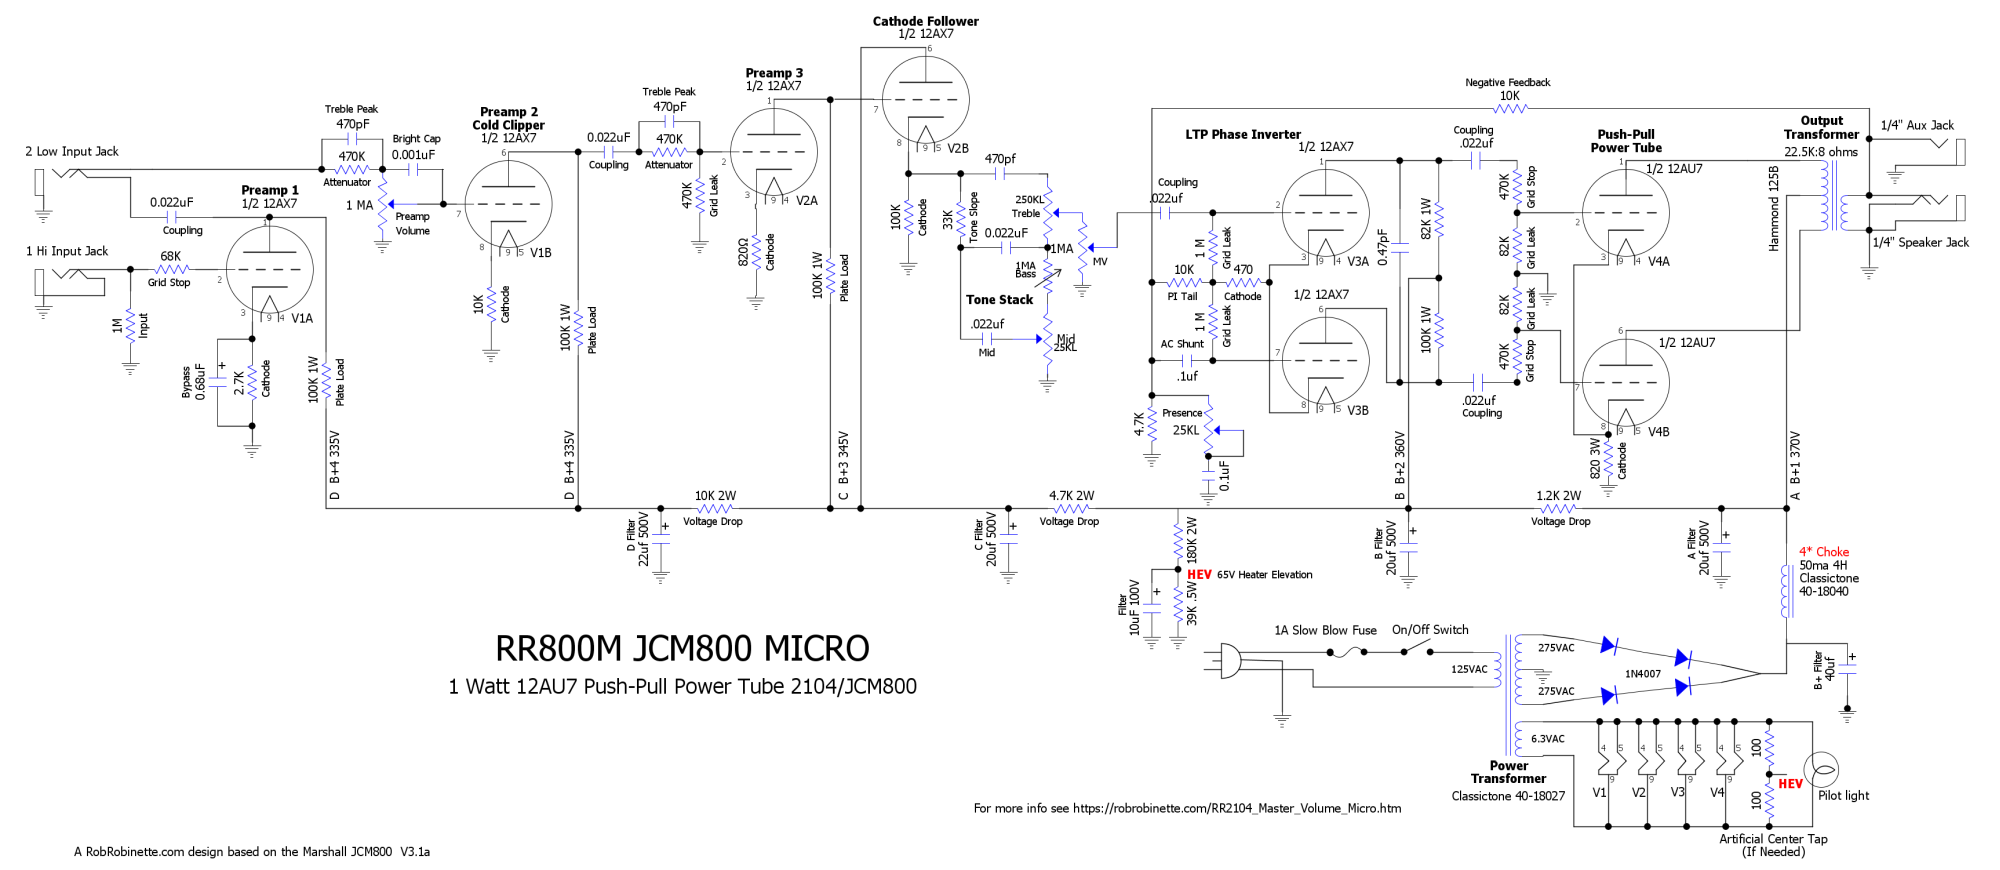
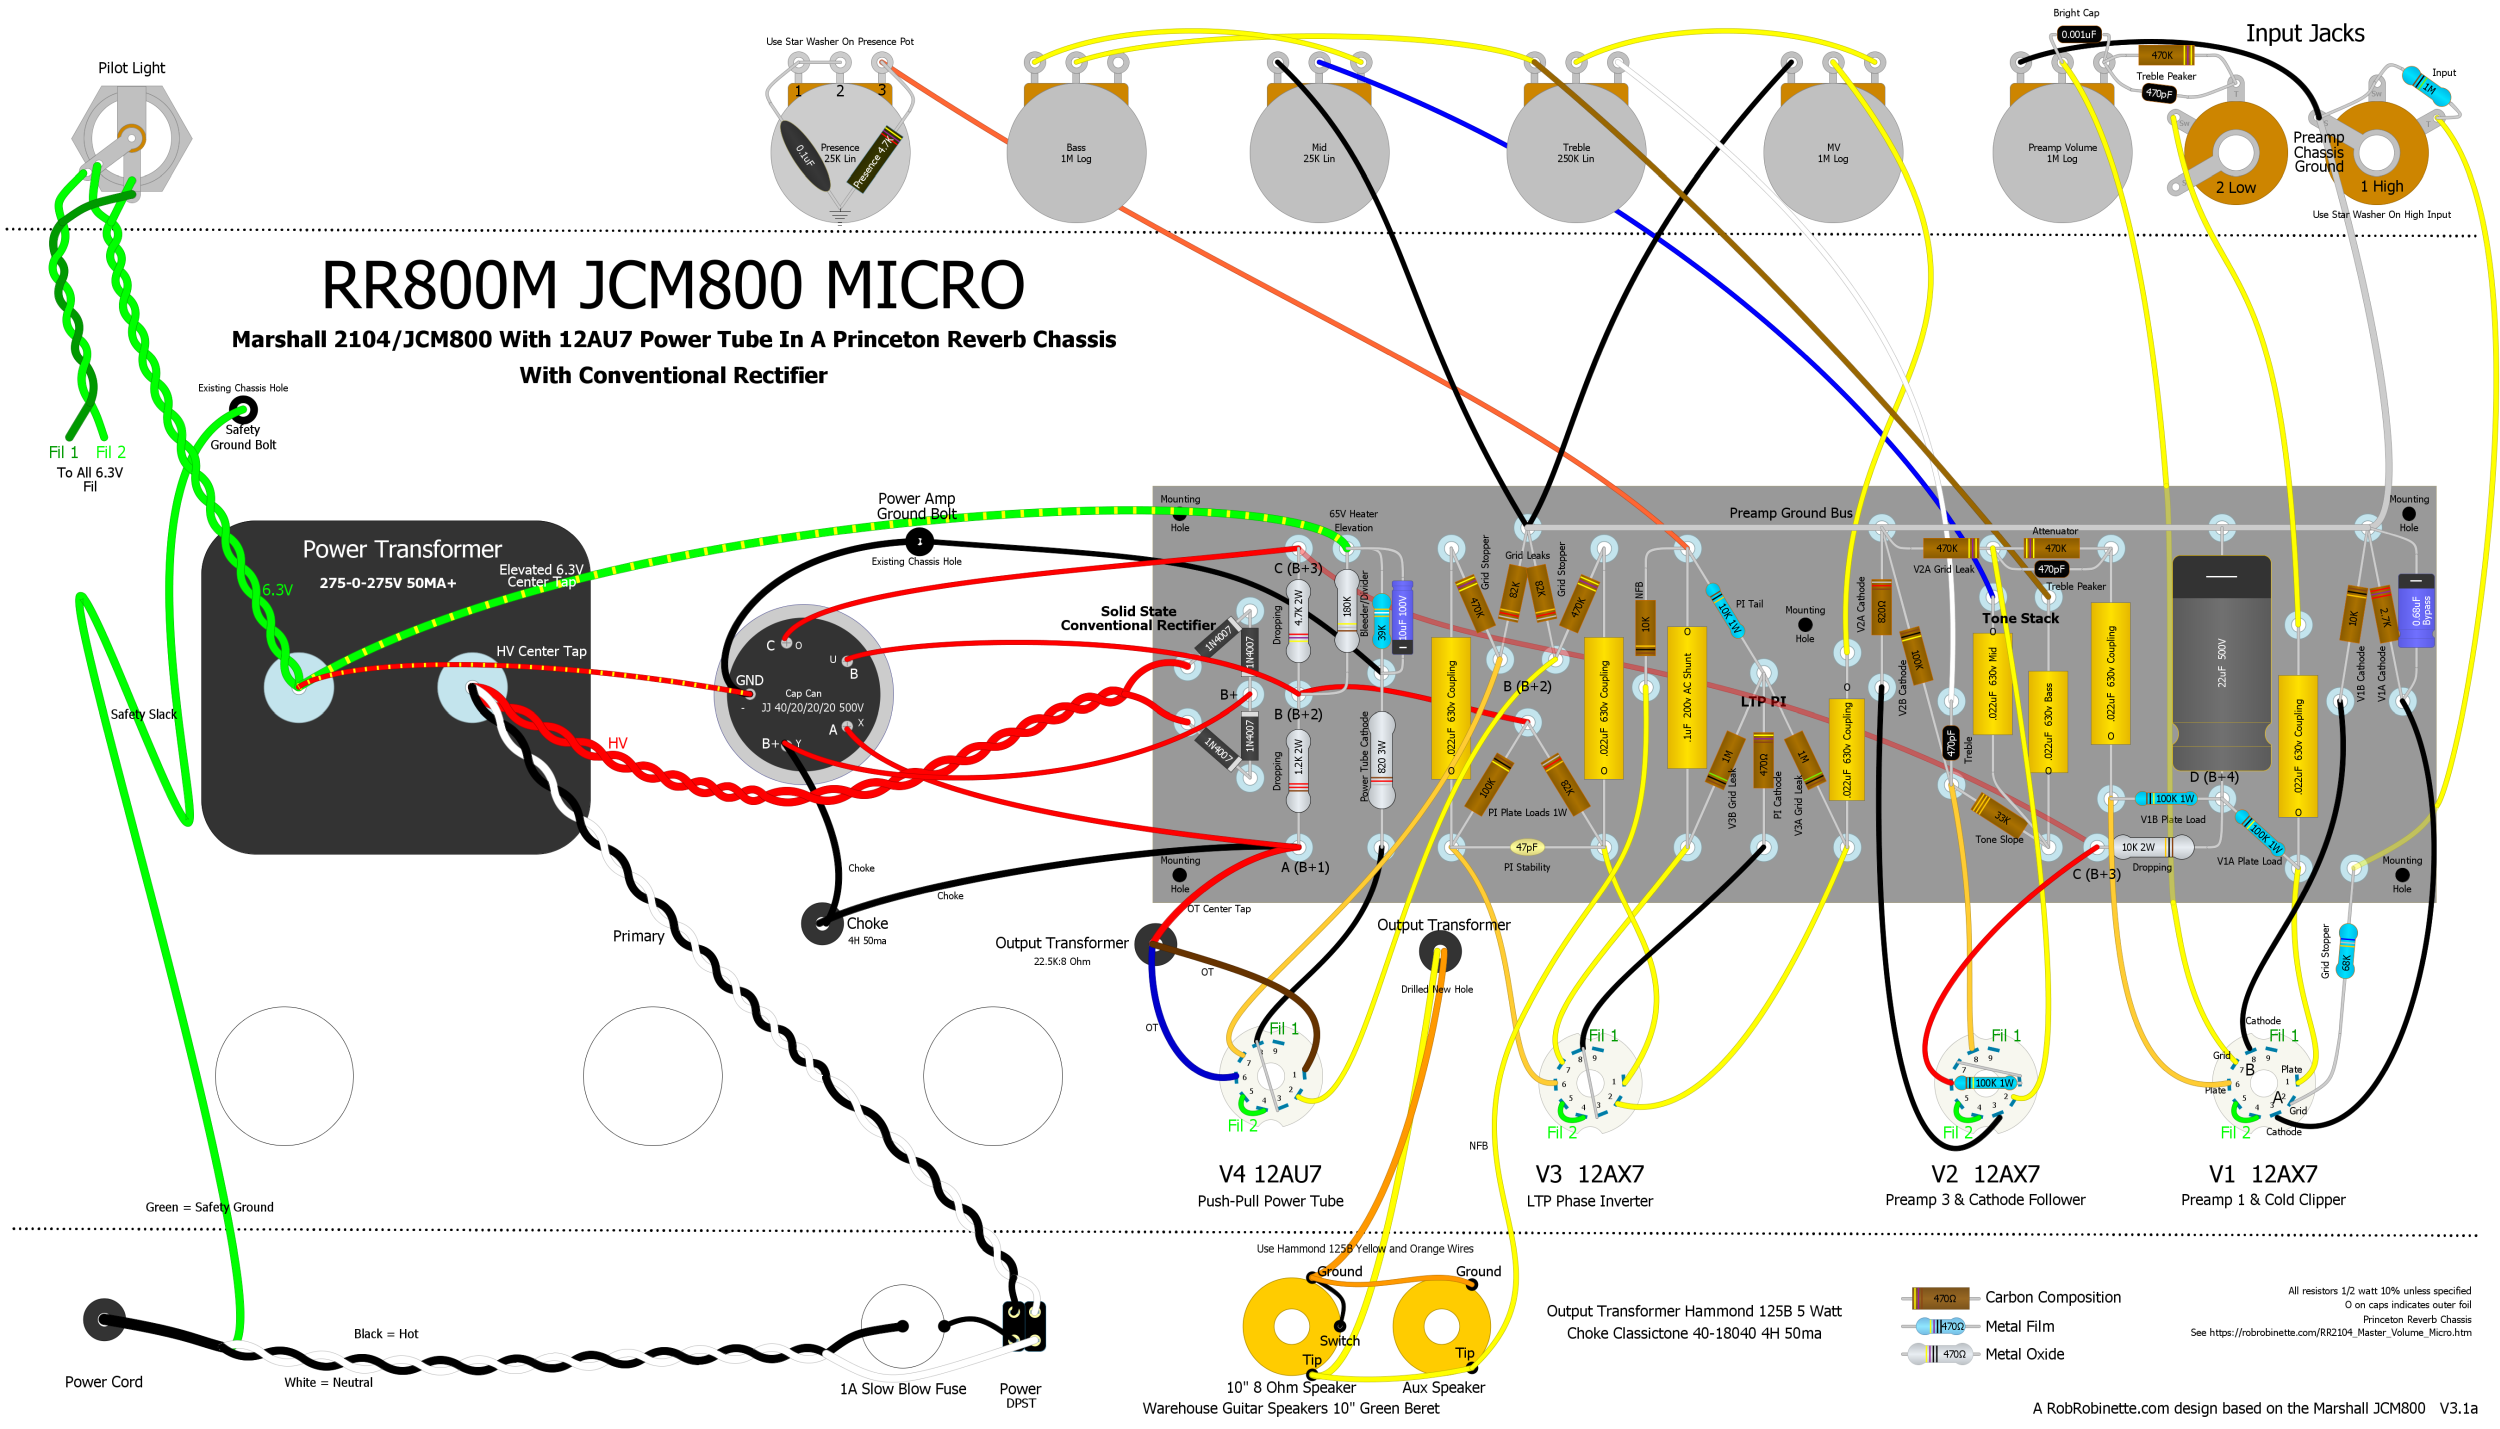
Uploaded some photos of the components on the board, if I have already made a mistake hopefully one of the nice folks on the forum will point them out. Link to Rob's page https://robrobinette.com/RR2104_Master_Volume_Micro.htm

Chassis is 15" x 7" x 3", started drilling it but now waiting on the transformers before I drill any more holes. PT is 275-0-275 @ 100mA with 3.15-0-3.15 @ 3A with 120V or 125V primary. Being custom wound with no 5V or Bias tap. OT is a 2W 22,500:8Ω

Have received my head cab from CCF drawers in PA.(photo 0812) All Maple, planing to stain it.
They cut to size and created the dovetailing and dado for the drawer bottom(amp face) and shipped it flat.
All I have to do is glue it together. (infamous last words)
 

Attachments

  • IMG_0809.JPG
    IMG_0809.JPG
    54.9 KB · Views: 187
  • IMG_0810.JPG
    IMG_0810.JPG
    54.1 KB · Views: 185
  • IMG_0811.JPG
    IMG_0811.JPG
    55 KB · Views: 186
  • IMG_0807.JPG
    IMG_0807.JPG
    119.9 KB · Views: 174
  • IMG_0812.JPG
    IMG_0812.JPG
    101.1 KB · Views: 181
  • RR2104_Master_Volume_Micro_Layout.pdf
    779.4 KB · Views: 243

anthrotony

Tele-Meister
Joined
Oct 23, 2017
Posts
272
Age
67
Location
France
Will look forward to your build report. I too was intrigued by both of these RobRob designs (but need to get my 5e3 out of the way first). I'd be especially interested to hear any sound clips as you get close to the finished amp! God luck with the build!!!
 

Asmith

Friend of Leo's
Joined
Nov 27, 2014
Posts
4,259
Location
East Yorkshire, England
Im getting addicted to these amp build threads after building me first. I'm saying no to myself though, if I do anything else amp related it will be a new cab/modding the current one. Its a great way to achieve a new sounds.

Anyway subscribed.

How big will your little amp end up and whats the plan for reverb? Is it going to be a long tank, short, little blue box, digital? I recently designed and built a spring reverb unit that goes in an amps effects loop that uses a short reverb tank.
 

robrob

Poster Extraordinaire
Ad Free Member
Joined
Dec 29, 2012
Posts
8,700
Location
United States
The amp is coming along very nicely. You're going to freak when you hear this thing.

A Facebook forum member built the first Master Volume Micro (1 watt JCM800 with a 12AU7 true push-pull power tube) and he posted a very short clip and the amp sounded exactly like a JCM800. The amp is a JCM800 through the LTP phase inverter and of course the power amp is massaged for the 12AU7 power tube.

I've been extremely busy with other aspects of my life so I haven't completed a Blackvibe Micro or MV Micro myself.

The amp is designed for a Princeton Reverb chassis and cab.

There is also a Master Volume 6V6 version if you'd like a 20 watt JCM800. It too uses a Princeton Reverb chassis.

RR2104_Master_Volume_Micro_Schematic_small.png


RR2104_Master_Volume_Micro_Layout_small.png

The 6V6 Version:
RR2104_Master_Volume_6V6_Layout_small.png
 
Last edited:

robrob

Poster Extraordinaire
Ad Free Member
Joined
Dec 29, 2012
Posts
8,700
Location
United States
Just want to double-check with you that you have the underboard B+3 wire in place?

When you play this amp for your friends you've gotta show them the four 12A*7 tubes before you fire it up. The tone is mind bending.
 
Last edited:

fastedtex

TDPRI Member
Joined
Dec 20, 2018
Posts
92
Location
Irving, TX
Just want to double-check with you that you have the underboard B+3 wire in place?

When you play this amp for your friends you've gotta show them the four 12A*7 tubes before you fire it up. The tone is mind bending.

Rob you made me go look to be sure. Yep, it's there.;)
About to pee my pants to hear "the thing" but I'm trying to restrain the big kid in me and go slow and triple check my work.
 

fastedtex

TDPRI Member
Joined
Dec 20, 2018
Posts
92
Location
Irving, TX
@robrob , I noticed that you made a revision to the heater center tap elevation?

I have my board obviously as the original layout, is it worth adding a couple of eyelets to include that change?
 

robrob

Poster Extraordinaire
Ad Free Member
Joined
Dec 29, 2012
Posts
8,700
Location
United States
The 65v heater elevation was added to make life easier on the cathode follower and add safety bleeder resistors. If you have the tools to add eyelets then I recommend you do it but I wouldn't bother if you don't have the tools.
 

fastedtex

TDPRI Member
Joined
Dec 20, 2018
Posts
92
Location
Irving, TX
Had some nasty weather last week and had tree damage to clean up, have not had time to do much to my amp project.:mad:
However I did have some time today.
Added a couple of turrets and made the changes to the board to facilitate the 65v heater elevation.
After some problems, got the face plate done and some other controls and components installed and some wiring done.
Had to knock off, too bleary eyed to continue.
IMG_0828.JPG
 

fastedtex

TDPRI Member
Joined
Dec 20, 2018
Posts
92
Location
Irving, TX
How big will your little amp end up and whats the plan for reverb? Is it going to be a long tank, short, little blue box, digital? I recently designed and built a spring reverb unit that goes in an amps effects loop that uses a short reverb tank.

No reverb as I'm building this one as Rob designed it.
The chassis is 15" wide 3" tall 7" deep. Cab will be a head cab 16.5" x 7.5" x 9"
Have you posted you reverb design?
 

fastedtex

TDPRI Member
Joined
Dec 20, 2018
Posts
92
Location
Irving, TX
Dang I used the same Hammond chassis for my recent micro build as well! Plenty roomy, could be smaller but I'm happy with the choice.

I put my FIRST build on hold because I used a chassis TOO small for the deluxe micro and ran into issues... like I can't do this, it just does not fit.
I'm going to salvage the parts and order a larger chassis and finish it however Rob posted this amp and I just had to build it first.
So i got the widest chassis from Hammond so I did not make the same mistake. I agree it could be smaller but so far I am having much more fun assembling it with plenty of room to work.
 

fastedtex

TDPRI Member
Joined
Dec 20, 2018
Posts
92
Location
Irving, TX
Super nice faceplate!!!...I really need to build this one !

Thanks @Pierre67. If you look close you can see that i need to learn how to read a ruler. The first POT on the right is not spaced correctly.
Good news is it doesn't affect the sound.;)

I think you should build it, @robrob says that the first one sounded fantastic on the sound clip he heard.
 

anthrotony

Tele-Meister
Joined
Oct 23, 2017
Posts
272
Age
67
Location
France
Thanks @Pierre67. If you look close you can see that i need to learn how to read a ruler. The first POT on the right is not spaced correctly.
Nice looking, nonetheless!

Can you share how you built the faceplate, please? This is still something I'd like to understand better as I can't justify having a custom one built. When I've used graphics programs to design one I've particularly struggled with the spacing of the 12 gradations on each control!
 

fastedtex

TDPRI Member
Joined
Dec 20, 2018
Posts
92
Location
Irving, TX
Nice looking, nonetheless!

Can you share how you built the faceplate, please? This is still something I'd like to understand better as I can't justify having a custom one built. When I've used graphics programs to design one I've particularly struggled with the spacing of the 12 gradations on each control!

I used Adobe Illustrator to create the graphics.
Created a circle with a diameter based on the length of the chicken head knob.
Used the "text on a path" tool to enter the numbers on the "path" of the circle.
Using kerning and letter spacing I visually adjusted the numbers to come close to the gradations.
There are controls to adjust where the text on the path start and stop.
Took many adjustments with the stop/start and kerning/letter spacing to get it close.(and it is not exact, just close)

That was the easy part. Used a clear label material I got online to print with laser printer. Worked great, printed well.
Getting it applied to the face-plate straight, there is where the fun starts.
The label has a very high tac glue and it does not allow re-positioning so getting it straight is difficult at best.
Trying to pull the label off will take the gold paint with it.:eek:

A flat-bed printer would be much better than the "label" method but I don't have one.
People that do in the large format printing biz want too much $$ just to print a one off.(since I'm not building to sell them i don't need 24 of the same face-plate)
So, the label was the only method I could think of for the one-off.
 

fastedtex

TDPRI Member
Joined
Dec 20, 2018
Posts
92
Location
Irving, TX
How many volts are going to the Presence POT?
The layout specs a 600V 0.1uF cap on lug 1 to ground.
Is that just since the rest of the caps were at 600 save the AC shunt?
The only connection to the negative feed back is the PI tail resistor and the AC shunt CAP.

The reason for the question as some of you have most likely surmised, is I don't have a 600V 0.1 CAP.:oops:
 
Top