Honey burst finish

  • Thread starter Ljislink24
  • Start date
  • This site may earn a commission from merchant affiliate links like Ebay, Amazon, and others.

Ljislink24

Tele-Holic
Joined
Mar 13, 2024
Posts
728
Location
Out West
I've never attempted a burst finish & looking for some insight on this Fender Honey Burst & if anyone has done one like this with spray cans. It's such a light burst I'm not even sure that was done with tinted lacquer or just stain ? The only color that's close I've seen in spray cans is Stew Mac cherry burst. Fender color is this,

Stew Mac,

Thanks for any advice on spraying a burst !
 

eallen

Friend of Leo's
Joined
Jul 30, 2013
Posts
4,344
Location
Bargersville/Indianapolis, Indiana
That is so light I call it more of an edge fade using a single darker color. It definately isn't a cherry sunburst.

It looks to be amber tint with a slightly amber brown edge. Spray the base color you want. Follow by aiming the darker edge color off the edge of the body away from the Center. Go in an even motion around the periphery until the shade desired is achieved. If more of a sunburst is desired the center section will need to be sprayed with yellow tint and the primary color faded away from the center. Follow with clear. Practice on scrap before the real thing.

You can also use the same color as the main color to create a fade as more coats create a darker shade. Depending on the amber doing so can result in more of an orange rather than brownish.
 

Pixelpounder

TDPRI Member
Joined
Aug 29, 2023
Posts
37
Age
65
Location
Chicagoland Area
Use a tinted lacquer. I'd try amber and Dark amber, but be careful with the dark amber you choose, some are more opaque than others. Then spray a test piece to make sure you have the look and to tighten up your technique (if needed)
 

Freeman Keller

Doctor of Teleocity
Ad Free Member
Joined
Aug 22, 2018
Posts
15,880
Age
80
Location
Washington
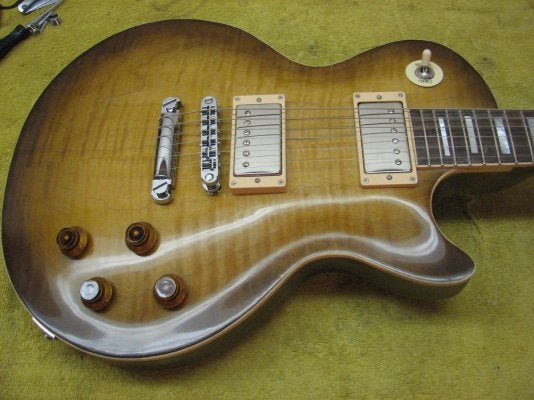
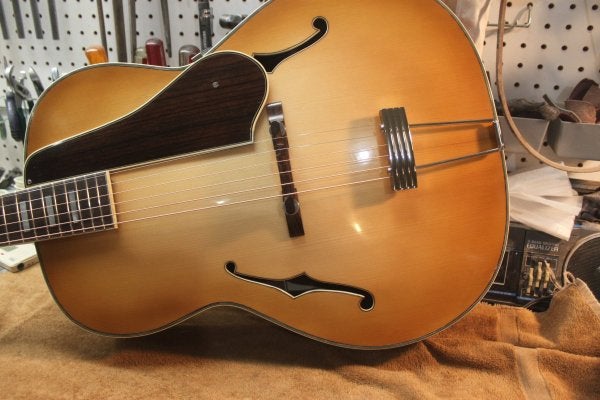
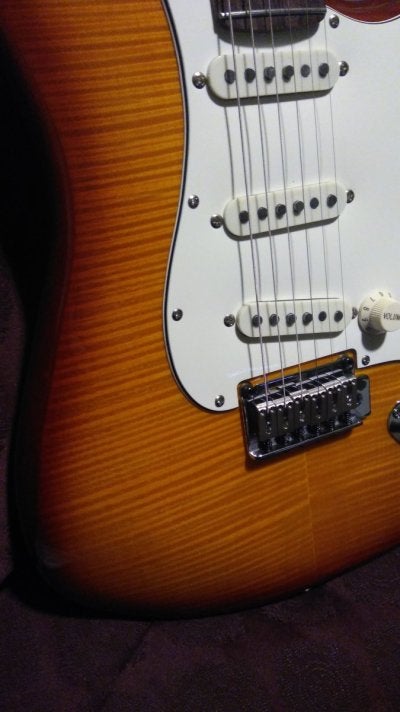
A little bit will depend on the wood you are using. I've done a couple of bursts like that on different woods, let me know if you like any of these and I'll talk you thru what I did

Classic Gibson 58 burst on maple

IMG_0802.JPG

Simple little edge burst on maple

IMG_4809.JPG

What I call "ice tea' burst on spruce

IMG_7383.JPG

One heads up, if you are going to use rattle cans get the auxiliary nozzles that StewMac and other sell. They give a much better pattern which is easier to control, mine wer all done with a gun. And remember the cardinal rule of finishing - practice on scraps of the same wood.
 

Ljislink24

Tele-Holic
Joined
Mar 13, 2024
Posts
728
Location
Out West
A little bit will depend on the wood you are using. I've done a couple of bursts like that on different woods, let me know if you like any of these and I'll talk you thru what I did

Classic Gibson 58 burst on maple

View attachment 1250098

Simple little edge burst on maple

View attachment 1250099

What I call "ice tea' burst on spruce

View attachment 1250103

One heads up, if you are going to use rattle cans get the auxiliary nozzles that StewMac and other sell. They give a much better pattern which is easier to control, mine wer all done with a gun. And remember the cardinal rule of finishing - practice on scraps of the same wood.
Nice looking finishes ! And spot on with wood species, I've got 2 bodies on the way 1 swamp ash & 1 alder. Thinking this through the ash grain may not look so good with a light amber body & the alder may be to brown or dark ? That ice tea is a bit like that Fender with it's a light burst very nice. And per just about everyones advice I will do samples for sure. In the mean time I'll get some amber & dark tinted amber lacquer & some ash/alder & see what happens.
Thanks everyone
 

Freeman Keller

Doctor of Teleocity
Ad Free Member
Joined
Aug 22, 2018
Posts
15,880
Age
80
Location
Washington
Nice looking finishes ! And spot on with wood species, I've got 2 bodies on the way 1 swamp ash & 1 alder. Thinking this through the ash grain may not look so good with a light amber body & the alder may be to brown or dark ? That ice tea is a bit like that Fender with it's a light burst very nice. And per just about everyones advice I will do samples for sure. In the mean time I'll get some amber & dark tinted amber lacquer & some ash/alder & see what happens.
Thanks everyone

OK a couple more comments and a couple more thoughts.

Some woods like ash, mahogany have open pores. Lacquer shrinks back and does not fill the pores so you don't get a nice smooth glossy surface, Alder, maple, spruce have closed pores, lacquer will lay smoothly on them. So you have two different situations with your body woods, to get a smooth finish on the ash you should fill the pores (some people call it 'grain filling" but to me that is something else.

Everyone has a favorite pore filling material and there are reasons to use different ones., Mine is a finishing resin called Zpoxy and we can discuss how I use it separately. Zpoxy has a second function which we will address in a moment,

The tele in your first link is alder so it doesn't have that problem. The top in the SM link is quilted maple, not only does it not require pore filling it is a different wood than yours so it may react differently,

Next, I think it is a good idea to think about the entire finishing process - what are you going to do with the back and side? Brown to match the outside of the burst, maybe burst the back to match the top, maybe a contrasting color. If you plan to do any staining the end grain on the sides will absorb more stain than flat grain, that is not so much of a problem if you are shooting tinted lacquer,

I make it a point before starting any finishing (usually when I first start building the guitar) to wipe the woods with naphtha (white gas) or DNA. That will show you the color the wood would be if you just shot clear lacquer. You'll see how grain and figure reacts to just a clear wetting finish like lacquer. With many woods you'll decide that the real color only needs a bit of help, that is what happened with the telecaster in the second picture. Neither ash or alder are noted as being highly figured, but doing the naphtha test will show you what you've got.

I shoot all my fades and sunbursts with the guitar laying flat on its back on a low table maybe 2-3 feet off the floor. I set it on little blocks of wood so the sides don't touch anything. I can walk completely around the guitar, I can either shoot the top close to me or on the opposite side, I can shoot the sides at 90 degrees and get in the cutaway horns (and if the neck is on I can deal with it also). I have never mastered shooting a guitar hanging from the neck or tail end, I'm not able to hold it by a stick screwed into the neck pocket and have any control over my gun.

As I mentioned before, get some of the little nozzles that SM sells, after a session take off the can and throw it in some lacquer thinner. Their pattern can be adjusted vertically or horizontal and is much better than a standard rattle can. I also recommend warming the cans in warm water before your session.

Keep your sanding to a minimum. I sand to 320 before starting, scraping is also good. I'll work on the burst with a few very light coats of the amber, just scuff sand between coats or as necessary - you are trying to build film thickness but at the same time keeping the finish translucent so you can see the grain. You also need to lay down enough lacquer that it will flow but not run or sag, at the same time sort of mist the finish to make the transition smooth. Bursts are not easy and while you can use rattle cans they are less than ideal.

When you are happy with the colors and the transitions shoot six to ten coats of clear, lightly sand to 320 every two or three coats. When you are happy with that wet sand from 800 or 1000 to 2000 and buff.

I do have pictures of each of those finishes going on and would be happy to post them, but you are going to learn far more buying some cans of finish and shooting it as some hunks of your wood

I forgot to attach this, it is the StewMac finishing schedule and its basically what I learned and what I follow

 
Last edited:

Ljislink24

Tele-Holic
Joined
Mar 13, 2024
Posts
728
Location
Out West
OK a couple more comments and a couple more thoughts.

Some woods like ash, mahogany have open pores. Lacquer shrinks back and does not fill the pores so you don't get a nice smooth glossy surface, Alder, maple, spruce have closed pores, lacquer will lay smoothly on them. So you have two different situations with your body woods, to get a smooth finish on the ash you should fill the pores (some people call it 'grain filling" but to me that is something else.

Everyone has a favorite pore filling material and there are reasons to use different ones., Mine is a finishing resin called Zpoxy and we can discuss how I use it separately. Zpoxy has a second function which we will address in a moment,

The tele in your first link is alder so it doesn't have that problem. The top in the SM link is quilted maple, not only does it not require pore filling it is a different wood than yours so it may react differently,

Next, I think it is a good idea to think about the entire finishing process - what are you going to do with the back and side? Brown to match the outside of the burst, maybe burst the back to match the top, maybe a contrasting color. If you plan to do any staining the end grain on the sides will absorb more stain than flat grain, that is not so much of a problem if you are shooting tinted lacquer,

I make it a point before starting any finishing (usually when I first start building the guitar) to wipe the woods with naphtha (white gas) or DNA. That will show you the color the wood would be if you just shot clear lacquer. You'll see how grain and figure reacts to just a clear wetting finish like lacquer. With many woods you'll decide that the real color only needs a bit of help, that is what happened with the telecaster in the second picture. Neither ash or alder are noted as being highly figured, but doing the naphtha test will show you what you've got.

I shoot all my fades and sunbursts with the guitar laying flat on its back on a low table maybe 2-3 feet off the floor. I set it on little blocks of wood so the sides don't touch anything. I can walk completely around the guitar, I can either shoot the top close to me or on the opposite side, I can shoot the sides at 90 degrees and get in the cutaway horns (and if the neck is on I can deal with it also). I have never mastered shooting a guitar hanging from the neck or tail end, I'm not able to hold it by a stick screwed into the neck pocket and have any control over my gun.

As I mentioned before, get some of the little nozzles that SM sells, after a session take off the can and throw it in some lacquer thinner. Their pattern can be adjusted vertically or horizontal and is much better than a standard rattle can. I also recommend warming the cans in warm water before your session.

Keep your sanding to a minimum. I sand to 320 before starting, scraping is also good. I'll work on the burst with a few very light coats of the amber, just scuff sand between coats or as necessary - you are trying to build film thickness but at the same time keeping the finish translucent so you can see the grain. You also need to lay down enough lacquer that it will flow but not run or sag, at the same time sort of mist the finish to make the transition smooth. Bursts are not easy and while you can use rattle cans they are less than ideal.

When you are happy with the colors and the transitions shoot six to ten coats of clear, lightly sand to 320 every two or three coats. When you are happy with that wet sand from 800 or 1000 to 2000 and buff.

I do have pictures of each of those finishes going on and would be happy to post them, but you are going to learn far more buying some cans of finish and shooting it as some hunks of your wood

I forgot to attach this, it is the StewMac finishing schedule and its basically what I learned and what I follow


Thank-you very much for taking the time to write all that up ! Can't beat experience I'll use your advice for sure. I build furniture/cabinets & unless it's a super simple finish like hard wax oil I send it to a pro.
This is going fun for me, going to be interesting to see which body ash or alder is going to look the best with burst, I'll post up finished body when done.
Thanks again
 

Beebe

Tele-Afflicted
Joined
Jun 1, 2021
Posts
1,596
Location
Atlanta
For a "honey" burst I would use Propolis mixed with shellac. Propolis, if you are unaware, is an alcohol soluble golden brown resin made by honey bees and is traditionally used in violin varnishing.

I get mine here:


I've found this one sold as an edible supplement to be nice as well

Stakich Bee Propolis Chunks - Pure, Natural - 4 Ounce https://a.co/d/3qFcVOk

You can probably get the look you are going for with various shades of shellac as well.

I like to build up a layer of clear over my base color and level sand before spraying the edge. It gives the edge something to melt and diffuse into and if you mess up the edge you might be able to sand it off without starting over. ...not an ultra thin way, but a safe way for starting out.

I imagine bursts are tricky from a spray can, as you usually set your gun to output a miniscule amount of paint in a tight circular shape, like an air brush and make multiple passes...

...When I first started I didn't really know this and sprayed too heavy. It's possible to get good results, you just need to move faster and get it right with fewer passes.
 

Sea Devil

Friend of Leo's
Joined
Sep 23, 2006
Posts
4,866
Age
62
Location
Brooklyn, NY
I did a burst finish with spray cans and am happy with it. It involved a lot of masking. I sprayed the edges black from the outside in, and did my fades from the inside out, masking the body with a hand-held cardboard template of the body shape. I'm not sure whether that's applicable here, since what you're going for is so much subtler.

Mohawk has a line called "Shadow Toners" that would be ideal for this purpose. The tone builds up very slowly and is easy to control. I think that would be your best bet.
 
Last edited:

Ljislink24

Tele-Holic
Joined
Mar 13, 2024
Posts
728
Location
Out West
For a "honey" burst I would use Propolis mixed with shellac. Propolis, if you are unaware, is an alcohol soluble golden brown resin made by honey bees and is traditionally used in violin varnishing.

I get mine here:


I've found this one sold as an edible supplement to be nice as well

Stakich Bee Propolis Chunks - Pure, Natural - 4 Ounce https://a.co/d/3qFcVOk

You can probably get the look you are going for with various shades of shellac as well.

I like to build up a layer of clear over my base color and level sand before spraying the edge. It gives the edge something to melt and diffuse into and if you mess up the edge you might be able to sand it off without starting over. ...not an ultra thin way, but a safe way for starting out.

I imagine bursts are tricky from a spray can, as you usually set your gun to output a miniscule amount of paint in a tight circular shape, like an air brush and make multiple passes...

...When I first started I didn't really know this and sprayed too heavy. It's possible to get good results, you just need to move faster and get it right with fewer passes.
Thanks, never heard of those color options interesting for sure. I've been doing samples with advice from this thread & getting mixed results. So I have given up on nitro spray cans. I'm waiting for my new spray gun & EM6000 water borne materiel to show up. The next hurdle I have is (besides learning curve on WB lacquer & spray rig) will be color. I sprayed stew mac vintage amber base with an Ohio valley "honey" color burst. And it's the exact color I want. If anyone has any tips or formula start point for these colors let me know. I have a lot of transtint dye I'm hoping I can use for color.
Thanks everyone for your help & replies.
 

Attachments

  • Amber.jpg
    Amber.jpg
    192.5 KB · Views: 44

Pixelpounder

TDPRI Member
Joined
Aug 29, 2023
Posts
37
Age
65
Location
Chicagoland Area
+1 For the Nitro finishes. I have tried Poly and sudo lacquer finishes but they are not close in quality to a nicely done Nitro finish.
 
Top