First CNC Build - '72 Thinline Tele Style

jfitch45

TDPRI Member
Joined
Sep 1, 2017
Posts
77
Age
32
Location
Midlothian, VA
Good afternoon everyone! I thought I would try to document my dad and I's second tele style build. This is actually our first full-fledged guitar project on his new CNC machine he got back in December, so it has taken a few months of trial and error in both design and build to get to this comfortable and 'proficient' so to speak.

I've never owned an electric guitar with humbuckers, much less a '72 Thinline with WRHBs, but I was drawn to building one to break this trend and try something new. I began by searching through Fender-Ish guitar plans and choosing my desired plan.

I imported the PDF file into AutoCAD for some fine tuning of the vectors and then into VCarve for the CNC.

img1.jpg

The body is ash with a walnut back strip. The drop top is also walnut. All the walnut was actually leftover scrap from a dining room table my dad and I built for my house last year. He stumbled upon the scrap in his shop just before we started the build and we thought it would be perfect for this guitar.

IMG_9253.jpg

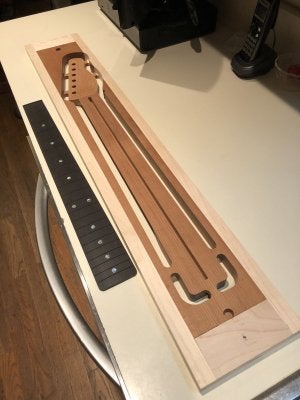
I don't think we had the drop top ready at this point, but we began with the pocket tool paths for the chambers.

img2.jpg

img3.jpg

img4.jpg

img5.jpg img6.jpg
 

jfitch45

TDPRI Member
Joined
Sep 1, 2017
Posts
77
Age
32
Location
Midlothian, VA
Next, we glued the walnut drop (0.25" thick) to the chambered ash body (1.5" thick). Make sure BEFORE you glue your drop top on that you mark on your body somewhere which end is the neck end and which is the bottom. This way your chamber cavities correspond correctly with your F hole and control cavitities once you glue your drop top and begin to rout.


img20.jpg

The current body blank weight at this stage was 8lbs 14oz.

img7.jpg

Next we routed out the body profile, neck pocket, pickup cavity, F hole, and control cavity, as well as the string holes and bridge mount holes (both accurately spaced to fit the Callaham Vintage Hardtail bridge), as well as a binding channel. The binding channel was created by offsetting the body profile vector by the thickness of the binding.

img8.jpg

This dropped the weight a little over a pound to 7lbs 11.75oz.

img9.jpg

img10.jpg img11.jpg

The bodyweight is now a whopping 4lbs and 3/8oz.

img21.jpg
 

jfitch45

TDPRI Member
Joined
Sep 1, 2017
Posts
77
Age
32
Location
Midlothian, VA
We have never experimented with binding before, but after reading some posts on TDPRI and watching every YouTube video ever uploaded on T style binding, we went for it. I bought the tape deck and binding tape from StewMac a while back during some sort of sale they had and it definitely came in handy.

Prior to applying the binding, we applied several coats of Aqua Coat grain filler to the top and back, and then a thin, uniform spray coat of Shellac to the entire body to protect the wood from any CA glue residue (there was plenty).

We taped the binding on first, using a heat gun to facilitate some of the sharper bends around the horns, and then wicked in super thin CA glue between the body and binding.

I know lots of people use the Acetone method and lots use the CA glue method in installing bindings, but we went with the CA glue method for this particular job. Looking back, it was a massive pain getting the tape and CA glue residue off the body, but the binding had no gaps whatsoever. The CNC cut a super clean binding channel and we ensured there were no gaps during taping and gluing. Needless to say, we were extremely happy with the results. If anyone has any other binding options or methods, I'm all ears!

img12.jpg
img13.jpg
 

jfitch45

TDPRI Member
Joined
Sep 1, 2017
Posts
77
Age
32
Location
Midlothian, VA
This brings us to the current stage of the build. Once all the tape and CA glue residue, was removed, we scraped and then sanded and sanded and sanded. We opted to grain fill the sides after the binding was installed and scraped and then we actually began wet sanding with 600 grit. In past body builds, we failed to give the sides the true attention and sanding they deserved, so we were determined to get some smooth, well-sanded sides with this build.

After we were satisfied, we hit the entire body with a coat of spray vinyl sealer to prep for spraying the clear Nitro finish! The weather is looking wet and cold this week so we may not begin spraying, but I will have more updates once we do.

The first three pictures are immediately after the vinyl sealer was applied.

img14.jpg
img15.jpg
img16.jpg


The next photos are a few minutes later once the sealer had dried quite a bit.

img17.jpg
img18.jpg
img19.jpg
 

jfitch45

TDPRI Member
Joined
Sep 1, 2017
Posts
77
Age
32
Location
Midlothian, VA
Misc. hardware for this build includes:

  • Pearloid '72 thinline pickguard, routed for WRHBs
  • Callaham Vintage Hardtail bridge
  • Fender locking tuners

I am undecided on both the pickups and the neck. Since we live in Richmond, VA it was easy to drive a few minutes down the road to Lindy Fralin's shop and play some of his guitars and pick out the pickups I wanted for past single coil builds. I am torn on what kind of WRHBs to purchase though. From what I have read, some of the the best available options out there are Fralin, Lollar, Revel, and Brandonwound, the last two being the most cost-friendly options. If anyone has any recommendations, please let me know!

As for a neck, we obviously have the capability to cut one out with the CNC, but I have been having much difficulty modeling the neck profile and transitions. I am not proficient on any CAD software whatsoever, but I have access to Fusion 360. The most difficult part though aside from the modeling itself is exporting the file from Fusion into the 2D VCarve software for milling. I'm still weeding my way through the posts on here, but any recommendations are welcomed and greatly appreciated.

I hope you've enjoyed the posts thus far. Thanks y'all!
 

Freeman Keller

Doctor of Teleocity
Ad Free Member
Joined
Aug 22, 2018
Posts
15,880
Age
80
Location
Washington
I'm liking the woods and grains a lot. I'll also just say that I converted from acetone (and wood glue) on binding to CA and pretaping and will never go back. If you are careful you won't get much CA on the rest of the guitar and in my experience it doesn't show up under finish like plastic or wood glues do.
 

jfitch45

TDPRI Member
Joined
Sep 1, 2017
Posts
77
Age
32
Location
Midlothian, VA
I'm liking the woods and grains a lot. I'll also just say that I converted from acetone (and wood glue) on binding to CA and pretaping and will never go back. If you are careful you won't get much CA on the rest of the guitar and in my experience it doesn't show up under finish like plastic or wood glues do.

Thanks for the input! I think I can definitely attribute much of the excess CA glue to lack of experience in installing binding. I trust it gets better with each subsequent build we take on.
Thanks again!
 

Jim_in_PA

Friend of Leo's
Joined
May 31, 2019
Posts
4,996
Location
SE PA - Doylestown PA
Bravo on that beautiful walnut cap! Great figure. Nice job on the CNC work, too. You have it down very nicely. VCP is very adaptable for almost anything you will want to do. Even though you don't have the modeling available in Aspire, there are some very interesting ways to leverage the molding tool path to do contouring when you get to a build that will benefit from them.

I'm looking forward to more installments of your build!
 

Thinline casket

Tele-Meister
Joined
Mar 10, 2020
Posts
453
Age
60
Location
Flintstone
Beautiful.

I have Lollars in mine. It's my number 1 because of those pups. I did a lot of research. It came down to Lollars or the Creamery '71 (1/2 alnico option). I wasn't willing to wait 45 days. If you are, you can save $100. 500k pots.
 

jfitch45

TDPRI Member
Joined
Sep 1, 2017
Posts
77
Age
32
Location
Midlothian, VA
It’s been a while since I’ve posted anything regarding this build, but we are finally starting to make progress again. After months of fighting and losing with VCarve Pro to produce the neck I designed in Fusion 360, I had a friend of mine machine the neck using his ShopSabre CNC. We were able to produce the fretboard on our machine, though!
I’m extremely pleased with the fit of the abalone pearl fret dots!
 

Attachments

  • 87886A00-FFB7-4942-B3B2-EBBA1DD7B005.jpeg
    87886A00-FFB7-4942-B3B2-EBBA1DD7B005.jpeg
    248.2 KB · Views: 108
  • 65E00842-DBD1-4135-AAC8-00FE45B2AA0E.jpeg
    65E00842-DBD1-4135-AAC8-00FE45B2AA0E.jpeg
    116.4 KB · Views: 128
  • B0569FB5-0730-449D-A53E-900B36121435.jpeg
    B0569FB5-0730-449D-A53E-900B36121435.jpeg
    141.5 KB · Views: 99
  • 798CFA2D-D3DD-4E9E-BE10-12A4A311AB32.jpeg
    798CFA2D-D3DD-4E9E-BE10-12A4A311AB32.jpeg
    145.8 KB · Views: 124
  • 98C242F6-356D-4100-B45A-9777997EF650.jpeg
    98C242F6-356D-4100-B45A-9777997EF650.jpeg
    104.8 KB · Views: 101
  • EFAC0301-83C0-470D-B839-B27D5FF2D8FD.jpeg
    EFAC0301-83C0-470D-B839-B27D5FF2D8FD.jpeg
    131.5 KB · Views: 96
Last edited:
Top