Filing down installed, pre-slotted nut- quick advice?

  • Thread starter Johnny Dubs
  • Start date
  • This site may earn a commission from merchant affiliate links like Ebay, Amazon, and others.

Johnny Dubs

Tele-Holic
Joined
Jun 9, 2022
Posts
757
Location
Los Angeles
I’ve never filed nut slots and I’m about to embark on some extensive research so thought I’d start here.

Protection, absolutely. I just saw a note about that in a thread re shaping the top of a preinstalled nut; I was going to rely on tape tbh, so thanks. Might not be as dangerous, what I’m doing, but I’m historically less careful than I should be.

What other quick advice would you give someone?

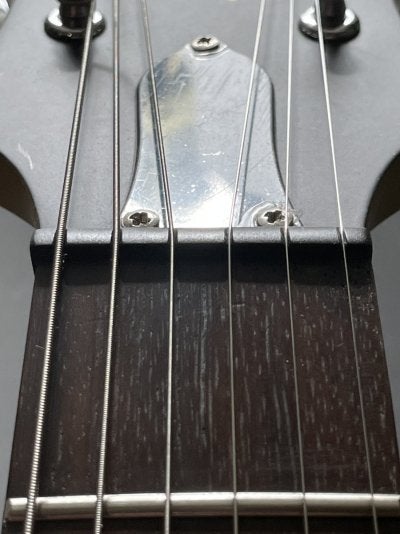
I’m working on a $50 epi special (pawn shop find complete with box and non-working bridge pickup.)

I plan to upgrade the nut at some point; I haven’t measured yet but the factory slots are all cut too high (and too close to the same depth?) for my taste.

I’m going to use this to learn what I’m doing. Wanna help me figure out what I’m going to do wrong, you know, before I sin?

Thanks in advance, and have a great weekend!
 

Attachments

  • IMG_6473.jpeg
    IMG_6473.jpeg
    167.1 KB · Views: 372
Last edited:

Freeman Keller

Doctor of Teleocity
Ad Free Member
Joined
Aug 22, 2018
Posts
15,880
Age
80
Location
Washington
Filing nut slots is just one part of doing what we fondly call "a setup". First carefully measure the existing first fret action and determine how far it is from you target goals. For most acoustic and electric guitar I like first fret action somewhere around 14 to 16 thousands at the first string, rising to aroud 18 thou at the 6th. Fenders specs are 20 all the way across. A good double check is to fret each string at the 3rd fret (which also holds it agains the 2nd), you want a tiny bit of clearance at the first (2 or 3 thousands).

Use gauges nut files, I file nuts with one standard size over the largest string you will ever put on that guitar. If you know you'll never put anything larger than a 10 on the first string I would use a 0.012 file . Put masking tape on the head plated next to the nut, losen the string and take a couple of passes with the file. Tru to keep the file parallel to the f/b, you can slightly rock it down as towards the tuner.

Put the string back in the slot, tune it up and measure the gap, repeat until you hit your target. Remember that going too far is hard to fix (I make a new nut) so sneak up on it. When I'm satisfied I might file the top of the nut so the strings aren't buried in the slots, then clean up any sanding or file marks with 800 grit wet and dry and polish with compound.

IMG_4818.JPG

IMG_4819.JPG

If you really want to learn about doing a complete setup this has more information about nuts and everything else


Johnny Dubs

Tele-Holic
Joined
Jun 9, 2022
Posts
757
Location
Los Angeles
Filing nut slots is just one part of doing what we fondly call "a setup". First carefully measure the existing first fret action and determine how far it is from you target goals. For most acoustic and electric guitar I like first fret action somewhere around 14 to 16 thousands at the first string, rising to aroud 18 thou at the 6th. Fenders specs are 20 all the way across. A good double check is to fret each string at the 3rd fret (which also holds it agains the 2nd), you want a tiny bit of clearance at the first (2 or 3 thousands).

Use gauges nut files, I file nuts with one standard size over the largest string you will ever put on that guitar. If you know you'll never put anything larger than a 10 on the first string I would use a 0.012 file . Put masking tape on the head plated next to the nut, losen the string and take a couple of passes with the file. Tru to keep the file parallel to the f/b, you can slightly rock it down as towards the tuner.

Put the string back in the slot, tune it up and measure the gap, repeat until you hit your target. Remember that going too far is hard to fix (I make a new nut) so sneak up on it. When I'm satisfied I might file the top of the nut so the strings aren't buried in the slots, then clean up any sanding or file marks with 800 grit wet and dry and polish with compound.

View attachment 1166689

View attachment 1166688

If you really want to learn about doing a complete setup this has more information about nuts and everything else

Great summary and nice resource- thank you!

I’ve done everything but cut a nut. I’ve never needed to but if I don’t learn, I’ll never play this thing.
 

Johnny Dubs

Tele-Holic
Joined
Jun 9, 2022
Posts
757
Location
Los Angeles
Over the last few hours I’ve clicked hundreds of links, read dozens of pages, had a few beers, and remembered that I have this (on forum advice.)

Now to decide if I wait until tomorrow, or even later.
 

Attachments

  • IMG_6475.jpeg
    IMG_6475.jpeg
    190.7 KB · Views: 67

Filmosound 621

Tele-Afflicted
Joined
Mar 22, 2021
Posts
1,263
Age
57
Location
Germany
use fine emery paper ( 400 ), that you fold, as a substitute for a nut file,

no hobby guitarist needs a set of nut-slot files.

2 layers of emery paper for the thin strings, 3 to 4 layers for the thicker ones.

make little one inch stripes from the emery paper, always file in a little angle,

upwards towards the neck, not just plain flat.

cover the head and neck around where you work with some painter masking tape,

that comes off easily, when you are finished.


cutting too deep happens quick but is no nightmare: some bone dust and some

super glue work more than nicely. ( I did that succesfully a couple of times )


you don't want the strings to follow the fret radius in full, but a tiny bigger gap

towards the outside of the neck.

I use thin paper sheets for shimming on the inner strings, and some little thicker

cardboard towards the outside of the neck.


just do it, it is a freaking Epiphone. :)
 
Last edited:

eallen

Friend of Leo's
Joined
Jul 30, 2013
Posts
4,344
Location
Bargersville/Indianapolis, Indiana
On preslotted nuts it is generally easier to just sand off what is needed from the bottom of the nut to very close to what you want. Trial fit the nut in the slot with strings installed & tuned. Measure the string height to guage how hight the slots are above spec. Set 220 grit sand paper on something flat, set the bottom of the nut on it and rub the nut bottom across it a few times. Put a hair more pressure on the side that is higher. Put the nut back in and check the height. Rinse and repeat until where you want it. Do it lightly each time to get an idea how much material is removed each pass.
 

philosofriend

Tele-Afflicted
Joined
Oct 28, 2015
Posts
1,706
Location
Kalamazoo
Remove about ten molecules of nut at a time. As in, almost none. Put the string back in the slot, look at the clearance at the first fret when fretting at the second fret. Repeat this quickly, like fifty times for each string. Each time only takes twenty seconds once you get the hang of it. If you end up needing another nut, so what, no big deal.

Keep in mind the shape of the curve of the nut slot. The string should touch the bottom of the slot for a width from 1 1/2 to 3 times as wide as the width of a fret. After that the back of the slot curve should drop away so the string doesn't touch the nut any more. If the string touches too much of the slot bottom it is easier to get buzzes o dead tone. If it touches too little the nut will wear out in months instead of in years.
 

ChicknPickn

Poster Extraordinaire
Joined
Apr 16, 2007
Posts
9,549
Age
62
Location
Coastal Virginia
On preslotted nuts it is generally easier to just sand off what is needed from the bottom of the nut to very close to what you want. Trial fit the nut in the slot with strings installed & tuned. Measure the string height to guage how hight the slots are above spec. Set 220 grit sand paper on something flat, set the bottom of the nut on it and rub the nut bottom across it a few times. Put a hair more pressure on the side that is higher. Put the nut back in and check the height. Rinse and repeat until where you want it. Do it lightly each time to get an idea how much material is removed each pass.
^^^^^^^^
THIS
 

Johnny Dubs

Tele-Holic
Joined
Jun 9, 2022
Posts
757
Location
Los Angeles
On preslotted nuts it is generally easier to just sand off what is needed from the bottom of the nut to very close to what you want. Trial fit the nut in the slot with strings installed & tuned. Measure the string height to guage how hight the slots are above spec. Set 220 grit sand paper on something flat, set the bottom of the nut on it and rub the nut bottom across it a few times. Put a hair more pressure on the side that is higher. Put the nut back in and check the height. Rinse and repeat until where you want it. Do it lightly each time to get an idea how much material is removed each pass.


I have a graphtech slotted nut awaiting installation- when I have sufficiently mangled this one I will definitely take this advice! I would definitely rather sand the bottom and check multiple times than glue it down and work on six slots fully.

I had some difficulty w my first tele nut replacement. First it wouldn’t seat, then it tipped back toward the headstock. (Someone here suggested rubbing it against sandpaper on the fretboard to help keep the radius right as I sanded down the bottom.

Flat seems right for the lp. Thanks again!
 

Johnny Dubs

Tele-Holic
Joined
Jun 9, 2022
Posts
757
Location
Los Angeles
you don't want the strings to follow the fret radius in full, but a tiny bigger gap towards the outside of the neck.
Can you give me more on this? Just woke up, but I want to make sure I follow. Radius the slots a little wider on the following the increase in radius due to the nut height?

just do it, it is a freaking Epiphone.


lol exactly! Don’t get me wrong, I have some Epis I love, but I went to find the cheapest, most beat up guitar I could find to learn on and this tv yellow special w a bolt-on neck was even cheaper.

It already plays much better than it did; I adjusted everything but the nut. I’ll have to start all over again after I finish messing with the slots, then again if I replace the nut entirely, but that’s just more practice.

I hope to be satisfied with my work by Wednesday for an A/B comparison when my Gibson tv yellow comes home to me (incoming new potato day alert!)
 
Last edited:

Filmosound 621

Tele-Afflicted
Joined
Mar 22, 2021
Posts
1,263
Age
57
Location
Germany
I did this nut-job to several expensive guitars now, electric and acoustic,
fine emery paper and some patience.
guitars that I set up play like a dream, that is no rocket science.

my first archtop has been a cheap Epiphone Joe Pass.
after that experience, I promised myself, to never touch any kind of non-vintage Epiphone again, ever.

thank you. :D
 

schmee

Telefied
Ad Free Member
Joined
Jun 2, 2003
Posts
31,222
Location
northwest
you don't want the strings to follow the fret radius in full, but a tiny bigger gap towards the outside of the neck.
Can you give me more on this? Just woke up, but I want to make sure I follow. Radius the slots a little wider on the following the increase in radius due to the nut height?

I think what he's saying is the bottom of the strings doesn't necessarily have to follow the radius of the frets/fretboard.
I've never made the height different on both outside edges. I will however have the low E height above the fret just a touch higher maybe.
To check, I capo at the third fret and measure under the string to the top of fret #1. I want to see almost nothing on the 3 plain strings, and just fo it by pressing down and looking for tiny gap. Like .005" or so. (the thickness of printing paper)
At the Low E and A I might want to have up to twice that, but often the .005 is fine.

-If adjusting the slot depth instead of sanding the bottom of the nut, as mentioned, take a tiny bit at a time as you get close. Once you're too deep you're too deep.
-If the setup is close I file the slots.
-If the setup is quite a bit too high, I sand the bottom.

PS: Sanding the bottom is difficult to do while keeping the bottom flat and perpendicular to the sides! If you get an angle it's a problem. For this reason I always put the sand paper on a flat hard surface and slide the nut in my fingers. But even then it's very easy to get an angle! Keep looking visually at how it looks as you take material off.
 

ChicknPickn

Poster Extraordinaire
Joined
Apr 16, 2007
Posts
9,549
Age
62
Location
Coastal Virginia
Can you give me more on this? Just woke up, but I want to make sure I follow. Radius the slots a little wider on the following the increase in radius due to the nut height?

I think what he's saying is the bottom of the strings doesn't necessarily have to follow the radius of the frets/fretboard.
I've never made the height different on both outside edges. I will however have the low E height above the fret just a touch higher maybe.
To check, I capo at the third fret and measure under the string to the top of fret #1. I want to see almost nothing on the 3 plain strings, and just fo it by pressing down and looking for tiny gap. Like .005" or so. (the thickness of printing paper)
At the Low E and A I might want to have up to twice that, but often the .005 is fine.

-If adjusting the slot depth instead of sanding the bottom of the nut, as mentioned, take a tiny bit at a time as you get close. Once you're too deep you're too deep.
-If the setup is close I file the slots.
-If the setup is quite a bit too high, I sand the bottom.

PS: Sanding the bottom is difficult to do while keeping the bottom flat and perpendicular to the sides! If you get an angle it's a problem. For this reason I always put the sand paper on a flat hard surface and slide the nut in my fingers. But even then it's very easy to get an angle! Keep looking visually at how it looks as you take material off.
Last time I "bottom sanded," I put the nut in a vise and used a sanding block to keep everything square. Carpet tape on one jaw of the vise makes it easy to set the nut blank in place.
 

Filmosound 621

Tele-Afflicted
Joined
Mar 22, 2021
Posts
1,263
Age
57
Location
Germany
I shim without fretting or capo.
thin paper sheet between 1st. fret and D and G string, little more for A and B,
thin cardboard as a shim for the E strings.
the radius of the strings is slightly bigger, than the fret radius.
 

schmee

Telefied
Ad Free Member
Joined
Jun 2, 2003
Posts
31,222
Location
northwest
Last time I "bottom sanded," I put the nut in a vise and used a sanding block to keep everything square. Carpet tape on one jaw of the vise makes it easy to set the nut blank in place.
Yeah, you still have to hold the sanding block square. I made a slotted wood block the nut went into once to help. But my main thing is to try to hold the nut so the original bottom is flat on the sand paper and by "feel" press evenly.
I cracked a bone nut once in a vise, so be careful!
 

Freeman Keller

Doctor of Teleocity
Ad Free Member
Joined
Aug 22, 2018
Posts
15,880
Age
80
Location
Washington
Just be aware that some fender necks have flat bottomed nut slots and some have slots that follow the radius of the board. You can sand the bottom of the first kind but not the second. Martin nuts are angled on the bottom. I have never liked sanding the bottom of a nut because it lowers all strings the same amount and I don't necessarily want that.

There has been a good discussion of nut files at the tool subforum


My preference are StewMac files but let me just say that any of the ones discussed there are better than the various MacQuiver approaches - welding tip cleaners, sand paper... A set of files will pay for themselves in two nut jobs and after that you are working for free.

One other little comment - different material will file at different rates. Most of the synthetics are pretty soft, bone and "Tusq" are harder. I don't know what the nut in your picture is made out of, just remember that its easy to go too far and then you get to start over.
 

eallen

Friend of Leo's
Joined
Jul 30, 2013
Posts
4,344
Location
Bargersville/Indianapolis, Indiana
I have a graphtech slotted nut awaiting installation- when I have sufficiently mangled this one I will definitely take this advice! I would definitely rather sand the bottom and check multiple times than glue it down and work on six slots fully.

I had some difficulty w my first tele nut replacement. First it wouldn’t seat, then it tipped back toward the headstock. (Someone here suggested rubbing it against sandpaper on the fretboard to help keep the radius right as I sanded down the bottom.

Flat seems right for the lp. Thanks again!
I should have clarified as Freeman did above. Check to see if the bottom of the nut slot I'm the neck is flat or radiused. If radiused put sandpaper on the fretboard & use it to remove the bottom material from the nut.
 

Lou Tencodpees

Poster Extraordinaire
Joined
Oct 15, 2020
Posts
5,018
Location
Near Houston
I've done a bunch of pre-slotted nuts on my partscasters with varying degrees of success and failure. The ones I found a bit more difficult are the ones with 3+3 headstock tuners. Addressing string binding/angle of the d and g strings required a bit more education. I've also learned not to glue the nut in place with super glue.
 

Freeman Keller

Doctor of Teleocity
Ad Free Member
Joined
Aug 22, 2018
Posts
15,880
Age
80
Location
Washington
I've done a bunch of pre-slotted nuts on my partscasters with varying degrees of success and failure. The ones I found a bit more difficult are the ones with 3+3 headstock tuners. Addressing string binding/angle of the d and g strings required a bit more education. I've also learned not to glue the nut in place with super glue.
On Gibson/Martin style nuts I shape the slot so the string exits towards the tuner, on F nuts the tree takes care of it. I don't glue the nut in until after it has been completel filed, sanded and polished, in fact I will usually play it for a day or two without being glued in. When its time I put two tiny drops of medium CA on the nut (bottom if its an F style, against the f/b if its a G style). It just enough to hold in in place but I can still knock it out with a punch

IMG_5352.JPG
 

Johnny Dubs

Tele-Holic
Joined
Jun 9, 2022
Posts
757
Location
Los Angeles
I've done a bunch of pre-slotted nuts on my partscasters with varying degrees of success and failure. The ones I found a bit more difficult are the ones with 3+3 headstock tuners. Addressing string binding/angle of the d and g strings required a bit more education. I've also learned not to glue the nut in place with super glue.
I used a bit of wood glue on my tele- maybe not enough the first time, but I definitely didn’t let it dry long enough.
 
Top