Started carving/gnawing the inside of the back. After I drilled the holes I used a cutzall disc to take out a large portion of the wood. Leaving dimples from the drill bit. If you have never used one of these discs ( I had not) they cut really fast and will remove a lot of wood. If not careful, too much wood. Little bit at a time. Then I used multiple finger planes to clean it up and get it close to the correct thickness. It is very thin, almost scary thin. I treat it with much care now. DA sander cleans it all up. It is sitting on a holder that I made just for this purpose.


You are using an out of date browser. It may not display this or other websites correctly.
You should upgrade or use an alternative browser.
You should upgrade or use an alternative browser.
F-5 Style Mandolin build.
- Thread starter 1bad914
- Start date
This site may earn a commission from merchant affiliate links like Ebay, Amazon, and others.
Mine is home brewed also and is a tad bit more native.I'm sure you've got some sort of thickness gauge. I made mine from a bridge clamp and a dial indicator.
 It works. I made it for the hollow body build.
I started the new top carve this morning. I left this top at a thickness of .800. I was not going to have this one come up to thin. I routed 3 terraces then stopped. I used the cutzall disc to initially shape it. Then started working with finger planes, checking with templates often. This is still very rough, the scroll carve is just beginning. I had to stop, I developed a blister on my thumb, I hope it does not affect my golf game. Lol
A lot of wood chips. That was after I had already swept up once.


A lot of wood chips. That was after I had already swept up once.
Bob J
Tele-Afflicted
A finger plane is a slow way to make wood shavings, no wonder you have a blister!
It is, but you have to sneak ou on this or you just make kindling. This entire build is a bit fiddly. Now I can see why a good one is so expensive.A finger plane is a slow way to make wood shavings, no wonder you have a blister!
Flipped it over and started on the inside carve. The drill stop is set at 5 mm. Still a lot of carving to go after initial hog out. …and of course my dial indicator fell off the bench and bent the main shaft. Sigh, had to order a new one. I had the old one for 25 years. Double sigh.
The last pic gives an idea of the depth.


The last pic gives an idea of the depth.
I have been too busy playing with my new CNC router to work on this. Finally have my shop back together after I had to blow it apart to fit the CNC. Had some time to rough cut the f-holes out. I used my scroll saw. Worked out well. Now I file them to shape.
The cnc would have been perfect for carving plates.
I agree. It is planned for the future.The cnc would have been perfect for carving plates.
Finished cleaning up the f-holes. Made the braces. They are made from quarter sawn spruce. They are different sizes. The bass is bigger than the treble side. Thicker and taller. I spent a lot of time dialing them in to fit correctly on the curve. Then glued them on.
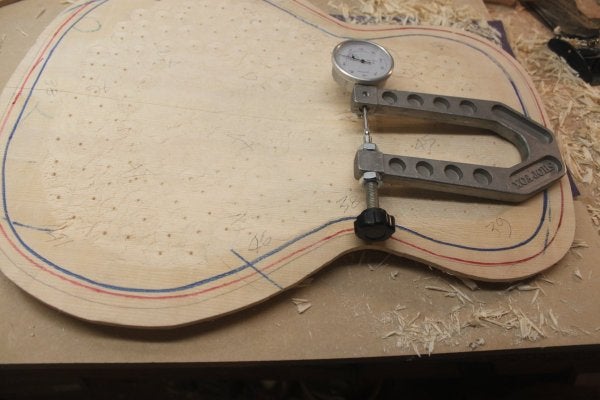
While waiting for the glue to dry I did a final check on the back. It was still thick in a few spots. Carved it down and dialed it in. The pic is of the diy thickness gage I use, I clamp to the bench sideways and measure. The dial indicator is spring loaded.
After the braces dried, I carved them to a baseline size. The final carve and tap tune occurs once the top is attached to the rim.
The top is just sitting on the rim.
Things are getting real here. I cut the top off at approximately the 15th fret. This will come to light why as I progress. I made a clamping buck to spread the clamping pressure evenly. Then installed two brads to help with alignment and slippage during gluing. Then did a dry run clamping session. It is right on. I want to glue it up today, but I am going to give it a day or two. I want to make sure I am at the glue up point.


The brads.
The brads.
Moldy Oldy
Tele-Holic
Looks really good. I hope that brad at the neck won’t interfere with the neck joint.
No problem with the brad, well outside the dovetail range.
Glued it up this morning. Let it stew for over an hour. Looks good. Next is sanding and routing the excess off around the edges.
I tapped this like Siminoff discusses in his book. Compared to one of my acoustic guitars at this point it sounds kind of dead. Guitars literally ring, this sounds a lot different. Yes, I have some tuning of the tone bars to do, but this just sounds kind of dead. Sigh.
Sanded and routed the top flush with the rim. I sand it with the OSS until about 1/16 inch is left. Then route it flush. This was a pucker factor 12, I am used to only routing 1/8 thick tops and backs, was not sure how this .200 thick top would react. All went well. Whew.
I then studied Siminoff’s write-up on tone tapping the top. As stated before, it sounded kind of dead. I realized that I still had the tone bars to big, I studied, tapped, shaved, tapped, shaved….. by the time I was done I had decreased the size significantly. They are now scalloped and much smaller. All this work made a big difference, I am going to attempt to document the difference in tapping the bass and treble bars, he has a target. Not sure how I will do, but I will try. Tap tuning is still dark arts magic to me, but he uses science, so maybe it will click.


I then studied Siminoff’s write-up on tone tapping the top. As stated before, it sounded kind of dead. I realized that I still had the tone bars to big, I studied, tapped, shaved, tapped, shaved….. by the time I was done I had decreased the size significantly. They are now scalloped and much smaller. All this work made a big difference, I am going to attempt to document the difference in tapping the bass and treble bars, he has a target. Not sure how I will do, but I will try. Tap tuning is still dark arts magic to me, but he uses science, so maybe it will click.
When I built mine I used a strobe tuner and tried to get it to lock on to the dominate frequency of the tap note. It didn't work all that well and a few months later I took a tap tuning course from Siminoff. He used a Conn strope tuner but added a compressor pedal in the signal chain, he said that gave the tuner more time to find the note.
If I was going to do it now I would be taking frequency spectrums with something likee Audacity or the Luthier's Spectrum analyzer.
 alainlambert.wixsite.com
I used the spectrum analyzer when I built the archtop and it was very clear in showing me how the spectrum was changing as I worked with the plate.
This is what mine looked like

If I was going to do it now I would be taking frequency spectrums with something likee Audacity or the Luthier's Spectrum analyzer.
Luthier Spectrum Analyser | lutherie
I used the spectrum analyzer when I built the archtop and it was very clear in showing me how the spectrum was changing as I worked with the plate.
This is what mine looked like
You sent me the link to that before. My hesitation in using it has been finding a mic for it. I recently acquired a nice mic, I just need to adapt it to a 3.5 mm plug and it should work. I will give it a go. They look similar, but different. Beautiful work as usual.
I made the fixture for cutting the neck joint. This fixture needs to hold the neck level side to side and at a 6 degree angle top to bottom. I have studied this joint extensively. There are 3 main types. Traditional dovetail, straight V and kind of a mortise and tenon with a flair. The dovetail is the most complex, V is next, m and t is the easiest. There is even a bolt on butt joint, but I tossed that one out right away.
I believe I will use a straight V on this one. It looks just like the dovetail, but does not have the angles in the side that draws the joint together.
I am now working on the fixtures to accomplish this. Below is a picture of how complex this joint is. This is going to take all my patience and skill to get it right.
I use the cheap little mic in the lap top It works fine. I figure since I am mainly doing comparisons and looking for trends and I use the same one each time that I really don't need flat response from zero to infinity. I'll do three or four bonks, save them and compare the peaks and valleys. Since a period of time, maybe days, happens between samples its a way for me to "remember" what I think I'm hearing.You sent me the link to that before. My hesitation in using it has been finding a mic for it. I recently acquired a nice mic, I just need to adapt it to a 3.5 mm plug and it should work. I will give it a go. They look similar, but different. Beautiful work as usual.
Last edited:
Similar threads
- Replies
- 30
- Views
- 530
- Replies
- 23
- Views
- 785