Duo-sonic type build

  • Thread starter tklaavo
  • Start date
  • This site may earn a commission from merchant affiliate links like Ebay, Amazon, and others.

tklaavo

Tele-Holic
Joined
Sep 9, 2011
Posts
503
Location
Finland
Hi,
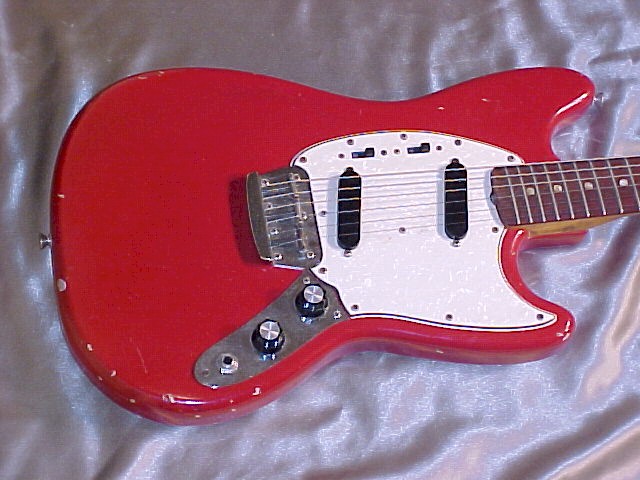
I got this idea as soon as I realized I could probably build some guitars, that is last autumn. The build is based on a 1971 Fender Music Master I bought in the 90's for quite cheap. Someone had modified it miserably, like this:
IMG_0911.jpg


The pickup has been moved to bridge position, and a disturbing flame has been painted on the body. Also the pickguard is obviously not original. And the body has been "routed" too:
IMG_0857.jpg


Looks like someone wanted a humbucker in the neck position, but then decided to have the original pickup in the bridge position instead.

It has, of course, the huge headstock too - you either love or hate it. I love.
IMG_0864.jpg


The serial number dates to 1971, and the neck has matching stamp in the heel. No, I'm not going to modify this any further and definitely not trying to restore it to original shape. But I took the outline of the body and neck and now I'm going to build me a Duo-sonic kind of guitar. I started the neck already last year, but it has been sitting idle until today.

I made a two-piece body blank out of grandad's mystery wood, which has been discussed here. This is it after bandsaw:
IMG_1140.jpg


I guess the wood might be alder after all? It's very light stuff.

This is what I have now. Today put frets and markers on the neck. My first time making a rosewood fingerboard, so there will be questions in the finishing stage. The dots are smaller than in the original neck, but I like the small ones better as the neck is quite narrow. It's 24" scale of course. Back is not shaped yet.
IMG_1141.jpg


The pickguard is from eBay seller cwgp2010, that is Custom World Guitar Parts in the Netherlands. It's labeled Mustang pickguard, but it's the same thing. Fits pretty good.

I'd like to have the original style bridge, and it would probably be possible to just cut / bend / drill it out of a steel plate. I'm not going to try a replica of any existing model, just a guitar that has the same looks. Not yet sure about the pickups and wiring, I definitely don't want the original on/off/phase switches but something else - maybe just neck/both/bridge switching on one and let the other be a dummy.

The finish is under consideration, too. And I'm not going to hurry with this build, so no frequent updates, sorry...
 

Picton

Friend of Leo's
Joined
Feb 7, 2009
Posts
2,666
Age
50
Location
Reading, Massachusetts
I love the way the maple figure enhances the headstock shape; a fortuitous accident, or did you plan that?

This will be a nice guitar. I love the simplicity of the entry-level Fenders.
 

tklaavo

Tele-Holic
Joined
Sep 9, 2011
Posts
503
Location
Finland
I love the way the maple figure enhances the headstock shape; a fortuitous accident, or did you plan that?

That was just a nice accident. I had just started to practice neck building and routed two pieces of maple to this shape and chose this one just for the figuring. The other is waiting for something else. And now when I look at the body, I see some similar grain close to the control plate area. But this will probably be painted, so that won't be seen.
 

crazydave911

Doctor of Teleocity
Ad Free Member
Joined
Feb 23, 2010
Posts
15,921
Age
65
Location
East Tennessee
Welllllllllll, great minds think alike :lol:. This is the bridge I'm using LINK, cheap too :). I'm sure Allparts Europe has it as well
 

tklaavo

Tele-Holic
Joined
Sep 9, 2011
Posts
503
Location
Finland
Welllllllllll, great minds think alike :lol:. This is the bridge I'm using LINK, cheap too :). I'm sure Allparts Europe has it as well

Do you have a similar project? Thanks for the link, but I might consider this:
(link removed)
I'd like to have the original shape, this has individual saddles, but it's string through. Could probably be drilled for top loading as well.
 

crazydave911

Doctor of Teleocity
Ad Free Member
Joined
Feb 23, 2010
Posts
15,921
Age
65
Location
East Tennessee
Do you have a similar project?
Yes I do, I will post a build thread as soon as my 12 string is completely finished :)

Thanks for the link, but I might consider this:
(link removed)
I'd like to have the original shape, this has individual saddles, but it's string through. Could probably be drilled for top loading as well.
As long as it has the round bridge barrels I see no problem with drilling holes for a top-loader. There is a seller on Ebay, Bezdez that has that bridge, but although cheaper, as he is in Canada the shipping might make it more costly for you
 

tklaavo

Tele-Holic
Joined
Sep 9, 2011
Posts
503
Location
Finland
I'm waiting to see your version, Dave!

Thanks for the tip - Bezdez has lots of great stuff for cheap, but I couldn't find that bridge there. My rosewood fingerboard blanks, including the one I used on this neck, are from Bezdez by the way.

Angela's shipping cost to Finland is over 30 bucks, more than the price of the item. I gotta figure out something else.. Still thinking about bending some steel myself. Have to do a matching control plate too, if I go that way.
 

crazydave911

Doctor of Teleocity
Ad Free Member
Joined
Feb 23, 2010
Posts
15,921
Age
65
Location
East Tennessee
I'm waiting to see your version, Dave!
I'll be posting soon :)

Bezdez has lots of great stuff for cheap, but I couldn't find that bridge there
Your right, here was what I was looking at. Actually resembles the Fender Tornado bridge (link removed) (and it would work, just not as a top-loader)

If you go with Mojo's idea, I'd use these LINK to prevent intonation problems (which Duos were notorious for). I may end up getting a set myself but I want to hear what my bridge sounds like first ;)


Dave
 

tklaavo

Tele-Holic
Joined
Sep 9, 2011
Posts
503
Location
Finland
Dave's got a head start in his duo build, so I'd better make some progress!

IMG_1152.jpg


The cavity template is based on pictures I googled, the pickguard I have and a very inaccurate Mustang PDF. Neck pocket was tricky, never done a round heel neck and had to just file, sand, test, file some more etc..

Then I routed and messed up around the bridge pickup - also damaged the template. I thought I already knew how to do this.. Still practicing.

IMG_1153.jpg


It's hanging there...
IMG_1155.jpg


I had to really push the neck in, but it needs some sanding still, so I guess it will be fine.

The neck thickness taper I figured out like this: taped two different thickness blocks on the ends and routed the underside:
(image removed)

And then used the 45 degree bit:

(image removed)

More neck shaping stuff next time!
 

crazydave911

Doctor of Teleocity
Ad Free Member
Joined
Feb 23, 2010
Posts
15,921
Age
65
Location
East Tennessee
Good looking progress! :). Hey, I might be ahead on the body, but your ahead of me on the neck :lol:. I'm really looking forward to these two honeys :D


Dave
 

flatfive

Friend of Leo's
Joined
Apr 23, 2009
Posts
3,907
Location
Monterey, CA
Hey tklaavo -- elegant simplicity on that setup to do the
neck thickness!

I guess you kept the neck up on the blocks when
you routed with the 45 degree router bit?
 

tklaavo

Tele-Holic
Joined
Sep 9, 2011
Posts
503
Location
Finland
Hey tklaavo -- elegant simplicity on that setup to do the
neck thickness!

I guess you kept the neck up on the blocks when
you routed with the 45 degree router bit?

thanks! And no, I didn't have the blocks then, can't get the bit so high, but now when you mention, it makes sense to have the same angle there as well.
So I guess I'll redo that part with shims, thanks for the idea!
 

tklaavo

Tele-Holic
Joined
Sep 9, 2011
Posts
503
Location
Finland
Today I sweated for some hours.

Body roundover. This is after raising the grain. Quite hairy, will need to sweat even more. The roundover radius could be bigger, but this is the biggest roundover bit I have:
(image removed)

The neck shaping jig, refined model, with some tools of the trade:
IMG_1164.jpg


I got this far. Still some work left:
IMG_1166.jpg


I'm going to try to build a bridge like the one in my Musicmaster, also the control plate out of the same steel plate. We'll see how much sweat that will be.
 

tklaavo

Tele-Holic
Joined
Sep 9, 2011
Posts
503
Location
Finland
Neck carve finished and sanded. Now it needs a fret dress and finish!
(image removed)
(image removed)

For the first time I feel I succeeded in this. The shape just feels right. I got so confident that I started reshaping my 2012 challenge neck, because I've disliked the shape since day two - too much U, i'm aiming for kind of D.

I'd like to try nitro finish on this one. There's a lot of questions coming to my mind. Like:
- What grit should I sand the wood before lacquering? Would 320 be enough?
- Should I use dewaxed shellac as a sanding sealer before that? Would it give any benefits or cause problems I'd regret later?
- what kind of masking tape would be best to cover the fret board? How do basic masking tapes react to nitro?
- how about the edge between lacquered maple and the bare rosewood - should I leave a small (less than half mm) amount of rosewood unmasked and then smoothen the transition when buffing the surface?
 

crazydave911

Doctor of Teleocity
Ad Free Member
Joined
Feb 23, 2010
Posts
15,921
Age
65
Location
East Tennessee
1. That roundover on the body is cool, you don't want to overdo it. Matter of fact, the first (non-offset) duos & mm were slab bodies. All the offsets had 1/2" (AFAIK) like a strat. Yours looks plenty close enough and is quite nice :)


2. That is a very fine neck, I'd be proud of that ;). Since my fretboard was cut for an acoustic/gibson type nut, mine will not look very authentic there. I noticed you routed the pups like a mustang, you can just extend the rout on the neck pup down to the tip of the pickguard and use a les paul type switch duosonic style like this one below the neck pup

003-3.jpg


It's just a thought, but it'd look kinda cool with the mustang style plate


3. I use shellac as a base coat and wetsand to 400 grit, you just can't get carried away with a lot of coats. If it's going to have primer then paint, it need not be over 3 coats max, if that. I have given this advice to people who have had trouble with it so remember, if that's anything like alder, you can just "whisker" the wood with a damp sponge, sand it smooth and just primer it ;). It's a closed pore wood and doesn't really have to have a sealer coat
 

tklaavo

Tele-Holic
Joined
Sep 9, 2011
Posts
503
Location
Finland
2. That is a very fine neck, I'd be proud of that ;)

Thanks, although my evidence photos are not too detailed.. Yes I'm proud.


I noticed you routed the pups like a mustang, you can just extend the rout on the neck pup down to the tip of the pickguard and use a les paul type switch duosonic style like this one below the neck pup

Nope.. this is more like the Duo Sonic II, which was basically a hardtail Mustang. With slider switches. Like this from '66:
66duosonic.jpg


And about the finish: Solid on the body, not sure yet about the colour. Red seems to work with the kind of pickguard I have, but I was thinking of blue.. Not a "proper" Fender colour of any era, no need for such.. Thanks for the advice, will need some sealing sith shellac. And yes, primer too. I'm still filling and sanding the rough parts.

I was thinking about nitro on the neck especially, there are other options too, this time Danish oil is out of the question.
 

crazydave911

Doctor of Teleocity
Ad Free Member
Joined
Feb 23, 2010
Posts
15,921
Age
65
Location
East Tennessee
Nope.. this is more like the Duo Sonic II, which was basically a hardtail Mustang. With slider switches. Like this from '66:
66duosonic.jpg
Ahh, your going to be much more authentic than I am. I do like the idea of other colors though. The red/white/blue of the American guitars pale in comparison to the ones built in Japan, for Japan. The Duo/Mustang is probably one of the most popular guitars over there. I know how they feel :lol:
 
Top