Cracked Neck Repair

envirodat

Tele-Holic
Joined
Aug 19, 2019
Posts
802
Age
62
Location
York, PA
I searched the threads here for a post like this and I didn't see one. However, if you are aware of one, please point me to it. A friend has an old guitar (Fender DG-7) that he said isn't worth the $ to repair but he said if I wanted to try to repair it I could since I am trying to learn guitar repair. The guitar is actually in good shape other than the crack. I would like to fix it so he can have a travel guitar.

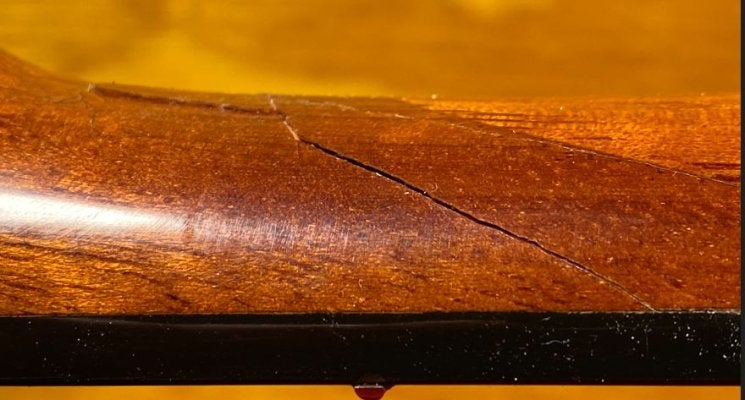
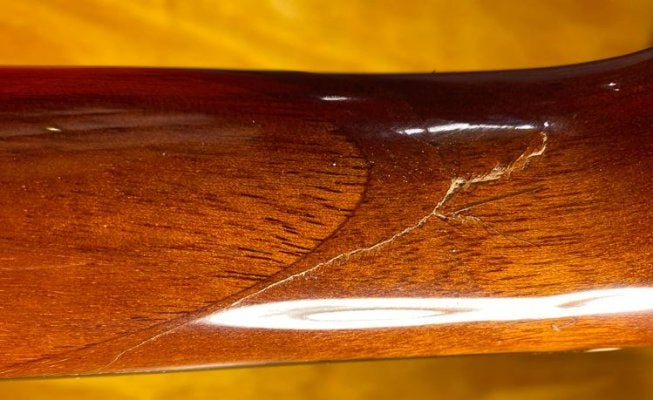
My initial thought was to use Tite-bond wood glue based on the articles I have read here. When I look at the cracks though I am trying to figure out how to get it all in. Would it be better to use water thin CA glue? I really don't want to spread the crack open as that in my mind would hurt it more. I have pictures below.

My question to all is, which glue approach would you use to fix this?
 

Attachments

  • crack4.JPG
    crack4.JPG
    52.2 KB · Views: 107
  • crack3.JPG
    crack3.JPG
    78.6 KB · Views: 119
  • crack2.JPG
    crack2.JPG
    96.9 KB · Views: 94
  • crack1.JPG
    crack1.JPG
    71.2 KB · Views: 122

Boreas

Telefied
Ad Free Member
Joined
Nov 3, 2019
Posts
20,704
Age
70
Location
Adirondack Coast, NY
You could use CA but it often doesn't bond well on uneven surfaces. I came across a new glue that modelers use called Super 'Phatic. It is a very watery aliphatic glue - like Titebond, yet able to wick and flow. I haven't used it on an application such as this, but it may be a good solution. IIRC, it is about $8 a bottle on Ammyzon.

The key obviously will be flooding the fracture with the glue and good clamping - preferably with a caul or two. The glue wipes off with water, and should be safe on most finishes - but always wise to test first.

Worst case is it snaps again, but there appears to be plenty of wood left for a strong neck.

Keep us posted if you use this glue because I believe it can be very useful in guitar repair.
 
Last edited:

guitarbuilder

Telefied
Ad Free Member
Joined
Mar 30, 2003
Posts
26,731
Location
Ontario County
If it were me, I'd open the crack and shoot some yellow glue in there. You'll need clamps and cauls to close it up. Do a dry run and open your clamps so you aren't messing with that. After the glue dries you can use a wet paper towel to get any ooze off. At least the splice joint didn't fail on the glue joint.
 

Freeman Keller

Doctor of Teleocity
Ad Free Member
Joined
Aug 22, 2018
Posts
15,882
Age
80
Location
Washington
You are somewhat lucky in that that is what is called a "green stick" fracture and it looks pretty clean without a lot of splinters, the wood has cracked along the grain but is being held together by the fretboard and binding. I agree that original Titebond is the correct glue. I have had reasonable luck clamping the neck to the work bench and putting ligh clamping pressure on the head - I would use a could of quick clamps and just gradually snug them up. With luck you should be able to pull the fracture open and work some glue all the way down into the crack with a long thin piece of something.

Take the clamps off the head and reposition them to hold the fracture closed. Use UHMW or blocks of wood with waxed paper on them to make a caul (prepare all of this before putting the glue in), clean up the squeeze out with water.

Finish repair will be another matter - test to see if it is lacquer or poly and choose the proper material for drop filling.

Here is a 112 string neck that had a similar break

IMG_3435.JPG


IMG_3436.JPG


IMG_3438.JPG


It is interesting that yours occured near the scarf joint but not actually in the joint. Tells me the joint was stronger that the cross grained wood.
 

schmee

Telefied
Ad Free Member
Joined
Jun 2, 2003
Posts
31,224
Location
northwest
If you cant open it up, I would use CA glue simply because it wicks in very deep fast and holds well enough. Even the so called "thick" stuff wicks in fast. If you can open it up like Freeman shows then sure Tite Bond, but you are going to have to fill with something else once it is held together anyway.
 

envirodat

Tele-Holic
Joined
Aug 19, 2019
Posts
802
Age
62
Location
York, PA
Thank you all for the comments. I am going to need to make some cauls to protect the guitar from the clamps. I was starting to make one that had a radius like the neck of the guitar with a flat back to clamp against and I think based on what I have read I need to do that. For the fret board, I was going to use some soft pine I have for protection. If there are suggestions on cauls, please let me know. I think I also would like to use quick clamps like how Freeman suggested above for this so I need to go get some this weekend.

Freeman the pictures you provided really helped me picture how to do this. Thank you. I hope it will open up enough for me to pipette in some glue like what you did. I have some fine wire and point tools to push the glue in. I think I will need to be careful though about hurting the fret board from what I see so I better make sure I don't open it up too much and create more problems. I was surprised as well that the break was not at the joint.

Guitarbuilder I will absolutely do some dry runs on the clamping. That's good advice!

As far as the finishing when I get it glued up, I admit I haven't thought it that far ahead. I'm just excited I can try to fix something like this. Sort of like how I did my first bridge repair. Excited to do something like this. I'm going to make sure I take some photos and add them to the post with the hope they will help someone else as well.
 

Mojotron

Poster Extraordinaire
Joined
Dec 21, 2008
Posts
5,875
Location
Seattle
Yep - those StuMac pipettes are amazing for shooting glue where the sun don't shine :) I've tried some glass ones but they so not work as well at all. Freeman's use of UHMW and parchment or wax paper is a great idea; I would do the clamping so that you would be able to flip it or move it to do some cleanup if needed on the wood that you do not want to get the glue on give the glue a good hour to set up and then clean up anything that you might have to.

I don't know chemically why, but titebond is always the right glue for breaks/cracks: CA just does not do quite as good of a job, but it the crack is too thin to squirt thinner titebond I've gotten great results with Satilite City Hot Stuff - which is about the thinnest CA glue I've seen. 60% of the time it works every time - with a tiny crack - if the CA glue does the job, you are done and it was quick and easy, if not it cleans up pretty easy and you really have not lost anything - at that point you know to try titebond instead.
 

envirodat

Tele-Holic
Joined
Aug 19, 2019
Posts
802
Age
62
Location
York, PA
I got the work done with the neck. I am now very impressed at people who remember to take photos of every step. I was so wrapped up with working the glue in I forgot to take a photo of that. However, below are the details.

Using Freeman's example I set up the neck as below. By gently pressing on the body to flex the neck I worked in the Titebond into the cracks. I found old string cutoffs to be great at pushing the glue in and I used a pipette to force in the glue.
fix1.JPG


I had made a caul that had the same radius of the neck and then clamped it tight and waited for 24 hours. When I released pressure before clamping it was wonder to see glue oozing out. I took it that I had worked in a lot and that hopefully I had full coverage

fix2.JPG


After it was clamped and looking at it, it looks like a good fix but visually a bit rough and I could feel the bumps

fix3.JPG


So I sanded the areas down, got them smooth and tried to match the stain. In areas that I could feel a gap I wicked in CA and then scrapped it smooth and then did some polishing.

fix4.JPG


It doesn't look perfect but when I play it you can't feel the crack. The neck is smooth and others who play it say that if they didn't look at it, they would not have known it was cracked. I still have a lot to learn on this but thanks to all for your help sharing what you know.
 

AmpHandle

Tele-Meister
Joined
Dec 23, 2020
Posts
242
Location
deleted
I would open it up and syringe in hide glue then clamp it. Easy enough if you have the repair parts.
 

Peegoo

Telefied
Ad Free Member
Joined
Oct 11, 2019
Posts
31,577
Location
Beast of Bourbon
I got the work done with the neck.

Nicely done! That is a fine outcome for your first cracked neck repair.

Poking tools, guitar stings, etc., into the crack will help distribute the glue, but it is also risky because you may displace splinters or narrow wood fibers, which can prevent the crack from completely closing.

When I repair a 'closed' break like this--one that's long and deep into the wood but one I don't want to open up--I use a little trick I came up with many years ago to get glue into the joint: compressed air.

I clamp the neck to the bench and use another clamp to gently hold the break open without causing further damage. Next, I lay a generous bead of glue (un-thinned Titebond II) along the crack, and hold the nozzle of a hand-held compressed air valve in line with the break with one hand. Before giving it a few quick short toots I cover the work with a small shop towel held in place with the other hand.

The shop towel is important because without it, the glue will splatter and get on stuff in your shop that does not need gluing. It is also important to wear eye pro because squinting or shutting your eyelids is not safe enough if glue comes flying out from under the towel.

So give it a toot or two, lift the towel and reposition the nozzle, cover again, and one or two more blasts. Lather, rinse, repeat. One thing to do is use a fingertip to push runaway glue back over the crack and continue. Like most any glue job, you'll waste more glue than you use in the joint, but this is good. You have about three minutes of work time, which is plenty of time for a break like this.

Gently close the break with the padded clamp(s), and have some slightly damp towels on hand to wipe up the glue squeeze-out. A few Q-Tips are also handy here as well.

All through the inspection, handling, and gluing procedure, it is critical that you be very gentle with the break, especially the very fine edges where the finish is broken. Ideally, you won't make contact with this fine edge and knock off pieces of finish that you have to fill later, or worse--push pieces of broken finish into the crack. Anything that does not belong in the joint and any wood fibers that are misaligned with the sound wood in the joint will prevent a nice tight closure.

If you don't have an air compressor, canned air ("computer duster," etc.), will work too. Use the little red straw in the nozzle.

You can crack a short piece of wood or a section of large dowel like a broom handle and practice this procedure to get a feel for it.
 

oldunc

Poster Extraordinaire
Joined
Jan 31, 2014
Posts
6,061
Age
75
Location
California
That's the first thing I noticed. A testament to the strength of glued joints. On that guitar anyway.

And nice job, @envirodat !
My experience is that failures more often than not happen next to and parallel to glue joints; I suspect that the relative inflexibility of the glue joint (aliphatic resin and hide glues are flexible, but less so than the wood, usually) creates a sort of fulcrum that transfers any bending forces to the nearby wood.
 

envirodat

Tele-Holic
Joined
Aug 19, 2019
Posts
802
Age
62
Location
York, PA
Nicely done! That is a fine outcome for your first cracked neck repair.

Poking tools, guitar stings, etc., into the crack will help distribute the glue, but it is also risky because you may displace splinters or narrow wood fibers, which can prevent the crack from completely closing.

When I repair a 'closed' break like this--one that's long and deep into the wood but one I don't want to open up--I use a little trick I came up with many years ago to get glue into the joint: compressed air.

I clamp the neck to the bench and use another clamp to gently hold the break open without causing further damage. Next, I lay a generous bead of glue (un-thinned Titebond II) along the crack, and hold the nozzle of a hand-held compressed air valve in line with the break with one hand. Before giving it a few quick short toots I cover the work with a small shop towel held in place with the other hand.

The shop towel is important because without it, the glue will splatter and get on stuff in your shop that does not need gluing. It is also important to wear eye pro because squinting or shutting your eyelids is not safe enough if glue comes flying out from under the towel.

So give it a toot or two, lift the towel and reposition the nozzle, cover again, and one or two more blasts. Lather, rinse, repeat. One thing to do is use a fingertip to push runaway glue back over the crack and continue. Like most any glue job, you'll waste more glue than you use in the joint, but this is good. You have about three minutes of work time, which is plenty of time for a break like this.

Gently close the break with the padded clamp(s), and have some slightly damp towels on hand to wipe up the glue squeeze-out. A few Q-Tips are also handy here as well.

All through the inspection, handling, and gluing procedure, it is critical that you be very gentle with the break, especially the very fine edges where the finish is broken. Ideally, you won't make contact with this fine edge and knock off pieces of finish that you have to fill later, or worse--push pieces of broken finish into the crack. Anything that does not belong in the joint and any wood fibers that are misaligned with the sound wood in the joint will prevent a nice tight closure.

If you don't have an air compressor, canned air ("computer duster," etc.), will work too. Use the little red straw in the nozzle.

You can crack a short piece of wood or a section of large dowel like a broom handle and practice this procedure to get a feel for it.
Thanks Peegoo. That is good to know. I don't have an air compressor but I do have a couple cans of the canned air. I have a couple of 1.5 inch dowel rods I could practice on. Good advice on eye protection and the rag too because I can guarantee I would've forgotten that and mutter a few curses as I sprayed glue about and wondering why I didn't cover it.
 

1stpitch

Tele-Afflicted
Joined
Feb 19, 2019
Posts
1,406
Location
South Carolina, USA
My experience is that failures more often than not happen next to and parallel to glue joints; I suspect that the relative inflexibility of the glue joint (aliphatic resin and hide glues are flexible, but less so than the wood, usually) creates a sort of fulcrum that transfers any bending forces to the nearby wood.
That's plausible for sure.
 

Freeman Keller

Doctor of Teleocity
Ad Free Member
Joined
Aug 22, 2018
Posts
15,882
Age
80
Location
Washington
That's the first thing I noticed. A testament to the strength of glued joints. On that guitar anyway.

And nice job, @envirodat !

My experience is that failures more often than not happen next to and parallel to glue joints; I suspect that the relative inflexibility of the glue joint (aliphatic resin and hide glues are flexible, but less so than the wood, usually) creates a sort of fulcrum that transfers any bending forces to the nearby wood.
Every test of glue joints in shear using wood glues (AR, PVA HHG) that I have seen the failure has been in the wood fibers and not at the seam. This is not necessarily true with brittle glues or gap filling glues, and definitely not true with butt joints. American Lutherie magazine has published several tests of glues used in lutherie.
 

oldunc

Poster Extraordinaire
Joined
Jan 31, 2014
Posts
6,061
Age
75
Location
California
Every test of glue joints in shear using wood glues (AR, PVA HHG) that I have seen the failure has been in the wood fibers and not at the seam. This is not necessarily true with brittle glues or gap filling glues, and definitely not true with butt joints. American Lutherie magazine has published several tests of glues used in lutherie.
Every example I have seen (more in long joints in panels etc. than guitars) has been in the wood fibers too, assuming a proper glue up in the first place, but adjacent to and more or less parallel to the glue joint.
 
Top