Another Blues Jr Reverb Not Working Thread

Fumbler

TDPRI Member
Joined
Mar 21, 2019
Posts
59
Age
53
Location
Victoria BC
Hello All:

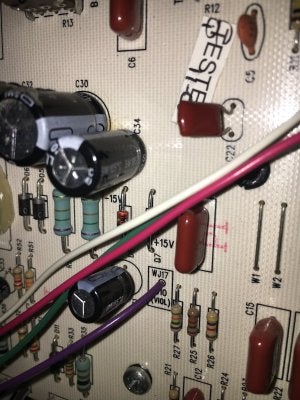
I did search exhaustively for an answer before posting but have come up with nothing. I bought a used BJ with non working reverb. Tank had been replaced with a MOD tank. I tried a known good tank from another BJ first with no luck. Touching pin on the return RCA does not give any hum. I installed a socket for the IC and put in a new 4560 chip. Still no reverb. I tried the pin touch again and strangely it worked briefly then nothing. I haven’t been able to replicate that since. I’ve gone over the board for loose connections or cold joints but all looks well. Today I tested voltages in a few places and am getting strange results. With chip in socket I am getting +15V at both pin 1 and 8! With chip removed I get 0 at pin 1 and +15V at 8. Any ideas?
 

Fumbler

TDPRI Member
Joined
Mar 21, 2019
Posts
59
Age
53
Location
Victoria BC
Ok some further info. I’ve got a working BJ as well so started comparing voltages. On the working amp I am also getting 0V at pin 1 but -15V on pin 4. Pin 4 on the no-reverb amp reads 0V. Bottom of D7 reads +15V on both amps but I have 0V at the top of D8 on the broken amp, -15V on the good one.
 

LudwigvonBirk

Tele-Afflicted
Joined
Aug 26, 2017
Posts
1,011
Age
123
Location
Madison
Easy first thing to check: Do the Reverb tank and cables from the "bad amp" work properly in the good amp?
 

Fumbler

TDPRI Member
Joined
Mar 21, 2019
Posts
59
Age
53
Location
Victoria BC
I haven’t tried that but hooking the tank from the good amp to the cables on the bad didn’t yield any results. Continuity is good on the cables. On these amps the cables are soldered to the board so not a simple switch. I will try the tank from the bad amp in the good one though, just to make sure.
 

corliss1

Poster Extraordinaire
Joined
Sep 13, 2008
Posts
7,884
Location
Lansing, MI
Something is up with the + and - supply to the chip. Trace that power supply section back until you get normal readings and go from there.
 

schmee

Telefied
Ad Free Member
Joined
Jun 2, 2003
Posts
31,222
Location
northwest
I know of two that a new tube fixed.
I know of one that, believe it or not, the pot was broken inside the pot!
They are infamous for reverb issues I guess.
 

Fumbler

TDPRI Member
Joined
Mar 21, 2019
Posts
59
Age
53
Location
Victoria BC
Thanks guys. I have only a very rudimentary knowledge of electronics and reading schematics but I am determined to figure this out. Has anyone found a good schematic online?
 

Fumbler

TDPRI Member
Joined
Mar 21, 2019
Posts
59
Age
53
Location
Victoria BC
I switched all the tubes with known good ones with no change. I checked resistance on the reverb pot and if I did it correctly it ranges from 0 ohms when pot is at 0 to about 35k at 10.

I’ve downloaded the service manual so now have what looks to be a decent schematic. I have a lot of questions that I am trying to figure out but one thing that stands out is the fact that unless I am missing something there are no diodes shown on the schematic. I am trying to see if there is a link between the 0v at D8 and the reverb circuit.
 

corliss1

Poster Extraordinaire
Joined
Sep 13, 2008
Posts
7,884
Location
Lansing, MI
You might be in over your head if you're not able to find diodes on the schematic. A quick look shows 11 if I'm counting right. Look up the symbol for a diode.

What is the voltage on pins 8 and 4 of the tl072? If the voltage isn't right, then this is the portion of the schematic you need to focus on as those two little arrows that go to the + and -15v go directly to those pins on the chip.


Screen Shot 2019-03-27 at 7.50.19 AM.png
 

corliss1

Poster Extraordinaire
Joined
Sep 13, 2008
Posts
7,884
Location
Lansing, MI
Here's a good diagram of the chip pins as well. You'll see the reference notch on the part that indicates the end that is pins 1 and 8.


Screen Shot 2019-03-27 at 8.07.25 AM.png
 

Fumbler

TDPRI Member
Joined
Mar 21, 2019
Posts
59
Age
53
Location
Victoria BC
Thanks Corliss1 for your patient and informative replies. OK I now know what a diode looks like. I was expecting them to be labeled D7 D8 etc like on the board. I am getting 0VDC at 4 and +15VDC at 8.
 

corliss1

Poster Extraordinaire
Joined
Sep 13, 2008
Posts
7,884
Location
Lansing, MI
Alright - so you'll want to trace back through the schematic and see where the voltage dies.

The first thing to do would be to find c30 and see what you have at that connection. Then r58, r37, and c28, since those all each connect to the -15 line. Make sense? We want to work backwards from the problem we have (no negative supply) to where we know the negative supply should be (test point of the junction of r58 and cr9)

"CR" is old speak for crystal rectifier, before the word "diode" was applied to those parts, so it still shows up on even modern schematics.
 

Fumbler

TDPRI Member
Joined
Mar 21, 2019
Posts
59
Age
53
Location
Victoria BC
When I found C30 I noticed something I hadn’t before. There is brown residue on the board at the bottom of either C30 or C34! I also found another schematic I think is correct for this amp.

I have to do some reading to learn how to test the voltages of the caps and I’ll need to get at the back side of the board first. In the meantime I have 0V at D8 and one of the resistors. The other two give me a brief voltage reading when I first touch them then read 0. Probably something wrong with my method(?)

View media item 42223
View media item 42222
 
Last edited:

corliss1

Poster Extraordinaire
Joined
Sep 13, 2008
Posts
7,884
Location
Lansing, MI
Are those images? The links are not working.

There are a couple versions of the schematic but the only major changes would be the way the parts are numbered.

If the caps look to be leaking, just replace them. People come in here with ESR meters and other cap testing methods, but I rarely find they are worth it. Just swap em out.

Can you post the schematic that matches the version you're working with so we can all play along with the right numbers?
 

Fumbler

TDPRI Member
Joined
Mar 21, 2019
Posts
59
Age
53
Location
Victoria BC
Sorry, the pics showed up in preview so I thought they would show for everyone. I will post when I’m at a PC tonight.
 

Attachments

  • F6844321-BA1C-4000-A236-679DEC57AA2B.jpeg
    F6844321-BA1C-4000-A236-679DEC57AA2B.jpeg
    194.3 KB · Views: 151
  • 7949B042-90BE-40C8-B616-EA165E1C8D3E.jpeg
    7949B042-90BE-40C8-B616-EA165E1C8D3E.jpeg
    111.5 KB · Views: 149

corliss1

Poster Extraordinaire
Joined
Sep 13, 2008
Posts
7,884
Location
Lansing, MI
Nothing in that picture looks odd to me - I see where there is some slight discoloration, but nothing I'd be concerned about from that view.

Why do you need to get to the back of the board at this point? If you're just taking measurements C34 is also connected to D8 and R53 (in the diagram you provided) so you can use those points to measure the voltage. Unless there is a broken part/trace in the board (which is always possible) those should all be connected and would be just the same as measuring at the back of the cap.
 

Fumbler

TDPRI Member
Joined
Mar 21, 2019
Posts
59
Age
53
Location
Victoria BC
Good grief - you’re right of course.

(Sound of hand slapping forehead)

Thanks, I will get back into it tonight.
 

corliss1

Poster Extraordinaire
Joined
Sep 13, 2008
Posts
7,884
Location
Lansing, MI
Although you will need to pull the board to replace things, possibly. Which can get interesting with the wire bundles, ground connections, and whatnot. But we'll get there - one step at a time :D
 

Fumbler

TDPRI Member
Joined
Mar 21, 2019
Posts
59
Age
53
Location
Victoria BC
Thanks. Believe it or not I did pull the board already when I replaced the IC. I don’t think I did anything to contribute to the problem but admittedly didn’t measure voltages first to know. When I did I left the ground and ribbon cables connected with the PCB flopped perpendicularly to the amp.
 
Top