Blue & Green Paisley Strat

  • Thread starter udimet720
  • Start date
  • This site may earn a commission from merchant affiliate links like Ebay, Amazon, and others.

udimet720

Tele-Holic
Joined
Feb 26, 2008
Posts
543
Location
Tustin, CA
OK... I have been working on this one for a few years. It's not that it took me that long. I just have worked on it off and on over that time period.

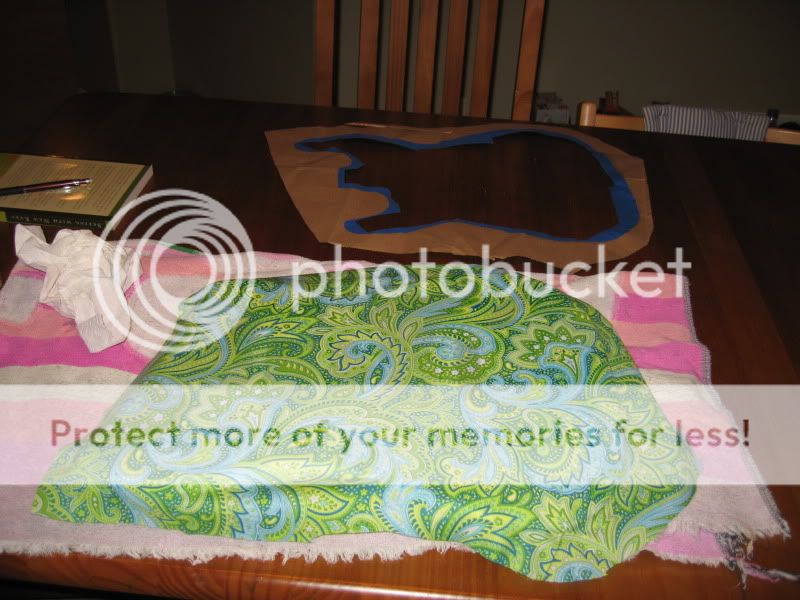
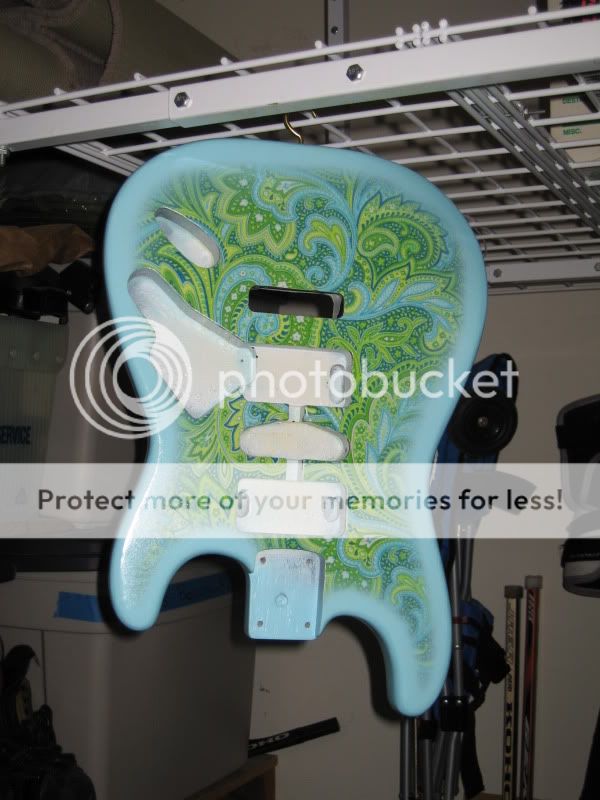
I'll give a teaser of the end product. Then give some in process shots. I didn't document the whole thing. But, I'll give you what I have.

IMG_6613.jpg


:D
 

udimet720

Tele-Holic
Joined
Feb 26, 2008
Posts
543
Location
Tustin, CA
OK... Here's where we started. It was a Squier of some kind. Originally a metallic cobalt blue color. I think it looked like this.

image removed

I bought the body only used off of ebay.

After some quality time getting to know my heat gun. It ended up like this...

md_IMG_3924.jpg


md_IMG_3925.jpg


You can see that I had some areas that gouged badly when I was scraping the sealer off. Since I knew I was going to be doing a fabric finish, I wasn't too worried. Given the amount of "stuff" that is on top of this body, not sure I would bother stripping the old finish again.

I have no idea what kind of wood this is. Not matched at all. Each section is a different shade. Somewhat open grained. The two holes for the bridge ended up getting filled with dowels.

Oh... And the body was purchased Jan 4, 2008.
 

udimet720

Tele-Holic
Joined
Feb 26, 2008
Posts
543
Location
Tustin, CA
One more note on the body... It's one of the thinner Squier versions.

Here's the fabric. Purchased from Joanne's Fabrics.

IMG_3920.jpg


I was thinking of something that would be in the range of daphne blue or surf green. When I saw this, I knew it was as close as I was going to get. There really were not a lot of great fabrics. At least, not for a guitar...
 

udimet720

Tele-Holic
Joined
Feb 26, 2008
Posts
543
Location
Tustin, CA
Now we are on to decoupaging the fabric onto the body.

As you will see, the body has been sealed/grain-filled (minwax polycrilic) and primed (BINS). I wanted a nice base behind the fabric.

Laid down a nice thick layer of decoupage with a foam brush. Laid down the fabric and squeegeed out the air and excess.

IMG_4445.jpg


IMG_4446.jpg


A shot of the texture.
IMG_4448.jpg


After drying, excess is trimmed with a sharp xacto knife.
IMG_4449.jpg


When prepping the body, I over sanded this area. I repaired it with plastic wood. But, when I trimmed with the xacto, I cut through the repair and it chipped off. :oops:
IMG_4451.jpg
 

PixMix

Tele-Holic
Joined
Aug 30, 2008
Posts
970
Location
MI
Looooove the color combo on the fabric! It's so unusual.
 

udimet720

Tele-Holic
Joined
Feb 26, 2008
Posts
543
Location
Tustin, CA
Thanks pixmix. That's def what I was going for - inspired by the traditional paisley but my own color combo.
 

udimet720

Tele-Holic
Joined
Feb 26, 2008
Posts
543
Location
Tustin, CA
Here's another issue I ran into doing the decoupage.

IMG_4452.jpg


A glob of the glue dried at the edge. You want to peel/scape these away. Decoupage is gummy and doesn't sand too well. So you don't want any excess if you can avoid it.

Not sure I mentioned this before. I put down 2-3 coats of decoupage over the fabric before trimming.

Then I flipped it over and did the other side as well.

IMG_4457.jpg


The cutout you see at the rear was used to "frame" the pattern and figure out what parts of the paisley I wanted where. This particular design has shapes that are several inches (4-5) long. So I had to give consideration to orientation and how to accent the curves.
 

udimet720

Tele-Holic
Joined
Feb 26, 2008
Posts
543
Location
Tustin, CA
Here we are with the burst. This is after the first try at the burst.

IMG_5070.jpg


Came out pretty well.

A couple of notes on the burst method. I used a cardboard cutout to do the burst, elevated 1-2 inches above the body. For the forearm, I bent it to match the curve. For the belly cut, I used a separate piece so that I could have the cardboard at an angle parallel to the belly cut. The hardest part to do was the corner where the belly ends. I kept playing with this til I got it right. Also, I sprayed outside in and varied the angle to get a gradual fade.

Before the bursting, I laid down several coats of clear. On this project, I elected to try wb clear. I started with a General Finishes brush on product. I liked this, but could not avoid bubbles. Probably my method. Then I switched back to Minwax Polycrilic spray. This looks slightly blue going on, but dries clear.

The color I used was Krylon Blue Ocean Breeze. This color was just the right mix of daphne blue and surf green. Id say its pretty much right in the middle and was a perfect match for the paisley print. The first can I used was the old formula (acrylic lacquer). Ran out while I was redoing part of the burst and had to go with the new formula (enamel). In spite of this, I didn't have any trouble with comparability. But, I gave plenty of time for off-gassing.
 

udimet720

Tele-Holic
Joined
Feb 26, 2008
Posts
543
Location
Tustin, CA
After trimming, I dripped some thin CA glue along the edge. Used a spare piece of guitar string to spread it where needed. Then, sanded later to get a smooth edge. Hardest area was the horns, of course. But, now that it's polished up, it is hard to see any irregularity unless you look very closely.

Also, you might notice from the pics above that I didn't strip the sealer from the sides, just the front and back. So, the sides did not need much smoothing. Just the corners.

Also, the fabric really is pretty thin. By the way, you can do the exact same thing with any kind of paper. Several here have done labels (Bud, Jack, etc.). Weren't the original paisleys wallpaper? So, you could print or purchase any design on paper and use the same techniques. Though, you'd have to make sure the inks won't bleed.

Here's another little project I did last year. A small travel amp.

IMG_6157.jpg


The paper is fairly heavy craft paper. But, with the decoupage, you can get it to lay flat nicely at the corners.
 

tvvoodoo

Tele-Afflicted
Joined
Jun 11, 2010
Posts
1,694
Location
Western Canada
I soo want to paisley my princeton chorus, something dark and subdued, not loud...

nice job on this guitar. I have plans for one too this summer.
 

JeradP

Former Member
Joined
Jan 21, 2011
Posts
2,684
Location
michigan
I have a love for paisley, floral, wild patterns. This is far and away the coolest looking guitar I've ever seen.
 

udimet720

Tele-Holic
Joined
Feb 26, 2008
Posts
543
Location
Tustin, CA
I soo want to paisley my princeton chorus, something dark and subdued, not loud...

nice job on this guitar. I have plans for one too this summer.

Not sure of this qualifies, but lots of paisley can be found on the internet as well.

image removed

(link removed)
 

udimet720

Tele-Holic
Joined
Feb 26, 2008
Posts
543
Location
Tustin, CA
All,

Thanks for the comments and compliments. Means a lot.

OK... a bit on the neck. I ordered it from ebay. It's an Eden neck. Overall seemed really nice considering the price I paid. Frets were better than the saga kit I did previously.

After giving it a light sanding, I added just a bit of color with RIT dye dissolved in lacquer thinner.

IMG_3800.jpg


IMG_3801.jpg


If you can see, it has just a slight yellow shading.

I tried to use my dremel drill press to drill the holes.
IMG_0504.jpg


Unfortunately, this did not yield a very good hole. I had to plug the hole and redrill. I got much better results with my hand drill.
IMG_0507.jpg


I also had to shorten the neck screws because of the thinner body. Used a dremmel cut-off wheel and then sanded the point a bit.
IMG_0506.jpg
 

udimet720

Tele-Holic
Joined
Feb 26, 2008
Posts
543
Location
Tustin, CA
I initially sprayed the neck with Watco nitro. But, I ended up stripping it off. Here's why:

PICT0024.jpg


Orange Peel!!! Also, the lacquer chipped on the edge of the FB when I was trying to roll the edges. Apparently, Watco is a bit more likely to chip than some other varieties. Rather than attempt a repair, I opted to strip the entire neck and finish with tru oil. Then I sprayed just the headstock with Minwax nitro.

Redone fb:
IMG_6154.jpg
 

porknblue

Tele-Holic
Joined
Dec 27, 2007
Posts
624
Location
South Bend, IN
Nice work. I really like the way the colors compliment each other.

Good information on blending-in the edges.

I've done a couple with wallpaper. Now I will definately have to try a fabric one.
 

Colt W. Knight

Doctor of Teleocity
Ad Free Member
Joined
Jan 21, 2007
Posts
18,974
Age
41
Location
Garland, Maine
I initially sprayed the neck with Watco nitro. But, I ended up stripping it off. Here's why:

PICT0024.jpg


Orange Peel!!! Also, the lacquer chipped on the edge of the FB when I was trying to roll the edges. Apparently, Watco is a bit more likely to chip than some other varieties. Rather than attempt a repair, I opted to strip the entire neck and finish with tru oil. Then I sprayed just the headstock with Minwax nitro.

Redone fb:
IMG_6154.jpg

If your lacquer is chipping, Id say there was something going on with the prep and sealer.
 
Top